How to create Android Material App intro
Welcome to this post.
In this post, we are going to make awesome app into for android app.
What we want to do?
We want to create a four-screen layout that represents some details about our app. And this will show only first time of app open.
Goal:
Basically, we create a ViewPager and 4 layouts.
View Pager contains two button
See a Video:
Let's start-
First, we want to create our main 4 Layout. before creating layout we need to add some color code and some dimension
Add color on the color.xml
welcome1.xml
Note: change Image source and also change the title and description.
In this case, I use tools:text for showing a mock text in the layout. But if you don't change those text value from java code then you can ignore them. Don't worry it will not show in the app layout.
Next Welcome Screen
welcome2.xml
vector drawable
ic_database.xml
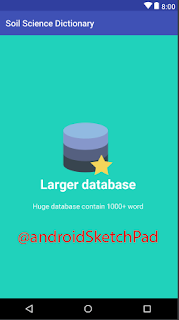
Screen Short:
Welcome screen 3
welcome3.xml
ic_lover.xml
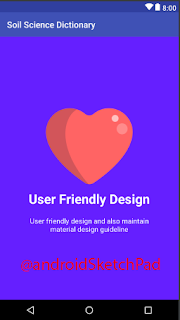
Screen Short:
Welcome screen 4
welcome4.xml
Screen Short:
Now create an activity and open xml file of this activity
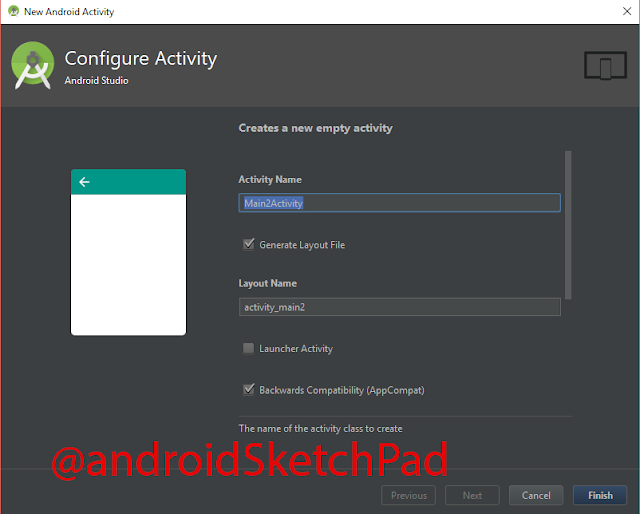
you can create activity through android studio by mouse click
see screen short
change activity name
after gradle build finish, it automatically open the newly added classes
open the xml file and below code on your xml file
you can create it on the separate array.xml file or in the colors.xml file in my case I add it on the colors.xml file
inactive dot color
Oh! We do a lot in this post. We finish all the XML code that need to make an ap intro. So In the part2, we just write some java code and finish the app intro. That's the deal.
Don't forget to follow part2 Android Material App intro (part 2)
Thanks for reading this post.
Happy coding.
In this post, we are going to make awesome app into for android app.
What we want to do?
We want to create a four-screen layout that represents some details about our app. And this will show only first time of app open.
Goal:
Basically, we create a ViewPager and 4 layouts.
View Pager contains two button
- skip button
- next button
- An Image View
- A Heading TextView
- A Details Text View
See a Video:
Let's start-
First, we want to create our main 4 Layout. before creating layout we need to add some color code and some dimension
Add color on the color.xml
<!-- Screens background color-->
<color name="bg_screen1">#f64c73</color>
<color name="bg_screen2">#20d2bb</color>
<color name="bg_screen3">#651fff</color>
<color name="bg_screen4">#c873f4</color>
Add dimens.XML
<dimen name="dots_height">30dp</dimen>
<dimen name="dots_margin_bottom">20dp</dimen>
<dimen name="img_width_height">120dp</dimen>
<dimen name="slide_title">30sp</dimen>
<dimen name="slide_desc">16sp</dimen>
<dimen name="desc_padding">40dp</dimen>

<dimen name="ic_clear_margin">16dp</dimen>
now create 4 layout
welcome1.xml
<?xml version="1.0" encoding="utf-8"?>

<RelativeLayout
    xmlns:android="http://schemas.android.com/apk/res/android"
    xmlns:tools="http://schemas.android.com/tools"
    android:layout_width="match_parent"
    android:layout_height="match_parent"
    android:background="@color/bg_screen1">

    <LinearLayout
        android:layout_width="wrap_content"
        android:layout_height="wrap_content"
        android:layout_centerInParent="true"
        android:gravity="center_horizontal"
        android:orientation="vertical"
        tools:ignore="UselessParent">

        <ImageView
            android:layout_width="@dimen/img_width_height"
            android:layout_height="@dimen/img_width_height"
            android:src="@drawable/icon_round"
            android:contentDescription="app icon"
            tools:ignore="HardcodedText" />

        <TextView
            android:layout_width="wrap_content"
            android:layout_height="wrap_content"
            android:text="@string/slide_1_title"
            android:textColor="@android:color/white"
            android:textSize="@dimen/slide_title"
            tools:text = "Soil Science Dictionary"
            android:textStyle="bold" />

        <TextView
            android:layout_width="wrap_content"
            android:layout_height="wrap_content"
            android:layout_marginTop="20dp"
            android:paddingLeft="@dimen/desc_padding"
            android:paddingRight="@dimen/desc_padding"
            android:text="@string/slide_1_desc"
            tools:text = "A complete dictionary app contains all soil related keyword"
            android:textAlignment="center"
            android:textColor="@android:color/white"
            android:textSize="@dimen/slide_desc" />

    </LinearLayout>
</RelativeLayout>
Note: change Image source and also change the title and description.
In this case, I use tools:text for showing a mock text in the layout. But if you don't change those text value from java code then you can ignore them. Don't worry it will not show in the app layout.
Next Welcome Screen
welcome2.xml
<?xml version="1.0" encoding="utf-8"?>

<RelativeLayout xmlns:android="http://schemas.android.com/apk/res/android"
    xmlns:app="http://schemas.android.com/apk/res-auto"
    xmlns:tools="http://schemas.android.com/tools"
    android:layout_width="match_parent"
    android:layout_height="match_parent"
    android:background="@color/bg_screen2">

    <LinearLayout
        android:layout_width="wrap_content"
        android:layout_height="wrap_content"
        android:layout_centerInParent="true"
        android:gravity="center_horizontal"
        android:orientation="vertical"
        tools:ignore="UselessParent">

        <ImageView
            android:layout_width="@dimen/img_width_height"
            android:layout_height="@dimen/img_width_height"
            app:srcCompat="@drawable/ic_database"
            android:contentDescription="Database icon"
            tools:ignore="HardcodedText" />

        <TextView
            android:layout_width="wrap_content"
            android:layout_height="wrap_content"
            android:text="@string/slide_2_title"
            android:textColor="@android:color/white"
            android:textSize="@dimen/slide_title"
            android:textStyle="bold" />

        <TextView
            android:layout_width="wrap_content"
            android:layout_height="wrap_content"
            android:layout_marginTop="20dp"
            android:paddingLeft="@dimen/desc_padding"
            android:paddingRight="@dimen/desc_padding"
            android:text="@string/slide_2_desc"
            android:textAlignment="center"
            android:textColor="@android:color/white"
            android:textSize="@dimen/slide_desc" />

    </LinearLayout>


</RelativeLayout>
make Changes like first welcome screen In this layout I use vector drawable so I will provide you the code
vector drawable
ic_database.xml
<vector android:height="24dp" android:viewportHeight="56.0"
    android:viewportWidth="56.0" android:width="24dp" xmlns:android="http://schemas.android.com/apk/res/android">
    <path android:fillColor="#545E73" android:pathData="M49.46,8L49.46,8C48.72,3.54 38.28,0 25.5,0S2.28,3.54 1.54,8l0,0H1.5v0.5V20v0.5V21v11v0.5V33v12h0.05c0.73,4.46 11.18,8 23.95,8s23.22,-3.54 23.95,-8H49.5V33v-0.5V32V21v-0.5V20V8.5V8H49.46z"/>
    <path android:fillColor="#38454F" android:pathData="M25.5,41c-13.26,0 -24,-3.81 -24,-8.5V45h0.05c0.73,4.46 11.18,8 23.95,8s23.22,-3.54 23.95,-8H49.5V32.5C49.5,37.19 38.76,41 25.5,41z"/>
    <path android:fillColor="#38454F" android:pathData="M1.5,32v0.5c0,-0.17 0.02,-0.33 0.05,-0.5H1.5z"/>
    <path android:fillColor="#38454F" android:pathData="M49.46,32c0.03,0.17 0.05,0.33 0.05,0.5V32H49.46z"/>
    <path android:fillColor="#556080" android:pathData="M25.5,29c-13.26,0 -24,-3.81 -24,-8.5V33h0.05c0.73,4.46 11.18,8 23.95,8s23.22,-3.54 23.95,-8H49.5V20.5C49.5,25.19 38.76,29 25.5,29z"/>
    <path android:fillColor="#556080" android:pathData="M1.5,20v0.5c0,-0.17 0.02,-0.33 0.05,-0.5H1.5z"/>
    <path android:fillColor="#556080" android:pathData="M49.46,20c0.03,0.17 0.05,0.33 0.05,0.5V20H49.46z"/>
    <path android:fillColor="#91BAE1" android:pathData="M1.5,8.5a24,8.5 0,1 0,48 0a24,8.5 0,1 0,-48 0z"/>
    <path android:fillColor="#8697CB" android:pathData="M25.5,17c-13.26,0 -24,-3.81 -24,-8.5V21h0.05c0.73,4.46 11.18,8 23.95,8s23.22,-3.54 23.95,-8H49.5V8.5C49.5,13.19 38.76,17 25.5,17z"/>
    <path android:fillColor="#8697CB" android:pathData="M1.5,8v0.5c0,-0.17 0.02,-0.33 0.05,-0.5H1.5z"/>
    <path android:fillColor="#8697CB" android:pathData="M49.46,8C49.48,8.17 49.5,8.33 49.5,8.5V8H49.46z"/>
    <path android:fillColor="#F3D55A" android:pathData="M42.5,34l3.71,7.24l8.29,1.16l-6,5.64l1.42,7.96l-7.42,-3.76l-7.42,3.76l1.42,-7.96l-6,-5.64l8.29,-1.16z"/>
</vector>
Screen Short:
Welcome screen 3
welcome3.xml
<?xml version="1.0" encoding="utf-8"?>
<RelativeLayout xmlns:android="http://schemas.android.com/apk/res/android"
    xmlns:app="http://schemas.android.com/apk/res-auto"
    xmlns:tools="http://schemas.android.com/tools"
    android:layout_width="match_parent"
    android:layout_height="match_parent"
    android:background="@color/bg_screen3">

    <LinearLayout
        android:layout_width="wrap_content"
        android:layout_height="wrap_content"
        android:layout_centerInParent="true"
        android:gravity="center_horizontal"
        android:orientation="vertical"
        tools:ignore="UselessParent">

        <ImageView
            android:layout_width="match_parent"
            android:layout_height="200dp"
            app:srcCompat="@drawable/ic_lover"
            android:contentDescription="love icon"
            tools:ignore="HardcodedText" />

        <TextView
            android:layout_width="wrap_content"
            android:layout_height="wrap_content"
            android:text="@string/slide_3_title"
            android:textColor="@android:color/white"
            android:textSize="@dimen/slide_title"
            android:textStyle="bold" />

        <TextView
            android:layout_width="wrap_content"
            android:layout_height="wrap_content"
            android:layout_marginTop="20dp"
            android:paddingLeft="@dimen/desc_padding"
            android:paddingRight="@dimen/desc_padding"
            android:text="@string/slide_3_desc"
            android:textAlignment="center"
            android:textColor="@android:color/white"
            android:textSize="@dimen/slide_desc" />

    </LinearLayout>

</RelativeLayout>
vector drawable code-
ic_lover.xml
<vector android:height="24dp"
    android:viewportHeight="512.0"
    android:viewportWidth="512.0"
    android:width="24dp"
    xmlns:android="http://schemas.android.com/apk/res/android">
    <path
        android:fillColor="#FF6464"
        android:pathData="M0,173.5C0,96 62.9,33.1 140.4,33.1c34.4,0 65.9,12.4 90.3,32.9c14.7,12.3 36,12.3 50.7,0c24.4,-20.5 55.9,-32.9 90.3,-32.9C449.1,33.1 512,96 512,173.5v-4.1c0,136.1 -165.6,258.9 -230.4,301.8c-15.5,10.3 -35.7,10.3 -51.2,0C165.6,428.3 0,305.5 0,169.4" />
    <path
        android:fillColor="#D2555A"
        android:pathData="M0,173.5c0,-0.6 0.1,-1.2 0.1,-1.8C0.1,171 0,170.2 0,169.4V173.5z" />
    <path
        android:fillColor="#D2555A"
        android:pathData="M114.8,182.7c-0,0.6 -0.1,1.3 -0.1,1.9v-4.5C114.8,181 114.8,181.9 114.8,182.7c0.5,-66.9 29.4,-123.3 69.2,-142.5c-13.7,-4.5 -28.4,-7.1 -43.6,-7.1c-76.9,0 -139.3,61.9 -140.3,138.6c1.9,135.2 165.9,256.8 230.3,299.4c6.6,4.4 14.1,6.8 21.6,7.4C198.9,418.8 116,306 114.8,182.7z" />
    <path
        android:fillColor="#FF8B8B"
        android:pathData="M449.5,153.9m-32,0a32,32 0,1 1,64.1 0a32,32 0,1 1,-64.1 0" />
    <path
        android:fillColor="#FFC1C1"
        android:pathData="M408.4,92.8m-20,0a20,20 0,1 1,40.1 0a20,20 0,1 1,-40.1 0" />
</vector>
Screen Short:
Welcome screen 4
welcome4.xml
<RelativeLayout xmlns:android="http://schemas.android.com/apk/res/android"
    xmlns:tools="http://schemas.android.com/tools"
    android:layout_width="match_parent"
    android:layout_height="match_parent"
    android:background="@color/bg_screen4">

    <LinearLayout
        android:layout_width="wrap_content"
        android:layout_height="wrap_content"
        android:layout_centerInParent="true"
        android:gravity="center_horizontal"
        android:orientation="vertical"
        tools:ignore="UselessParent">

        <ImageView
            android:layout_width="@dimen/img_width_height"
            android:layout_height="@dimen/img_width_height"
            android:src="@drawable/download"
            android:contentDescription="open source app icon"
            tools:ignore="HardcodedText" />

        <TextView
            android:layout_width="wrap_content"
            android:layout_height="wrap_content"
            android:text="@string/slide_4_title"
            android:textColor="@android:color/white"
            android:textSize="@dimen/slide_title"
            android:textStyle="bold" />

        <TextView
            android:layout_width="wrap_content"
            android:layout_height="wrap_content"
            android:layout_marginTop="20dp"
            android:paddingLeft="@dimen/desc_padding"
            android:paddingRight="@dimen/desc_padding"
            android:text="@string/slide_4_desc"
            android:textAlignment="center"
            android:textColor="@android:color/white"
            android:textSize="@dimen/slide_desc" />

    </LinearLayout>

</RelativeLayout>
here I use a png file so replace with your own.
Screen Short:
Now create an activity and open xml file of this activity
you can create activity through android studio by mouse click
see screen short
change activity name
after gradle build finish, it automatically open the newly added classes
open the xml file and below code on your xml file
<?xml version="1.0" encoding="utf-8"?>

<RelativeLayout xmlns:android="http://schemas.android.com/apk/res/android"
    xmlns:tools="http://schemas.android.com/tools"
    android:layout_width="match_parent"
    android:layout_height="match_parent">


    <android.support.v4.view.ViewPager
        android:id="@+id/view_pager"
        android:layout_width="match_parent"
        android:layout_height="match_parent" />

    <LinearLayout
        android:id="@+id/layoutDots"
        android:layout_width="match_parent"
        android:layout_height="@dimen/dots_height"
        android:layout_alignParentBottom="true"
        android:layout_marginBottom="@dimen/dots_margin_bottom"
        android:gravity="center"
        android:orientation="horizontal"/>

    <View
        android:layout_width="match_parent"
        android:layout_height="1dp"
        android:alpha=".5"
        android:layout_above="@id/layoutDots"
        android:background="@android:color/white" />

    <Button
        android:id="@+id/btn_next"
        android:layout_width="wrap_content"
        android:layout_height="wrap_content"
        android:layout_alignParentBottom="true"
        android:layout_alignParentEnd="true"
        android:background="@null"
        android:text="@string/next"
        android:textColor="@android:color/white"
        tools:ignore="RelativeOverlap" />

    <Button
        android:id="@+id/btn_skip"
        android:layout_width="wrap_content"
        android:layout_height="wrap_content"
        android:layout_alignParentBottom="true"
        android:layout_alignParentStart="true"
        android:background="@null"
        android:text="@string/skip"
        android:textColor="@android:color/white" />

</RelativeLayout>
one more thing to go for finishing xml code we need to create an array for active and inactive dot button for view page indication dot button.
you can create it on the separate array.xml file or in the colors.xml file in my case I add it on the colors.xml file
inactive dot color
<color name="dot_inactive_screen1">#d1395c</color>
<color name="dot_inactive_screen2">#14a895</color>
<color name="dot_inactive_screen3">#2278d4</color>
<color name="dot_inactive_screen4">#a854d4</color>
active dot color
<color name="dot_active_screen1">#f98da5</color>
<color name="dot_active_screen2">#8cf9eb</color>
<color name="dot_active_screen3">#93c6fd</color>
<color name="dot_active_screen4">#e4b5fc</color>
The array of inactive dot color
<array name="array_dot_inactive">
    <item>@color/dot_inactive_screen1</item>
    <item>@color/dot_inactive_screen2</item>
    <item>@color/dot_inactive_screen3</item>
    <item>@color/dot_inactive_screen4</item>
</array>
The array of active dot color
<array name="array_dot_active">
    <item>@color/dot_active_screen1</item>
    <item>@color/dot_active_screen2</item>
    <item>@color/dot_active_screen3</item>
    <item>@color/dot_active_screen4</item>
</array>
Oh! We do a lot in this post. We finish all the XML code that need to make an ap intro. So In the part2, we just write some java code and finish the app intro. That's the deal.
Don't forget to follow part2 Android Material App intro (part 2)
Thanks for reading this post.
Happy coding.


No comments :