Android Splash Screen right way
Welcome to this post. In this post, I am going to discuss on Android Splash Screen.
In this whole post, I gonna cover those topics
1. How to create android Splash Screen
2. How to override default color when app launching (windows background)
When you click app icon, the app takes some time to start. To overcome this option android by default show a color until the activity is launched. By default, it is white in color. So later in this post, I will show you how to overcome this situation and how to change this default color.
Let's start-
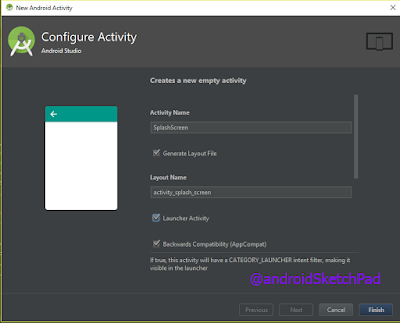
Create an Activity named it as your choice
now design your layout file. I just provide my XML code.
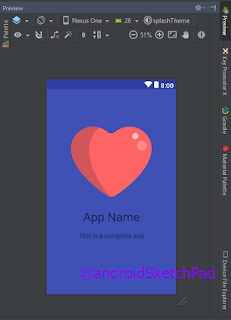
We finished our design option, see the preview
it contains an ImageView and two TextView
now time for java coding, SplashScreen.java
now create an instance of Thread class and in the run methods call sleep methods and pass value 1000 (1000 for 1s, the value of Mille seconds). Don't forget to put this sleep method on try-catch block. and finally, block on try-catch, create an Intent that brings us to MainActivity. At list call finish() method and this activity will be destroyed.
See the code-
oh! Your app is not working. I forget one thing that we are using vector drawable. If your app minimum API is 21 then you have no headache. but if you targeting lower API you need to use support library to support vector drawable for lower API. To do that add below line in your build.gradle file
Screen Short:
Note: Don't be confused I use another app splash screen. Both are used the same code.
Now come on the last topics of this post, create a new theme on style.xml and add windows background color
See Screen Short:
A Bonus for you
I also show you how to animate this splash screen. This is the pretty basic animation example.
Let's do this
create an XML file on res -> anim folder.
splash_screen_animation.xml
Are you confused about this class SplashScreen.java code?
See all the call code below:
See full video:
Note: in this video, you can also see the app intro. Link is here: Create Android Material App Intro
That's it
now you can create a splash screen and also override the loading screen. In this example, I use just the only color but you can also use drawable in the loading time. So it's your choice what you used un your project.
That finished this post.
Why you wasting your time, create an awesome splash screen for your existing or next project?
Thank you for reading this post.
Happy coding.
In this whole post, I gonna cover those topics
1. How to create android Splash Screen
2. How to override default color when app launching (windows background)
When you click app icon, the app takes some time to start. To overcome this option android by default show a color until the activity is launched. By default, it is white in color. So later in this post, I will show you how to overcome this situation and how to change this default color.
Let's start-
Create an Activity named it as your choice
now design your layout file. I just provide my XML code.
<?xml version="1.0" encoding="utf-8"?>
<android.support.constraint.ConstraintLayout xmlns:android="http://schemas.android.com/apk/res/android"
    xmlns:app="http://schemas.android.com/apk/res-auto"
    xmlns:tools="http://schemas.android.com/tools"
    android:layout_width="match_parent"
    android:layout_height="match_parent"
    app:layout_behavior="@string/appbar_scrolling_view_behavior"
    tools:context="com.blogspot.shudiptotrafder.soilscience.SplashActivity"
    tools:showIn="@layout/activity_splash"
    android:background="?attr/colorPrimary">

    <ImageView
        android:id="@+id/splash_imageView"
        android:layout_width="match_parent"
        android:layout_height="200dp"
        app:srcCompat="@drawable/ic_lover"
        app:layout_constraintStart_toStartOf="parent"
        android:layout_marginStart="8dp"
        app:layout_constraintEnd_toEndOf="parent"
        android:layout_marginEnd="8dp"
        android:contentDescription="app icon"
        app:layout_constraintTop_toTopOf="parent"
        android:layout_marginTop="80dp"
        tools:ignore="HardcodedText" />

    <TextView
        android:id="@+id/splash_app"
        android:layout_width="wrap_content"
        android:layout_height="wrap_content"
        android:text="App Name"
        app:layout_constraintStart_toStartOf="parent"
        android:layout_marginStart="8dp"
        app:layout_constraintEnd_toEndOf="parent"
        android:layout_marginEnd="8dp"
        android:layout_marginTop="16dp"
        android:textSize="30sp"
        app:layout_constraintTop_toBottomOf="@+id/splash_imageView" />

    <TextView
        android:layout_width="wrap_content"
        android:layout_height="wrap_content"
        app:layout_constraintTop_toBottomOf="@+id/splash_app"
        app:layout_constraintStart_toStartOf="parent"
        android:layout_marginStart="8dp"
        android:layout_marginEnd="8dp"
        android:layout_marginTop="16dp"
        android:id="@+id/splash_appAbout"
        android:text="This is a complete app"
        android:textSize="16sp"
        app:layout_constraintEnd_toEndOf="parent" />

</android.support.constraint.ConstraintLayout>
and ic_lover.xml it as vector drawable, code here
<vector android:height="24dp"
    android:viewportHeight="512.0"
    android:viewportWidth="512.0"
    android:width="24dp"
    xmlns:android="http://schemas.android.com/apk/res/android">
    <path
        android:fillColor="#FF6464"
        android:pathData="M0,173.5C0,96 62.9,33.1 140.4,33.1c34.4,0 65.9,12.4 90.3,32.9c14.7,12.3 36,12.3 50.7,0c24.4,-20.5 55.9,-32.9 90.3,-32.9C449.1,33.1 512,96 512,173.5v-4.1c0,136.1 -165.6,258.9 -230.4,301.8c-15.5,10.3 -35.7,10.3 -51.2,0C165.6,428.3 0,305.5 0,169.4" />
    <path
        android:fillColor="#D2555A"
        android:pathData="M0,173.5c0,-0.6 0.1,-1.2 0.1,-1.8C0.1,171 0,170.2 0,169.4V173.5z" />
    <path
        android:fillColor="#D2555A"
        android:pathData="M114.8,182.7c-0,0.6 -0.1,1.3 -0.1,1.9v-4.5C114.8,181 114.8,181.9 114.8,182.7c0.5,-66.9 29.4,-123.3 69.2,-142.5c-13.7,-4.5 -28.4,-7.1 -43.6,-7.1c-76.9,0 -139.3,61.9 -140.3,138.6c1.9,135.2 165.9,256.8 230.3,299.4c6.6,4.4 14.1,6.8 21.6,7.4C198.9,418.8 116,306 114.8,182.7z" />
    <path
        android:fillColor="#FF8B8B"
        android:pathData="M449.5,153.9m-32,0a32,32 0,1 1,64.1 0a32,32 0,1 1,-64.1 0" />
    <path
        android:fillColor="#FFC1C1"
        android:pathData="M408.4,92.8m-20,0a20,20 0,1 1,40.1 0a20,20 0,1 1,-40.1 0" />
</vector>
We finished our design option, see the preview
it contains an ImageView and two TextView
now time for java coding, SplashScreen.java
public class SplashScreen extends AppCompatActivity {

    @Override
    protected void onCreate(Bundle savedInstanceState) {
        super.onCreate(savedInstanceState);
        setContentView(R.layout.activity_splash);

    }
now create an instance of Thread class and in the run methods call sleep methods and pass value 1000 (1000 for 1s, the value of Mille seconds). Don't forget to put this sleep method on try-catch block. and finally, block on try-catch, create an Intent that brings us to MainActivity. At list call finish() method and this activity will be destroyed.
See the code-
Thread checkForData = new Thread(){
      @Override
      public void run() {
            super.run();
            try{
            sleep(1000);

         } catch (Exception e) {
             e.printStackTrace();
         } finally {
             startActivity(new Intent(SplashActivity.this,
                            MainActivity.class));
             finish();
         }
     }
};
start this thread by calling start method
checkForData.start();That's it. Splash Screen is created successfully. You can run a test for see result.
oh! Your app is not working. I forget one thing that we are using vector drawable. If your app minimum API is 21 then you have no headache. but if you targeting lower API you need to use support library to support vector drawable for lower API. To do that add below line in your build.gradle file
compile 'com.android.support:support-vector-drawable:25.3.1'Note: change the version according to you compile SDK version. See mine-
compileSdkVersion 25
buildToolsVersion "25.0.3"
One more thing to go. add below code in your activity class
static {
    AppCompatDelegate.setCompatVectorFromResourcesEnabled(true);
}
ok, run the app again.
Screen Short:
Note: Don't be confused I use another app splash screen. Both are used the same code.
Now come on the last topics of this post, create a new theme on style.xml and add windows background color
<style name="splashTheme" parent="AppTheme.NoActionBar">
        <item name="android:windowBackground">@color/colorPrimary</item>
</style>
use this theme on the splash screen activity. Open manifest file and override below code-
<activity
       android:name=".SplashScreen"
       android:label="@string/app_name"
       android:theme="@style/splashTheme">
         <intent-filter>
            <action android:name="android.intent.action.MAIN" />

            <category android:name="android.intent.category.LAUNCHER" />
          </intent-filter>
</activity>
and my color code is
<color name="colorPrimary">#3F51B5</color>rerun your app and see the change.
See Screen Short:
A Bonus for you
I also show you how to animate this splash screen. This is the pretty basic animation example.
Let's do this
create an XML file on res -> anim folder.
splash_screen_animation.xml
<alpha
    xmlns:android="http://schemas.android.com/apk/res/android"
    android:fromAlpha="0"
    android:toAlpha="1"
    android:duration = "1000" />
Now load this animation, see code-Animation set = AnimationUtils.loadAnimation(this, R.anim.splash_screen_animation);In the upper activity code, we don't create view variable, because we don't need that time. But now we need those views add set this animation with those views. Create view and assign it by calling findViewById()
ImageView imageView = (ImageView) findViewById(R.id.splash_imageView);
TextView app = (TextView) findViewById(R.id.splash_app);
TextView appAbout = (TextView) findViewById(R.id.splash_appAbout);
set animation with those views and also start the animation
//set animation
imageView.setAnimation(set);
app.setAnimation(set);
appAbout.setAnimation(set);

//start animation
set.start();
That's it now run the app again and see the animation on your splash screen.
Are you confused about this class SplashScreen.java code?
See all the call code below:
public class SplashScreen extends AppCompatActivity {

    static {
        AppCompatDelegate.setCompatVectorFromResourcesEnabled(true);
    }

    @Override
    protected void onCreate(Bundle savedInstanceState) {
        super.onCreate(savedInstanceState);
        setContentView(R.layout.activity_splash);

        ImageView imageView = (ImageView) findViewById(R.id.splash_imageView);
        TextView app = (TextView) findViewById(R.id.splash_app);
        TextView appAbout = (TextView) findViewById(R.id.splash_appAbout);


        Animation set = AnimationUtils.loadAnimation(this,
                R.anim.splash_screen_animation);

        //set animation
        imageView.setAnimation(set);
        app.setAnimation(set);
        appAbout.setAnimation(set);

        //start animation
        set.start();

        Thread checkForData = new Thread(){
            @Override
            public void run() {
                super.run();
                try{
                    sleep(1000);

                } catch (Exception e) {
                    e.printStackTrace();
                } finally {
                    startActivity(new Intent(SplashActivity.this,
                            MainActivity.class));
                    finish();
               }
             }
         };
        checkForData.start();

    }
}
See full video:
Note: in this video, you can also see the app intro. Link is here: Create Android Material App Intro
That's it
now you can create a splash screen and also override the loading screen. In this example, I use just the only color but you can also use drawable in the loading time. So it's your choice what you used un your project.
That finished this post.
Why you wasting your time, create an awesome splash screen for your existing or next project?
Thank you for reading this post.
Happy coding.


No comments :