Saturday, June 30, 2018

Searching Algorithms: Linear Search

June 30, 2018

welcome to this post.

Today I am going to talk about Searching Algorithms.
In this tutorial, I will cover 3 Searching Algorithms
  • Linear Search
  • Binary Search
  • Interpolation Search

So Let start with Linear Search

Linear Search:
From the name, you can get an idea. It searches linearly. One by one.
This algorithm starts the search from the beginning and continues until finding the
desired search index.

For example,
Assume an array from 0 to 10. and you are searching for10. so what will happen?

First, it checks
if 10 is equal to 0 => nope, then
if 10 is equal to 1 => nope, then
.................................................
continue this
if 10 is equal to 10 => yes.

Now it's finding the number.

So it starts from the beginning and continues until it's done.

Let's jump into the code
Create a class and it's constructor take the array size.
class DataK(size:int){
} 

create two variable,

  • one is an array that holds the data set
  • other is numberOfTry: an int type variable that will give information,
how many tries need to find the value.

val array: Array<Int> = Array(size,{i -> i})
var numberOfTry = 0

Now Just run a for loop from 1 to the given size and put the data into the array.
init {
    for (i in 1 until size){
         array[i-1] = i
     }
}

The complete Class code in GitHub
Note: This class is used in every searching Algorithms.

Now create the main method and initialize the data and give the size 100000.
val data = DataK(100000)

we want to find 9999
val search = 99999

Set the initial number of try to zero
var numberOfTry = 0

And the last declare a new variable, named it to result and this will hold the result.
everything is set, now I am ready for the main action

To search run a for loop from 0 to the data size and compare the index value with our searching number if find the break the loop and at the end increase the number of tries.

That's is the idea.
See code
for (i in 0 until (data.array.size - 1)) {
    val number = data.array[i]
    if (number == search) {
        result = number as Int
        break
    }

    numberOfTry++
}

Now result:
from the linear search if the result is -1 then the value does not exist and that means data is not found.

so, we print the number of tries to see it actually search or not if the result is not -1 then
we find the data.
print number of trials, to see how much try need to find our data

if (result != -1)
    println("Data found on: $numberOfTry")
else
    println("Data not found try: $numberOfTry")

Output:
Data found on: 99998

so, it takes 99998 try to find 99999.

Check the full source code in Github

Note: If you are from java. Check this on Github.

That is all about the Linear search algorithm.

It is a very simple algorithm. It is not widely used.

we will compare all of the searching algorithms after completing all of those.

In the next part, I will discuss Binary search.

Thank you for reading.
If you have any suggestion or any queries use the comment section.

Happy coding

Read More

Saturday, June 2, 2018

Kotlin Data Structure: Circular Queue

June 02, 2018

Welcome to this post.
In this post, we are going to learn about the Circular queue.

If you don't know the queue data structure, please check this post Queue.

In the previous post of Queue, I discuss the problem about the queue. So today we learn about the circular queue.

In queue, to data in the queue, the method is called enqueue()  
and to get data from the queue, the method is dequeue()

Let's jump in the programming:

circular queue
circular queue

In the above picture, you can see that data inserted in the back or last position and then the position move one row. and the same thing happens when we access data.
So we have to track
  • Top position
  • Last position
First, create a class with a constructor. In the constructor take an int type data. It will use for initializing the circular queue with size.
class CircularQueueK(size: Int){
}
Create an array with size and also create 2 variable that mentions above.
private val list:Array<Any> = Array(size,{ i: Int -> i })
private var head = 0
private var tail = 0

we have to implement 2 additional method
  • isFull() ->  this will return true if the queue is full, so we don't allow to insert more data.
  • isEmpty() -> this will return true if the queue is empty, so we don't allow dequeue the data.
Let's implement those-
fun isFull() = (tail + 1) % list.size == head
fun isEmpty() = head == tail

Code review of isFull():
In this method, we increase of tail with one the modules with list size and if the result is same as head then it is full. For example, At first, the head is 0, so insert data and tail are increasing, assume that our list size is 5, so at the 4 index it will be filled and the tail is now 4.
Now, when this method is called then first increase tail, and modulus with the list size. Increase the tail to 5 and list size is 5, then the modulus is zero, and it is equal to the head. So it's now empty. because it's come back to the start position.

enqueue():
First, check the circular queue is full or not, If full the return.
Insert data in the list at the tail position
Insert the value in the tail as we did on the if full method
fun enqueue(value: Any){
    if (isFull()){
        return
    }

    list[tail] = value
    tail = (tail+1) % list.size
}

dequeue():
First, check the circular queue is empty or not. if empty return
Get data from the head position
assign new value of the read same as enqueue()
fun dequeue():Any{

    var a:Any = ""

    if (!isEmpty()){
        a = list[head]
        head = (head +1) % list.size
    }

    return a
}

Code analysis:
head = (head +1) % list.size
what is actually happening under the hood?
For example, assume the list size is 5 and head position is now 4.
Now if we want to access data from the list then it is the last position of the list. so we don't access next data.
This is the main problem in the queue. But in the circular queue head and tail position is circled from zero to list position.
so now our goal is to initialize head position to again start point.
If the head is 4 then with increase 1 and modules with the list size, and the result is zero.
So, it's back again.
In the circular queue, at least one position is to remain blank for this purpose.

Ok, one more extra method to go-
fun iterator() = list.withIndex()

Now time for testing
Create the main method-
fun main(args: Array<String>) {
}

Create an instance of the circular queue.
val queue = CircularQueueK(5)

enqueue():
run a while loop until the circular queue is full
var s = 0

while (!queue.isFull()){
    queue.enqueue(s)
    s++
}

Check the list:
run a for loop with the help of iterator() function that we created earlier.
for ((i,v) in queue.iterator()) {
    println("Index:$i and value:$v")
}
Output:
Index:0 and value:0
Index:1 and value:1
Index:2 and value:2
Index:3 and value:3
Index:4 and value:4

dequeue():
just call dequeue method for 3 times and print the value
println("\nGet value1:${queue.dequeue()}")
println("Get value2:${queue.dequeue()}")
println("Get value3:${queue.dequeue()}")
Output:
Get value1:0
Get value2:1
Get value3:2

now enqueue() again:
var d = 10
while (!queue.isFull()){
     queue.enqueue(d)
     d++
}

Compare this list with the previous result-
print all data from the circular queue
for ((i,v) in queue.iterator()) {
    println("Index:$i and value:$v")
}
Output:
Index:0 and value:11
Index:1 and value:12
Index:2 and value:2
Index:3 and value:3
Index:4 and value:10

Result analysis:
If you compare this output with the previous output you will see the changes.
we call dequeue() function for 3times, that means we get 3 data from the circular queue. So 3 position is empty now.
We enqueue() again, and only 3 data is inserted on the position of the array is 4, 1, 2 and now the head position is 3. so circulated.

That's the ending of the circular queue()
Thank you, for reading.
Happy coding.

Read More

Friday, June 1, 2018

Kotlin Data Structure: Queue

June 01, 2018

Welcome to this post.
This is the second post about data Structure.
In this post, we are going to learn about Queue data structure.

In the previous post, we discuss Stack. Stack is FILO type data structure.
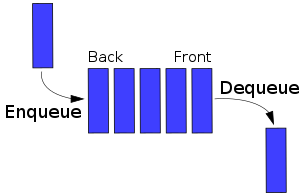
But Queue is the FIFO data structure, that means the data enter first that also come first.
queue data structure in kotlin
Src: Wikipedia
In queue, to data in the queue, the method is called enqueue()  
and to get data from queue, the method is dequeue()

Implementation of Queue:
In the above picture, you can see that data inserted in the back or last position and then the position move one row. and the same thing happens when we access data.
So we have to track
  • Top position
  • Last position
Create an array of Int' and also create 2 variable that mentions above.
var ints = IntArray(10)
var head = 0
var tail = 0

Methods:
enqueue():
insert data in the tail position and increase the tail
fun enqueue(n: Int) {
    ints[tail] = n
    tail += 1
    println("Input:" + n)
}
dequeue():
get data from head position index from the array and increase the head
fun dequeue(): Int {
    val n = ints[head]
    head += 1
    return n
}
Empty check:
if head and tail is same then the stack is empty
val isEmpty: Boolean
        get() = head == tail

Now time for access data:
First, create the main method:
fun main(arg: Array<String>) {
}
enqueue():
just run a for loop from 0 to 10 and insert data
for (i in 0..9) {
     enqueue(i)
}
Output:
Input:0
Input:1
Input:2
Input:3
Input:4
Input:5
Input:6
Input:7
Input:8
Input:9
works fine.
dequeue()
run a while loop until the queue is empty
while (!isEmpty) {
    println("value: " + dequeue())
}
Output:
value: 0
value: 1
value: 2
value: 3
value: 4
value: 5
value: 6
value: 7
value: 8
value: 9

It's work fine.
That's is the basic queue implementation.
You can check this out on Github

Discussion about queue:
The uses of the basic queue are not huge. It has a very limited use.
Because it wastes memory.
For example, if the queue has the capacity of 100. Then at the beginning data inserted from zero, when we access data from one we can get that data from the zero position. After the head is also increased and the tail already increased. Imagine by this way at 99 position data is filled and we access data from the 99 potions. If we want to insert new data into the queue it shows you a warning, "hey! I am full, I can not take any new data". But already the previous position is empty and there is no way to insert new data in the queue. we can use the previous position. But it allocates the memory. This is obviously the waste of memory. see the picture for the more clear concept.

Queue Data structure


To fix this problem we use the circular queue

Circular Queue
Circular Queue


In circular queue top position and the last position move around a circle. I will discuss circular queue in the next post.

Until then, stay happy and keep practicing.
Thank you for reading this post. 
Happy coding

Read More

Tuesday, May 29, 2018

Kotlin Data Structure: Stack

May 29, 2018

Welcome to this post.
This is going to be a series post about data structure and algorithm, In this series, I use kotlin as a default language.

Let's start with stack data structure-

Stack is a simple data structure.
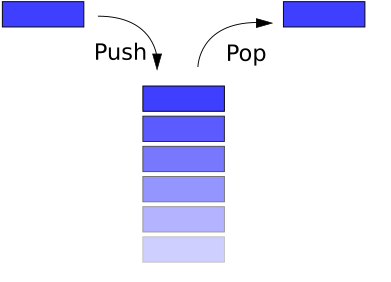
The implementation of this data structure is also called LIFO that means Last in Fast out.
Basically, in this data structure, the last data will come in first.

Src: Wikipedia

In this picture, the First A block moves into C. Now if we want to get a block from C then we must take the green block first that insert in the last. And this is the basic concept of Stack.
You check Wikipedia for more.

Now come in programming-
To put data in Stack there is a function called push()
and to access data called pop() and this function also removes the first element of Stack.

Src: Wikipedia


To implement sack we always think about the top position. For example, after a successful push top position will change and also in the pop operation.

So, create a class, (you can make an inner class) and create two variable,
  • one is for top position
  • other is a list to store data.
we are using kotlin so mutable list will be perfect.
initialize top as -1 and an empty list
class Stack<T> {
    private var top = -1
    private val array:MutableList<T> = mutableListOf()
}

push() function
         now our top position is -1. so in the push method, we just increase the top position. Just add plus one in every push. and insert data in the array at this index.
fun push(value: T) {
    top += 1
    array.add(top,value)
}

pop() function:
          when we create the class we initialize top position as -1. basically, array stary from zero indexes. so -1 index does not exist. so first check the value of the top position. if the position is -1 the stack has no data yet. If you called pop() function you are trying to get data from the empty stack. For this case, if the stack is empty we throw an exception.
if (top == -1) {
    throw Exception("Stack is empty")
}

now take the value from array and array index will be top value. And finally, reduce the top position.
fun pop(): T {

    if (top == -1) {
         throw Exception("Stack is empty")
    }

    val value = array[top]
    top -= 1
    return value
}

now create a variable that will show the length of this stack. we use get method of kotlin.
If the top is -1 then the length will be 0 and is not then length will be top + 1
val length:Int get() {
     return if (top == -1) 0
     else top + 1
}

Now time for put data and access data from this stack

create the main function-
fun main(args: Array<String>) {
}
create an instance of stack and type will be Int
val stack = Stack<Int>()
push():
run a for loop and the number range will be 0 to 10. And insert the date in the stack
for (i in 0 until 10){
    stack.push(i)
}

Now print the length of Stack-
println("Stack length:${stack.length}")
Output:
Stack length:10
so the data inserted successfully. Now get the data

pop()
we run a while loop until the stack length is zero
while (stack.length > 0){
    println("Stack: value:${stack.pop()} length:${stack.length}")
}
Output:
Stack: value:9 length:9
Stack: value:8 length:8
Stack: value:7 length:7
Stack: value:6 length:6
Stack: value:5 length:5
Stack: value:4 length:4
Stack: value:3 length:3
Stack: value:2 length:2
Stack: value:1 length:1
Stack: value:0 length:0

see the first value is 9 and but we start to insert data from 0. We find zero in the last.
at the last, the value is zero and the length is zero.
So now our stack is zero.

If we try to get data from stack then see what will happen-
println("Stack ${stack.pop()}")
Output:
Exception in thread "main" java.lang.Exception: Stack is empty
    at dataStructure.stack.Stack.pop(StackDemo.kt:33)
    at dataStructure.stack.StackDemoKt.main(StackDemo.kt:18)
we will get an exception.

That's it, we finished the implementation of stack and do push and pop operation.

In case you miss something, check the full code on Github

Thank you very much for reading. Hope this will help you.
Keep practicing

Happy coding

Read More

Friday, April 13, 2018

Android ThemeLibrary

April 13, 2018

Hello visitors,

After a long gap, I bring a post for you.
I don't like to waste your time anymore.

Let's start-
Today, I will write about a new library. The Library is about for android theming and color plate.

First of all, see some screenshot-
sample11

So you can see that this library has an awesome theme list. You can use this list and with your own additional list. You can also remove this list and use your own theme list.
It has a built-in night mode icon that switches On and Off night mode. The biggest advantage of this library is If you don't like this option you can turn off by one line of code.
See another screenshot (here night mode is enabled)
nightmode

So you can see that this is highly customizable.
Enough intro lets get started-

Read More

Saturday, August 19, 2017

Kotlin null safety

August 19, 2017

Welcome to kotlin Series

In this post, we are going to discuss a very important topic of Kotlin. The topic is kotlin null safety.
I think you already heard this keyword, null safety, Kotlin is a null safety language. right?
what is the null safety? In kotlin by default, you can not assign a value of a variable as null. All the variable must have a value.

but if you want an assign a variable as null, you have to use?
code-
val nullValue:String? = null
if you want to create a variable but want to assign a value later then use
var name:String?
name = "shudipto"
now print the value
println("Name: $name")
output:
Name: shudipto
now assign this value to null
name = null
print this new value
println(name)
Output:
null
Note: if you want to set this variable must have value then use below code-
print(name!!)
now we create a function that returns null
//null return function
fun returnNull():String? {
    return null
}
print this value:
 println("Function: ${returnNull()}")
Output:
 println("Function: ${returnNull()}")
now we use the force operator to assign the return value of this methods
val returnNull1:String ?= returnNull()
now if we want to learn the length of this variable we can use length method
//val returnNull2 = returnNull1.length
but this line shows an error because the value of the variable is null. This is the advantage of kotlin. If you are in java the here this line program will be crashed. but in kotlin, we can do by this way without any crash
val returnNull2 = returnNull1?.length
Now, this program will not crash. but you can do another thing that is if the value is null then you can save a string or default value I am using a string
val returnNull2 = returnNull1?.length ?: "value is null"
print the value
println("ReturnNull2: $returnNull2")
output:
ReturnNull2: value is null
see the variable value is null so the default value is assigned. you can also use this method for the specific data type variable:
val returnNull4:String = returnNull() ?: "No name"
print the value:
println(returnNull4)
Output:
No name
That's it. Hope you understand the concept. This is very important in Android App development. It prevent some unexpected crash.

Thank you very much.
Happy coding

Read More

Kotlin Series

August 19, 2017

welcome to kotlin series.
Kotlin
Kotlin Series

In this series, we are basically going through some basic and advanced tutorial about kotlin language.
we try to serve you best practices on those tutorials.

Here is the collection of all post

1. String -  kotlin string tutorial
2. Array and loop - array and loop tutorial
3. File reader and write - kotlin IO tutorial. 
4. ArrayList - kotlin ArrayList
5. How to control loop in kotlin - kotlin loop control
6. Collection - kotlin collection such as hash map, array, list
7.Null Safety - kotlin null safety

Series tutorial:
Kotlin OOP series:
  1. OOP Basic
  2. Constructor
  3. Inheritance
  4. Method Overriding
Advance:
1.Bookstore a simple program with function and input-output from the console with conditions. 

Read More

Friday, August 18, 2017

Kotlin Collection Example

August 18, 2017

Welcome to kotlin Series

In the tutorial, we are going to discuss Kotlin collection.
we touch on below topics
1. Hashmap
2. Array
3. List
       3.a. mutable list
       3.b. immutable list
4. Set
       4.a. mutable set
       4.b. immutable set

Let's start-

Hashmap: In kotlin, we can use java hashmap easily. But kotlin has an own hashmap. First, we go through Java hashmap create an instance of Hashmap class and parameter will be string and string after input some data and print data to check.
see the code-
val hasMap = HashMap<String,String>()

hasMap.put("s","Shudipto")
hasMap["d"] = "trafder"
hasMap["f"] = "Himu"
hasMap["g"] = "Rupa"
now print a value
println(hasMap["s"])
Output:
Shudipto
I am using a for loop to print all the value that stored in hashmap with their key. code-
for ((v,k) in hasMap.entries){
        println("$v -> $k")
    }
Output:
s -> Shudipto
d -> trafder
f -> Himu
g -> Rupa
that's it in this way we use java hashmap. But kotlin has already a default hashmap. now use kotlin hashmap.
See the code
val hasmap = hashMapOf(1 to "shudipto")
hasmap.put(2,"trafder")
hasmap.put(3,"himu")
print a value
println(hasmap[1])
Output:
shudipto
use a for loop to see all the value with the key that stored in the hashmap.
//print all value with index
for ((position,value) in hasmap.entries){
    println("Index:$position value:$value")
}
Output:
//print all value with index
for ((position,value) in hasmap.entries){
    println("Index:$position value:$value")
}
That's all on hashmap. next topics Array

Array: kotlin has a special array class. let's see the example. But before jump into code, you can check our two tutorial about ArrayList and Array and loop. This will help you to understand the array concept easily.
see the code-
println("\nKotlin Array")
val array = arrayOf("Shudipto",1,2,3.5,"Trafder")
array[4] = "himu"
now print all the value with for loop-
for ((p,v) in array.withIndex()){
    println("Index:$p value:$v")
}
Output:
Index:0 value:Shudipto
Index:1 value:1
Index:2 value:2
Index:3 value:3.5
Index:4 value:himu
That's it on Array. Next topics is  list

List:  In kotlin, there are two types of list available. Mutable and immutable list.
see the code-
mutable list-
println("\n\nMutable list of array")
val list = mutableListOf(1,2,34,5,6,7,8,"Shudipto")

list[0] = "trafder"
immutable list-
val list2 = listOf(1,2,34,5,6,7,8,"Shudipto")

Mutable vs immutable list: you can not update immutable list after assign.

now print all the value by using for loop
mutable list-
for ((p,v) in list.withIndex()){
    println("Index:$p value:$v")
}
Output:
Mutable list of array
Index:0 value:trafder
Index:1 value:2
Index:2 value:34
Index:3 value:5
Index:4 value:6
Index:5 value:7
Index:6 value:8
Index:7 value:Shudipto
Immutable List
println("\n\nimmutable list of array")
for ((p,v) in list2.withIndex()){
    println("Index:$p value:$v")
}
Output:
immutable list of array
Index:0 value:1
Index:1 value:2
Index:2 value:34
Index:3 value:5
Index:4 value:6
Index:5 value:7
Index:6 value:8
Index:7 value:Shudipto
That's it on the list. Nest on set.

Set: As list, kotlin has also two types of set. one is mutable and second is immutable.
so see the code
mutable set-
val mSet = mutableSetOf(1,2,4,5,6,6,8,1)
mSet.add(5)
immutable set
val set = setOf(15,2,3,10,5,6,15,10)

mutable vs immutable set: you can update mutable set anytime. But immutable set can not update after assign.
print all the value
mutable set-
for ((p,v) in mSet.withIndex()) println("Index:$p value:$v")
output:
Index:0 value:1
Index:1 value:2
Index:2 value:4
Index:3 value:5
Index:4 value:6
Index:5 value:8
Immutable set-
for ((p,v) in set.withIndex()) println("Index:$p value:$v")
Output:
Index:0 value:15
Index:1 value:2
Index:2 value:3
Index:3 value:10
Index:4 value:5
Index:5 value:6
That's it on set.

oh! we finish all the topics. Before finish this post I will give you a gift topics.
List vs set:
you probably see that list and set is working basically same process. List and Set both save a collection of data. They also have the mutable and immutable option. you can save any time of data type and you can also mix data type. but the question is, what is the difference between list and set?
the answer is, the set is not stored duplicate value but list save. If you are working with duplicate value then you must use list. or, If you are want to ignore duplicate value then use set.

Thank you for reading.
Hope you enjoy this tutorial.
Happy coding.

Read More

How to control loop in Kotlin

August 18, 2017

Welcome to kotlin Series

In this small post, we are going to discuss how to control loop in Kotlin.
Basically, we use 2 keywords for the control loop.
1. continue
2. break
if we want to skip one process, then we use to continue the keyword
for (a in 1..5){
        if (a==4){
            continue
        }
        println("A: $a")
    }
Output:
A: 1
A: 2
A: 3
A: 5
or if we stop the loop then we use break keyword
for (a in 1..5){
    if (a==4){
        break
     }
    println("A: $a")
}
Output:
A: 1
A: 2
A: 3

But in the nested loop if we want to stop the second loop after a selected value.
But in this case, if we use break keyword in the second loop-
for (a in 1..5){
        println("A: $a")

        for (b in 1..5){
            if (a == 4){
                break
            }
            println("B: $b")
        }
    }
and output:
A: 1
B: 1
B: 2
B: 3
B: 4
B: 5
A: 2
B: 1
B: 2
B: 3
B: 4
B: 5
A: 3
B: 1
B: 2
B: 3
B: 4
B: 5
A: 4
A: 5
B: 1
B: 2
B: 3
B: 4
B: 5
so we see loop is not stopped. It only stops inner loop after reaching the value of a is 4. no value of this loop is not printed and it repeated every time with increasing value with a
But our target on the basis of above value, we want to stop whole loop not only second loop after the value of a is 4.
For this case, we use loop keyword.
See the code-
loop@ for (a in 1..5){
        
        println("value a:$a")

        for (b in 1..4){
            if (a == 4){
                break@loop
            }

            println(" b:$b")
        }
    }

    println("Loop done")
Output:
value a:1
 b:1
 b:2
 b:3
 b:4
value a:2
 b:1
 b:2
 b:3
 b:4
value a:3
 b:1
 b:2
 b:3
 b:4
value a:4
Loop done
Oh! now our loop is stopped when the value of a is 4
sometimes we need to control the inner loop with the main loop condition. So loop keyword is saved a lot of time, we don't need to implement the complex logic.

Thank you for reading this post.
Happy coding

Read More

Wednesday, August 16, 2017

Kotlin ArrayList

August 16, 2017

Welcome to kotlin Series

Kotlin

In this post, we are going to learn about ArrayList. In android the use of ArrayList is huge.
So let's move on today task list.
1. we create an ArrayList
2. insert some value
3. update some value
4. search in ArrayList
5. delete some value

Let's start:
Note: we discuss array and loop in this post Kotlin: Array and Loop. you can take a look at this post of array section it will help you to understand today's topics easily.
Create an instance of ArrayList class and make this variable as immutable by using val
val list = ArrayList<String>()
Now insert some value by calling add method
list.add("Shudipto")
list.add("Trafder")
list.add("Is")
list.add("a")
list.add("good")
list.add("student")
Now print the first element of this array list
println("First Name:${list[0]}")
Result:
First Name:Shudipto
Now print all the element by using a for loop. see the code-
println("All element")
println("\nOnly value")
for (a in list){
     println("value:$a")
}
Output:
All element

Only value
value:Shudipto
value:Trafder
value:Is
value:a
value:good
value:student
Now print all the element with the index number. see the code-
println("\nIndex with value")
for ((position,a) in list.withIndex()){
    println("Index:$position value:$a")
}
Output:
Index with value
Index:0 value:Shudipto
Index:1 value:Trafder
Index:2 value:Is
Index:3 value:a
Index:4 value:good
Index:5 value:student
Now update an element-
we update the value of index number 5.
The new value will be developer.
println("\n\nUpdate an element")
list[5] = "developer"
Now print all the value with index
println("\nIndex with value")
for ((position,a) in list.withIndex()){
     println("Index:$position value:$a")
}
Output:
Index with value
Index:0 value:Shudipto
Index:1 value:Trafder
Index:2 value:Is
Index:3 value:a
Index:4 value:good
Index:5 value:developer
Search in ArrayList: we make a search in our ArrayList.
If we found the data and we print name found and if not we print name not found.
see the code below
println("\n\nSearch in array list")
if (list.contains("Shudipto")){
    println("Name found")
} else println("Not found")
Output:
Search in array list
Name found
Now delete some data: we can remove by two ways.
1. by value
2. by index number
I am showing you those two ways by the value, we remove "a" by index number, we remove index number 5
see the code below
println("Delete some data")
//with value
list.remove("a")
//with position
list.removeAt(4)
Note: in code, we use index number 4 because we just remove one element so the last index number is now 4.
Now print all the value with index number
println("\nIndex with value")
for ((position,a) in list.withIndex()){
     println("Index:$position value:$a")
}
Output:
Index with value
Index:0 value:Shudipto
Index:1 value:Trafder
Index:2 value:Is
Index:3 value:good
Today's full code:
fun main(args: Array<String>) {

    val list = ArrayList<String>()

    list.add("Shudipto")
    list.add("Trafder")
    list.add("Is")
    list.add("a")
    list.add("good")
    list.add("student")

    println("First Name:${list[0]}") //list.get(0)

    println("All element")
    println("\nOnly value")
    for (a in list){
        println("value:$a")
    }

    println("\nIndex with value")
    for ((position,a) in list.withIndex()){
        println("Index:$position value:$a")
    }

    println("\n\nUpdate an element")
    //list.set(5,"developer")
    list[5] = "developer"

    println("All element")
    println("\nOnly value")
    for (a in list){
        println("value:$a")
    }

    println("\nIndex with value")
    for ((position,a) in list.withIndex()){
        println("Index:$position value:$a")
    }

    println("\n\nSearch in array list")
    if (list.contains("Shudipto")){
        println("Name found")
    } else println("Not found")

    println("Delete some data")
    //with value
    list.remove("a")
    //with position
    list.removeAt(4)

    println("\nIndex with value")
    for ((position,a) in list.withIndex()){
        println("Index:$position value:$a")
    }
}
Full output:
First Name:Shudipto
All element

Only value
value:Shudipto
value:Trafder
value:Is
value:a
value:good
value:student

Index with value
Index:0 value:Shudipto
Index:1 value:Trafder
Index:2 value:Is
Index:3 value:a
Index:4 value:good
Index:5 value:student


Update an element
All element

Only value
value:Shudipto
value:Trafder
value:Is
value:a
value:good
value:developer

Index with value
Index:0 value:Shudipto
Index:1 value:Trafder
Index:2 value:Is
Index:3 value:a
Index:4 value:good
Index:5 value:developer


Search in array list
Name found
Delete some data

Index with value
Index:0 value:Shudipto
Index:1 value:Trafder
Index:2 value:Is
Index:3 value:good

Process finished with exit code 0
Thank you for reading this post.
Happy coding

Read More