Monday, September 18, 2017

Android Splash Screen right way

September 18, 2017

Welcome to this post. In this post, I am going to discuss on Android Splash Screen.

splash Screen @androidSketchPad


In this whole post, I gonna cover those topics
1. How to create android Splash Screen
2. How to override default color when app launching (windows background)

When you click app icon, the app takes some time to start. To overcome this option android by default show a color until the activity is launched. By default, it is white in color. So later in this post, I will show you how to overcome this situation and how to change this default color.

Let's start-

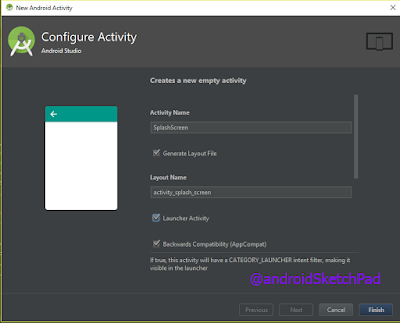
Create an Activity named it as your choice

creating an activity android SketchPad


now design your layout file. I just provide my XML code.
<?xml version="1.0" encoding="utf-8"?>
<android.support.constraint.ConstraintLayout xmlns:android="http://schemas.android.com/apk/res/android"
    xmlns:app="http://schemas.android.com/apk/res-auto"
    xmlns:tools="http://schemas.android.com/tools"
    android:layout_width="match_parent"
    android:layout_height="match_parent"
    app:layout_behavior="@string/appbar_scrolling_view_behavior"
    tools:context="com.blogspot.shudiptotrafder.soilscience.SplashActivity"
    tools:showIn="@layout/activity_splash"
    android:background="?attr/colorPrimary">

    <ImageView
        android:id="@+id/splash_imageView"
        android:layout_width="match_parent"
        android:layout_height="200dp"
        app:srcCompat="@drawable/ic_lover"
        app:layout_constraintStart_toStartOf="parent"
        android:layout_marginStart="8dp"
        app:layout_constraintEnd_toEndOf="parent"
        android:layout_marginEnd="8dp"
        android:contentDescription="app icon"
        app:layout_constraintTop_toTopOf="parent"
        android:layout_marginTop="80dp"
        tools:ignore="HardcodedText" />

    <TextView
        android:id="@+id/splash_app"
        android:layout_width="wrap_content"
        android:layout_height="wrap_content"
        android:text="App Name"
        app:layout_constraintStart_toStartOf="parent"
        android:layout_marginStart="8dp"
        app:layout_constraintEnd_toEndOf="parent"
        android:layout_marginEnd="8dp"
        android:layout_marginTop="16dp"
        android:textSize="30sp"
        app:layout_constraintTop_toBottomOf="@+id/splash_imageView" />

    <TextView
        android:layout_width="wrap_content"
        android:layout_height="wrap_content"
        app:layout_constraintTop_toBottomOf="@+id/splash_app"
        app:layout_constraintStart_toStartOf="parent"
        android:layout_marginStart="8dp"
        android:layout_marginEnd="8dp"
        android:layout_marginTop="16dp"
        android:id="@+id/splash_appAbout"
        android:text="This is a complete app"
        android:textSize="16sp"
        app:layout_constraintEnd_toEndOf="parent" />

</android.support.constraint.ConstraintLayout>

and ic_lover.xml it as vector drawable, code here
<vector android:height="24dp"
    android:viewportHeight="512.0"
    android:viewportWidth="512.0"
    android:width="24dp"
    xmlns:android="http://schemas.android.com/apk/res/android">
    <path
        android:fillColor="#FF6464"
        android:pathData="M0,173.5C0,96 62.9,33.1 140.4,33.1c34.4,0 65.9,12.4 90.3,32.9c14.7,12.3 36,12.3 50.7,0c24.4,-20.5 55.9,-32.9 90.3,-32.9C449.1,33.1 512,96 512,173.5v-4.1c0,136.1 -165.6,258.9 -230.4,301.8c-15.5,10.3 -35.7,10.3 -51.2,0C165.6,428.3 0,305.5 0,169.4" />
    <path
        android:fillColor="#D2555A"
        android:pathData="M0,173.5c0,-0.6 0.1,-1.2 0.1,-1.8C0.1,171 0,170.2 0,169.4V173.5z" />
    <path
        android:fillColor="#D2555A"
        android:pathData="M114.8,182.7c-0,0.6 -0.1,1.3 -0.1,1.9v-4.5C114.8,181 114.8,181.9 114.8,182.7c0.5,-66.9 29.4,-123.3 69.2,-142.5c-13.7,-4.5 -28.4,-7.1 -43.6,-7.1c-76.9,0 -139.3,61.9 -140.3,138.6c1.9,135.2 165.9,256.8 230.3,299.4c6.6,4.4 14.1,6.8 21.6,7.4C198.9,418.8 116,306 114.8,182.7z" />
    <path
        android:fillColor="#FF8B8B"
        android:pathData="M449.5,153.9m-32,0a32,32 0,1 1,64.1 0a32,32 0,1 1,-64.1 0" />
    <path
        android:fillColor="#FFC1C1"
        android:pathData="M408.4,92.8m-20,0a20,20 0,1 1,40.1 0a20,20 0,1 1,-40.1 0" />
</vector>

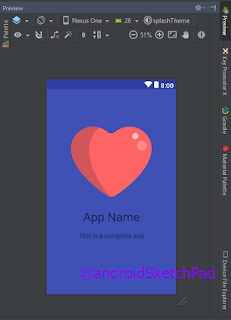
We finished our design option, see the preview
splash screen android SketchPad

it contains an ImageView and two TextView

now time for java coding, SplashScreen.java
public class SplashScreen extends AppCompatActivity {

    @Override
    protected void onCreate(Bundle savedInstanceState) {
        super.onCreate(savedInstanceState);
        setContentView(R.layout.activity_splash);

    }

now create an instance of Thread class and in the run methods call sleep methods and pass value 1000 (1000 for 1s, the value of Mille seconds). Don't forget to put this sleep method on try-catch block. and finally, block on try-catch, create an Intent that brings us to MainActivity. At list call finish() method and this activity will be destroyed.
See the code-
Thread checkForData = new Thread(){
      @Override
      public void run() {
            super.run();
            try{
            sleep(1000);

         } catch (Exception e) {
             e.printStackTrace();
         } finally {
             startActivity(new Intent(SplashActivity.this,
                            MainActivity.class));
             finish();
         }
     }
};
start this thread by calling start method
checkForData.start();
That's it. Splash Screen is created successfully. You can run a test for see result.

oh! Your app is not working. I forget one thing that we are using vector drawable. If your app minimum API is 21 then you have no headache. but if you targeting lower API you need to use support library to support vector drawable for lower API. To do that add below line in your build.gradle file
compile 'com.android.support:support-vector-drawable:25.3.1'
Note: change the version according to you compile SDK version. See mine-
compileSdkVersion 25
buildToolsVersion "25.0.3"
One more thing to go. add below code in your activity class
static {
    AppCompatDelegate.setCompatVectorFromResourcesEnabled(true);
}
ok, run the app again.

Screen Short:
Splash Screen @android SketchPad

Note: Don't be confused I use another app splash screen. Both are used the same code.

Now come on the last topics of this post, create a new theme on style.xml and add windows background color
<style name="splashTheme" parent="AppTheme.NoActionBar">
        <item name="android:windowBackground">@color/colorPrimary</item>
</style>
use this theme on the splash screen activity. Open manifest file and override below code-
<activity
       android:name=".SplashScreen"
       android:label="@string/app_name"
       android:theme="@style/splashTheme">
         <intent-filter>
            <action android:name="android.intent.action.MAIN" />

            <category android:name="android.intent.category.LAUNCHER" />
          </intent-filter>
</activity>
and my color code is
<color name="colorPrimary">#3F51B5</color>
rerun your app and see the change.

See Screen Short:
Splash Screen2 @android SketchPad


A Bonus for you
I also show you how to animate this splash screen. This is the pretty basic animation example.
Let's do this
create an XML file on res -> anim folder.
splash_screen_animation.xml
<alpha
    xmlns:android="http://schemas.android.com/apk/res/android"
    android:fromAlpha="0"
    android:toAlpha="1"
    android:duration = "1000" />
Now load this animation, see code-
Animation set = AnimationUtils.loadAnimation(this,
                R.anim.splash_screen_animation);
In the upper activity code, we don't create view variable, because we don't need that time. But now we need those views add set this animation with those views. Create view and assign it by calling findViewById()
ImageView imageView = (ImageView) findViewById(R.id.splash_imageView);
TextView app = (TextView) findViewById(R.id.splash_app);
TextView appAbout = (TextView) findViewById(R.id.splash_appAbout);
set animation with those views and also start the animation
//set animation
imageView.setAnimation(set);
app.setAnimation(set);
appAbout.setAnimation(set);

//start animation
set.start();
That's it now run the app again and see the animation on your splash screen.

Are you confused about this class SplashScreen.java code?
See all the call code below:
public class SplashScreen extends AppCompatActivity {

    static {
        AppCompatDelegate.setCompatVectorFromResourcesEnabled(true);
    }

    @Override
    protected void onCreate(Bundle savedInstanceState) {
        super.onCreate(savedInstanceState);
        setContentView(R.layout.activity_splash);

        ImageView imageView = (ImageView) findViewById(R.id.splash_imageView);
        TextView app = (TextView) findViewById(R.id.splash_app);
        TextView appAbout = (TextView) findViewById(R.id.splash_appAbout);


        Animation set = AnimationUtils.loadAnimation(this,
                R.anim.splash_screen_animation);

        //set animation
        imageView.setAnimation(set);
        app.setAnimation(set);
        appAbout.setAnimation(set);

        //start animation
        set.start();

        Thread checkForData = new Thread(){
            @Override
            public void run() {
                super.run();
                try{
                    sleep(1000);

                } catch (Exception e) {
                    e.printStackTrace();
                } finally {
                    startActivity(new Intent(SplashActivity.this,
                            MainActivity.class));
                    finish();
               }
             }
         };
        checkForData.start();

    }
}


See full video:

Note: in this video, you can also see the app intro. Link is here: Create Android Material App Intro

That's it 
now you can create a splash screen and also override the loading screen. In this example, I use just the only color but you can also use drawable in the loading time. So it's your choice what you used un your project.

That finished this post.
Why you wasting your time, create an awesome splash screen for your existing or next project?

Thank you for reading this post.
Happy coding.

Read More

Thursday, May 18, 2017

Android Floating Action Button with animation part-2

May 18, 2017

Welcome to the part two of our today's android project.
In the previous part, we create animation XML and drawable. Now we add fab code in the layout. (if you miss part one click here)

In my case my layout is activity_main.xml before doing this we need two colors in colors.xml.
Let's add this
<color name="fab1">#e2e21d</color>
<color name="fab2">#47e92e</color>
Now add three fab button. I share this code one by one.
<android.support.design.widget.FloatingActionButton
        android:layout_width="wrap_content"
        android:layout_height="wrap_content"
        android:layout_marginBottom="150dp"
        android:layout_marginEnd="16dp"
        android:layout_gravity="bottom|end"
        android:elevation="6dp"
        android:src="@drawable/ic_person_outline_black_24dp"
        app:fabSize="normal"
        android:visibility="gone"
        android:id="@+id/fab_people"
        app:backgroundTint="@color/fab2"
        app:pressedTranslationZ="12dp"/>
next one
<android.support.design.widget.FloatingActionButton
        android:layout_width="wrap_content"
        android:layout_height="wrap_content"
        android:layout_marginBottom="80dp"
        android:layout_marginEnd="16dp"
        android:layout_gravity="bottom|end"
        android:elevation="6dp"
        android:src="@drawable/ic_school_black_24dp"
        app:fabSize="normal"
        android:visibility="gone"
        android:id="@+id/fab_school"
        app:backgroundTint="@color/fab1"
        app:pressedTranslationZ="12dp"/>
and the last one
<android.support.design.widget.FloatingActionButton
        android:layout_width="wrap_content"
        android:layout_height="wrap_content"
        android:layout_margin="@dimen/fab_margin"
        android:layout_gravity="bottom|end"
        android:elevation="6dp"
        android:src="@drawable/ic_share_black_24dp"
        app:fabSize="normal"
        android:id="@+id/main_fab"
        app:pressedTranslationZ="12dp"/>

Note: if you have any dought you can check full activity.xml code on GitHub.

Now time for java code.
In my case java file is MainActivty.java Add those variables-
FloatingActionButton main,people,school;
Animation fabOpen,fabClose,fabRotate,fabRotateAntiClockWise;

//fab is open or close
boolean isOpen = false;
Now assign all fab button with findViewById()
main = (FloatingActionButton) findViewById(R.id.main_fab);
people = (FloatingActionButton) findViewById(R.id.fab_people);
school = (FloatingActionButton) findViewById(R.id.fab_school);
Now time for load animation-
fabOpen = AnimationUtils.loadAnimation(this,R.anim.fab_open);
fabClose = AnimationUtils.loadAnimation(this,R.anim.fab_close);
fabRotate = AnimationUtils.loadAnimation(this,R.anim.rotate_clockwise);
fabRotateAntiClockWise = AnimationUtils.loadAnimation(this,R.anim.rotate_anit_clockwise);

If the user clicks the main fab button then we will show others button. That's is the logic. ok add main fab clickListener and use below code to show others button. After the code, I discuss code logic again Ok enough talking. Let's start-

main.setOnClickListener(new View.OnClickListener() {
            @Override
            public void onClick(View v) {

                Log.e("Click", "click");

                if (isOpen){
                    people.setAnimation(fabClose);
                    school.setAnimation(fabClose);
                    main.setAnimation(fabRotateAntiClockWise);
                    people.setClickable(false);
                    school.setClickable(false);
                    people.setVisibility(View.GONE);
                    school.setVisibility(View.GONE);
                    isOpen = false;

                } else {
                    people.setVisibility(View.VISIBLE);
                    school.setVisibility(View.VISIBLE);
                    people.setAnimation(fabOpen);
                    school.setAnimation(fabOpen);
                    main.setAnimation(fabRotate);
                    people.setClickable(true);
                    school.setClickable(true);
                    people.setOnClickListener(new View.OnClickListener() {
                        @Override
                        public void onClick(View v) {
                            Toast.makeText(MainActivity.this, "Welcome to people", 
                                      Toast.LENGTH_SHORT).show();
                        }
                    });

                    school.setOnClickListener(new View.OnClickListener() {
                        @Override
                        public void onClick(View v) {
                            Toast.makeText(MainActivity.this, "Welcome to school", 
                                                      Toast.LENGTH_SHORT).show();
                        }
                    });

                    isOpen = true;
                }
            }
        });

Note: youcan recheck MainActivity.java on GitHub 

Code analysis-
1.In layout file when we created out floating action button we set those button's visibility gone excepts main fab button. we check boolean state first, isopen is true or false

2. If the answer is true that means fab is open now. So we set here close fab functionality.
2.1. set close animation on two fabs that are you want's to close.
2.2. set those fab clickable false.
2.3 set anti clock rotate animation on mainFab.
2.4 now time to invisible that's fab.
2.5 at last assign isopen to false.

3.If the answer is false that means fab is close. So we set here close fab functionality.
3.1. now time to invisible others fab.
3.1. set open animation on two fabs that are not shown.
3.2. set those fab clickable true.
3.3 set clock rotate animation on mainFab.
3.4 set click listener on those fab
3.5 at last assign isopen to true.

Wow. now we fab three fabs in our layout but only one is showing at first. After clicking main fab other's button is open with animation. And those button is now working. And again click the main fab button, others two buttons is gone. So welcome to you all. you successfully created this project.

you can find the full project on Github. Fab

Thanks for reading this post and hope this code is working and now you can use fab with animation on your own project.

Happy coding.

Read More

Android Floating Action Button with animation

May 18, 2017

In this android project, we create 3 floating action button. The main fab button is only showing when activity is launch. other's two are invisible. After clicking the main fab button it will show the other's fab button. Those buttons are now visible and clickable. after clicking again main fab button is rotate 45 degrees and close others fab button with animation. That's our main goal today.

Let's start to making our today's android app
First, add those dependencies to your build.gradle file
dependencies {
   
    compile 'com.android.support:appcompat-v7:25.2.0'
    compile 'com.android.support:design:25.2.0'
    
}

Now we create 4 animations XML file in res > anim folder.

1.fab_open.XML
2.fab_close.xml
3. rotate_clockwise.XML
4.rotate_anti_clockwise.xml

first two are using on closing and opening fab and last 2 are using to rotate the main fab.

Let's create those file in res > anim folder

Note: we should follow code comment. That will help us to understand code easily.

1.fab_open.xml
<?xml version="1.0" encoding="utf-8"?>
<set xmlns:android="http://schemas.android.com/apk/res/android"
     android:fillAfter="true">
    <!-- android:fillAfter="true" is ensure thata animation transformation occur
     only after finish animation -->

    <!-- we change animation from 0 to 80 percent -->
    <!-- pivot x or y means it's is the center point of animation -->
    <scale
        android:fromXScale="0.0"
        android:fromYScale="0.0"
        android:toXScale=".8"
        android:toYScale=".8"
        android:pivotX="50%"
        android:pivotY="50%"
        android:duration = "300"
        android:interpolator = "@android:anim/linear_interpolator"/>

    <!-- now change the animation of the opacity of the object -->
    <!-- now we change alpha 0 to 1 that's means object's disappears -->
    <!-- accelerate_interpolator means that's animation start's slowly -->
    <alpha
        android:fromAlpha="0"
        android:toAlpha="1"
        android:duration = "300"
        android:interpolator = "@android:anim/accelerate_interpolator"/>


</set>
2.fab_close.xml
<?xml version="1.0" encoding="utf-8"?>
<set xmlns:android="http://schemas.android.com/apk/res/android"
    android:fillAfter="true">
    <!-- android:fillAfter="true" is ensure thata animation transformation occur
     only after finish animation -->

    <!-- same as fab_open.xml but inverse order -->
    
    <!-- we change animation from 80 to 0 percent -->
    <!-- pivot x or y means it's is the center point of animation -->
    <scale
        android:fromXScale=".8"
        android:fromYScale=".8"
        android:toXScale="0.0"
        android:toYScale="0.0"
        android:pivotX="50%"
        android:pivotY="50%"
        android:duration = "300"
        android:interpolator = "@android:anim/linear_interpolator"/>

    <!-- now change the animation of the opacity of the object -->
    <!-- now we change alpha 1 to 0 that's means object's disappears -->
    <!-- accelerate_interpolator means that's animation start's slowly -->
    <alpha
        android:fromAlpha="1"
        android:toAlpha="0"
        android:duration = "300"
        android:interpolator = "@android:anim/accelerate_interpolator"/>

</set>
3.rotate_clockwise.xml
<?xml version="1.0" encoding="utf-8"?>
<set xmlns:android="http://schemas.android.com/apk/res/android"
    android:fillAfter="true">

    <!-- it rotate to 0 to 45 degree -->

    <rotate
        android:fromDegrees="0"
        android:toDegrees="45"
        android:pivotX="50%"
        android:pivotY="50%"
        android:duration = "300"
        android:interpolator = "@android:anim/linear_interpolator"/>


</set>
34 rotate_anti_clockwise.xml
<?xml version="1.0" encoding="utf-8"?>
<set xmlns:android="http://schemas.android.com/apk/res/android"
     android:fillAfter="true">

    <!-- same as clockwise.xml but inverse order -->
    <!-- in this animation we rotate start 45 to 0  -->
    <rotate
        android:fromDegrees="45"
        android:toDegrees="0"
        android:pivotX="50%"
        android:pivotY="50%"
        android:duration = "300"
        android:interpolator = "@android:anim/linear_interpolator"/>
</set>

Now add some drawable to on our android project. I am currently use vector drawable here. I also share my code here. Note you can use image or others vector drawable as you.(it also reduces android app size)

1.ic_person_outline_black_24dp.xml
<vector xmlns:android="http://schemas.android.com/apk/res/android"
        android:width="24dp"
        android:height="24dp"
        android:viewportWidth="24.0"
        android:viewportHeight="24.0">
    <path
        android:fillColor="#FF000000"
        android:pathData="M12,5.9c1.16,0 2.1,0.94 2.1,
        2.1s-0.94,2.1 -2.1,2.1S9.9,9.16 9.9,8s0.94,-2.1 2.1,
        -2.1m0,9c2.97,0 6.1,1.46 6.1,2.1v1.1L5.9,18.1L5.9,
        17c0,-0.64 3.13,-2.1 6.1,-2.1M12,4C9.79,4 8,5.79 8,
        8s1.79,4 4,4 4,-1.79 4,-4 -1.79,-4 -4,-4zM12,13c-2.67,
        0 -8,1.34 -8,4v3h16v-3c0,-2.66 -5.33,-4 -8,-4z"/>
</vector>

2.ic_school_black_24dp.xml
<vector xmlns:android="http://schemas.android.com/apk/res/android"
        android:width="24dp"
        android:height="24dp"
        android:viewportWidth="24.0"
        android:viewportHeight="24.0">
    <path
        android:fillColor="#FF000000"
        android:pathData="M5,13.18v4L12,21l7,-3.82v-4L12,17l-7,-3.82zM12,3L1,9l11,6 9,-4.91V17h2V9L12,3z"/>
</vector>

3.ic_share_black_24dp.xml
<vector xmlns:android="http://schemas.android.com/apk/res/android"
        android:width="24dp"
        android:height="24dp"
        android:viewportWidth="24.0"
        android:viewportHeight="24.0">
    <path
        android:fillColor="#FF000000"
        android:pathData="M18,16.08c-0.76,0 -1.44,0.3 -1.96,
        0.77L8.91,12.7c0.05,-0.23 0.09,-0.46 0.09,-0.7s-0.04,
        -0.47 -0.09,-0.7l7.05,-4.11c0.54,0.5 1.25,0.81 2.04,
        0.81 1.66,0 3,-1.34 3,-3s-1.34,-3 -3,-3 -3,1.34 -3,
        3c0,0.24 0.04,0.47 0.09,0.7L8.04,9.81C7.5,9.31 6.79,9 6,
        9c-1.66,0 -3,1.34 -3,3s1.34,3 3,3c0.79,0 1.5,-0.31 2.04,
        -0.81l7.12,4.16c-0.05,0.21 -0.08,0.43 -0.08,0.65 0,1.61 1.31,
        2.92 2.92,2.92 1.61,0 2.92,-1.31 2.92,-2.92s-1.31,
        -2.92 -2.92,-2.92z"/>
</vector>


Ok, that's looking great.
we have done a lot. In the next part, we have created layout and java code. Click here for next part.

Read More

Saturday, May 13, 2017

Android Custom Dialog with Material Design

May 13, 2017

Hello, reader.
Welcome to my blog.
How about your day?

In this post, we will make a custom dialog with user input option.

we also use material edit text. Edit text has a floating hint option. we can use it on login option or feedback option. But I am using for feedback option.

So we are going to add a custom dialog so we have to add a layout file.
Our dialog will show exactly what we will design in our layout XML file. In our layout XML file, we have 3 Edit text. Because we need to get three information from our user. Need username and user email address and user feedback.

Add 3 Edit text-

  • Name EditText
  • Email EditText
  • Message EditText


Enough Intro. Let's start.

At first, you need to check that's design dependence is added to your gradle file. But the android studio has already added those dependencies  If not add already then add it. Because you use Text Input layout. I am not showing how to add design dependence, I think you are quite capable of adding this.

Now create a layout File name custom_dialog.xml
We use the Constraint Layout layout as base layout. Now add the Text Input Layout as child layout of the Main layout. After that, We add our EditText as a child layout of TextInputLayout. In the edit text, we add a hint option for Edit text and that's label will float up when user will start writing.

Let's show me the code.
Below code is the full code of our custom dialog XML file.
custom_dialog.xml
<android.support.constraint.ConstraintLayout
  xmlns:android="http://schemas.android.com/apk/res/android"
  xmlns:app="http://schemas.android.com/apk/res-auto"
  android:layout_width="match_parent"
  android:layout_height="match_parent"
  android:orientation="vertical">

  <android.support.design.widget.TextInputLayout
  android:id="@+id/addTaskNameLayout"
  android:layout_width="0dp"
  android:layout_height="wrap_content"
  android:layout_marginEnd="@dimen/card_element_margin"
  android:layout_marginStart="@dimen/card_element_margin"
  android:layout_marginTop="@dimen/card_element_margin"
  app:layout_constraintLeft_toLeftOf="parent"
  app:layout_constraintRight_toRightOf="parent"
  app:layout_constraintTop_toTopOf="parent">

  <EditText
  android:id="@+id/customName"
  android:layout_width="match_parent"
  android:layout_height="wrap_content"
  android:hint="@string/custom_name"
  android:inputType="textPersonName"
  android:padding="@dimen/main_list_universal_padding"
  android:textColorHint="?attr/colorAccent"/>
  </android.support.design.widget.TextInputLayout>

  <android.support.design.widget.TextInputLayout
  android:id="@+id/textInputLayout"
  android:layout_width="0dp"
  android:layout_height="wrap_content"
  android:layout_marginEnd="@dimen/card_element_margin"
  android:layout_marginStart="@dimen/card_element_margin"
  android:layout_marginTop="8dp"
  app:layout_constraintLeft_toLeftOf="parent"
  app:layout_constraintRight_toRightOf="parent"
  app:layout_constraintTop_toBottomOf="@+id/addTaskNameLayout">

  <EditText
  android:id="@+id/customEmail"
  android:layout_width="match_parent"
  android:layout_height="wrap_content"
  android:hint="@string/custom_email"
  android:inputType="textEmailAddress"
  android:padding="@dimen/main_list_universal_padding"
  android:textColorHint="?attr/colorAccent"/>

  </android.support.design.widget.TextInputLayout>

  <android.support.design.widget.TextInputLayout
  android:id="@+id/addTaskSolLayout"
  android:layout_width="0dp"
  android:layout_height="wrap_content"
  android:layout_marginEnd="@dimen/card_element_margin"
  android:layout_marginStart="@dimen/card_element_margin"
  android:layout_marginTop="8dp"
  app:layout_constraintHorizontal_bias="0.0"
  app:layout_constraintLeft_toLeftOf="parent"
  app:layout_constraintRight_toRightOf="parent"
  app:layout_constraintTop_toBottomOf="@+id/textInputLayout">

  <EditText
  android:id="@+id/customFeedback"
  android:layout_width="match_parent"
  android:layout_height="wrap_content"
  android:hint="@string/custom_feedback"
  android:inputType="textMultiLine"
  android:lines="4"
  android:maxLines="10"
  android:padding="@dimen/main_list_universal_padding"
  android:textColorHint="?attr/colorAccent"/>
  </android.support.design.widget.TextInputLayout>


</android.support.constraint.ConstraintLayout>

Note: I don't add any button on this layout. I use default button in the dialog (positive button or negative button in the dialog) but if need to add your custom design button you can add here.

You are seeing some error. Don't worry about it. it's only for String reference not find in your system. You can override it by yourself. but  I also provide my strings that strings are used for the hint as Edit text.

<!-- Custom dialog layout -->
  <!-- ***************Start************* -->
  <string name="custom_name">Your Name:</string>
  <string name="custom_email">your email:</string>
  <string name="custom_feedback">your message:</string>
  <!-- ***************FINISH************* -->

But after you add all of those strings, you also some error too. It's for dimension reference. I also provide my dimension reference. Let's take a look.

<dimen name="card_element_margin">8dp</dimen>

that's it for XML code.

Now we gonna move on JAVA code.
Let's start where you want to build dialog you can use it on fragment or Activity.
I used in MainActivity, and I created separate methods for this. But it's as like other Alert Dialog but only you should use Layout Inflator to inflate layout.xml. And Edit Text function is as like others. And get the text from edit text also same. we add positive and negative button label as Send and cancel. We get all text in the positive click listener and send it's to Email app through Intent.
Ok, see the code-
private void feedback() {

  AlertDialog.Builder dialogBuilder = new AlertDialog.Builder(this);
  LayoutInflater inflater = this.getLayoutInflater();
  final View dialogView = inflater.inflate(R.layout.custom_dialog, null);
  dialogBuilder.setView(dialogView);

  final EditText name = (EditText) dialogView.findViewById(R.id.customName);
  final EditText email = (EditText) dialogView.findViewById(R.id.customEmail);
  final EditText message = (EditText) dialogView.findViewById(R.id.customFeedback);

  dialogBuilder.setTitle("Send FeedBack");
  dialogBuilder.setMessage("please send me to your feedback.");
  dialogBuilder.setPositiveButton("Send", new DialogInterface.OnClickListener() {
  public void onClick(DialogInterface dialog, int whichButton) {
  String nameStr = name.getText().toString().trim();
  String emailStr = email.getText().toString();
  String messageStr = message.getText().toString().trim();
  
  Intent emailIntent = new Intent(Intent.ACTION_SEND);
  emailIntent.setData(Uri.parse("mailto:"));
  emailIntent.setType("message/rfc822");
  emailIntent.putExtra(Intent.EXTRA_EMAIL, new String[]{"Shudiptotrafder@gmail.com"});
  emailIntent.putExtra(Intent.EXTRA_CC, emailStr);
  emailIntent.putExtra(Intent.EXTRA_SUBJECT, "Life Scheduler Feedback");
  emailIntent.putExtra(Intent.EXTRA_TEXT, nameStr + ":" + messageStr);

  if (emailIntent.resolveActivity(getPackageManager()) != null) {
  startActivity(Intent.createChooser(emailIntent, "Send Email ..."));
  } else {
  Toast.makeText(MainActivity.this, "Sorry you don't have any email app", Toast.LENGTH_SHORT).show();
  }

  }
  });
  dialogBuilder.setNegativeButton("Cancel", new DialogInterface.OnClickListener() {
  public void onClick(DialogInterface dialog, int whichButton) {
  //pass
  }
  });

  AlertDialog b = dialogBuilder.create();
  b.show();
  }

That's it. Now run your code and use it where ever you want. If you have any queries then you can use comment option.
See the final Screen Short-
custom dialog


Hope this tutorial will help you.
It will help you to implement easily to add feedback option from your app. And if you want to add quick login option in your app, you can use this too, but you need to customize. If you have any quires then you can use the comment section.

Happy coding

Read More