Saturday, June 30, 2018

Searching Algorithms: Linear Search

welcome to this post.

Today I am going to talk about Searching Algorithms.
In this tutorial, I will cover 3 Searching Algorithms
  • Linear Search
  • Binary Search
  • Interpolation Search

So Let start with Linear Search

Linear Search:
From the name, you can get an idea. It searches linearly. One by one.
This algorithm starts the search from the beginning and continues until finding the
desired search index.

For example,
Assume an array from 0 to 10. and you are searching for10. so what will happen?

First, it checks
if 10 is equal to 0 => nope, then
if 10 is equal to 1 => nope, then
.................................................
continue this
if 10 is equal to 10 => yes.

Now it's finding the number.

So it starts from the beginning and continues until it's done.

Let's jump into the code
Create a class and it's constructor take the array size.
class DataK(size:int){
} 

create two variable,

  • one is an array that holds the data set
  • other is numberOfTry: an int type variable that will give information,
how many tries need to find the value.

val array: Array<Int> = Array(size,{i -> i})
var numberOfTry = 0

Now Just run a for loop from 1 to the given size and put the data into the array.
init {
    for (i in 1 until size){
         array[i-1] = i
     }
}

The complete Class code in GitHub
Note: This class is used in every searching Algorithms.

Now create the main method and initialize the data and give the size 100000.
val data = DataK(100000)

we want to find 9999
val search = 99999

Set the initial number of try to zero
var numberOfTry = 0

And the last declare a new variable, named it to result and this will hold the result.
everything is set, now I am ready for the main action

To search run a for loop from 0 to the data size and compare the index value with our searching number if find the break the loop and at the end increase the number of tries.

That's is the idea.
See code
for (i in 0 until (data.array.size - 1)) {
    val number = data.array[i]
    if (number == search) {
        result = number as Int
        break
    }

    numberOfTry++
}

Now result:
from the linear search if the result is -1 then the value does not exist and that means data is not found.

so, we print the number of tries to see it actually search or not if the result is not -1 then
we find the data.
print number of trials, to see how much try need to find our data

if (result != -1)
    println("Data found on: $numberOfTry")
else
    println("Data not found try: $numberOfTry")

Output:
Data found on: 99998

so, it takes 99998 try to find 99999.

Check the full source code in Github

Note: If you are from java. Check this on Github.

That is all about the Linear search algorithm.

It is a very simple algorithm. It is not widely used.

we will compare all of the searching algorithms after completing all of those.

In the next part, I will discuss Binary search.

Thank you for reading.
If you have any suggestion or any queries use the comment section.

Happy coding
Wednesday, June 20, 2018

Dart: Variable

Welcome to the series post.
The is the first post about Dart

From today I am starting Dart language tutorial.
I already posted a brief introduction about dart and I also try to answer why you choose the dart programming. Check this Dart Introduction

In the previous post, I write about some important concept about dart. Before starting I recommend for taking a look.

Main method:
First, see the code:
void main(List<String> lists) {
}
In the code, you see that the parameter of the main method is a list of string. I think this is as usual of other programming languages. But most interesting part is that you can also create the main method without this parameter.
void main() {
}

So, That's so simple.
Now write a hello world program, to print something on the console, use print() function.
void main(List<String> lists) {
  print("Hello world");
}
Output:
Hello world

That's is the hello world program.
Now you can modify this program as yourself.

Variables:
Var:
To declare any variable you can use var keyword.
var v = 10;
you can put any type of data, like, Int, Double, String or anything
var string = "String";
var int = 10;
var double  = 30.0;
var boolean = false;

If you don't specify the value by default it considers as null
var value; //value is null

dynamic
You can use another keyword available name dynamic.
dynamic s = "s";
this dynamic type of variables can also hold any type of data, like var
dynamic string = "String";
dynamic int = 10;
dynamic double  = 30.0;
dynamic boolean = false;

You can also specify the data type of the data
String value;
int number;
double number2;
bool status;

Multiple variables:
You can also initialize multiple variables at the same time.
var a,b,c,d,e;
also, you can specify the value
var a1 = 10,b2 = 20,c2 = 30;

final and const:
If you need a variable that's value is not change after the declaration, use final keyword
final name = "Shudipto";
also the option for specific variables
final String type = "Student"; //explicitly

If you need runtime constant variables, then use const keyword
const value = 1000;
specific variable
const String data = "data:$value";

Lest see an example-
var foo = const [];
final bar = const [];
const baz = const [];
Here, [] create an empty list. and const[] creates an empty immutable list, it's denoted as (EIL)
In the above code,
foo => foo is currently an EIL.
bar => bar will always be an EIL.
baz => baz is a compile-time constant EIL.

It is possible to change the value of a non-final, non-const variable,
even if it used to have a const value.
foo = [];

It is not possible to change the value of a final or const variable.
// bar = []; // Unhandled exception.
// baz = []; // Unhandled exception.

that's it of the variable.

Comments:
single line comment: as usual like other languages. use '//'
//single line comment

multiline comment:
/*
* multi line comment
*/


That's the ending of today post.
Today in this article, I covered Hello world program and variable and Comments.

Thank you for reading.

Happy coding.

Friday, June 8, 2018

Communication between View and ViewModel

Welcome to this post.

In this post, I am going to talk about, how to communicate between view and viewModel.

Let's take a look on ViewModel

ViewModel was introduced on Google I/O 17, a part of Lifecycle extensions. Now it's released version is 1.1.0.
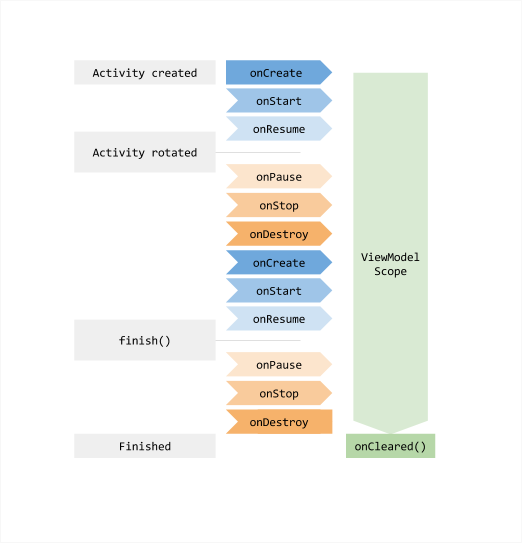
lifecycle
Src: Medium

From the picture, you can see that it launch with the creation of activity. And it will be cleared only when the activity is finished. The biggest advantage is that it can survive configuration changes.
You should not put any view reference in the viewModel. Why?
The answer is so simple When activity recreated the also. So if you pass view to ViewModel then it creates a leak, because, on the recreation of activity, all the views are brand new, but your ViewModel is still holding the older view that already destroyed.
Don't do this.

Now a question, so how to communicate between view and ViewModel?

Case Study:
Imagine you build an app that has an option for the user signup. When the user clicks signup button then
you can show a dialog and after successful signup, we have to show a notification or perform any task. In this case how you contact view and ViewModel.

Let's start-
To solve this problem I create a class that inherited Mutable Live Data Class.
class SingleLiveEvent<T> : MutableLiveData<T>() {

    private val pending = AtomicBoolean(false)

    @MainThread
    override fun observe(owner: LifecycleOwner, observer: Observer<T>) {

        if (hasActiveObservers()) {
            //Log.w(TAG, "Multiple observers registered but only one will be notified of changes.")
        }

        // Observe the internal MutableLiveData
        super.observe(owner, Observer<T> { t ->
            if (pending.compareAndSet(true, false)) {
                observer.onChanged(t)
            }
        })
    }

    @MainThread
    override fun setValue(t: T?) {
        pending.set(true)
        super.setValue(t)
    }

    /**
     * Used for cases where T is Void, to make calls cleaner.
     */
    @MainThread
    fun call() {
        value = null
    }

    companion object {
        private const val TAG = "SingleLiveEvent"
    }
}

This is the sample from google, it is the blueprint of architecture component. Check this.
But If you want to set a value from the main thread then it's ok. you can use this without changing anything.

But what about the background thread?
If you want to set a value from a background thread, then you have to override postValue() method.
override fun postValue(value: T) {
    pending.set(true)
    super.postValue(value)
}
If you have any confuse, then check GitHub

Create a status class
enum class Status{
    LOGIN,
    SIGNUP,
    FAILED
}

Now come on ViewModel Code:
create an instance of SingleLiveEvent
val observableEvent = SingleLiveEvent<Status>()

I create 3 mock methods, just with a thread that wait for 2 seconds and set the value on the variable, observableEvent.

mockLogin()
just set value from the main thread and start a new background thread.
fun mockLogin(){
    observableEvent.value = Status.LOGIN
    background()
}

mockSignup()
start a thread and wait for 2s and set value. and also start a new background thread.
fun mockSignUp(){
        Thread({
            try {
                Thread.sleep(2000) //2 sec wait
            } catch (e:Exception){
                //nothing
            } finally {
                observableEvent.postValue(Status.SIGNUP)
                //do some task from background
                background()
            }
        }).start()
    }

background()
start a background thread and with the handler and wait for 2s
private fun background(){
        val thread = HandlerThread("Background")
        thread.start()

        Handler(thread.looper).post({

            //wait for 2 sec
            Thread({
                try {
                    Thread.sleep(2000) //2 sec wait
                } catch (e:Exception){
                    //nothing
                } finally {
                    observableEvent.postValue(Status.FAILED)
                }
            }).start()
        })
    }

Now time for activity code:
I have 3 view
  • progress bar
  • login button
  • signup button
First, hide the progress bar
val progressBar:ProgressBar = progressBar
progressBar.gone()
Note, here I use an extension function. see here 

set onclick event for every button and also called the method from ViewModel

Login:
hide progress bar
button.setOnClickListener {
    progressBar.vis()
    viewModel.mockLogin()
}

Sign up:
hide progress bar
button2.setOnClickListener {
    progressBar.vis()
    viewModel.mockSignUp()
}

now observe that event and show toast message. see the code
viewModel.observableEvent.observe(this, Observer {
    if (it == Status.LOGIN){
        progressBar.gone()
        "Login Successful".showToast()
    } else if (it == Status.SIGNUP) {
        progressBar.gone()
        "Sign up Successful".showToast()
    }

    if (it == Status.FAILED){
        "Job Failed from background thread".showToast()
    }
})
here, showToast is another extension function
private fun String.showToast(){
    Toast.makeText(context, this, Toast.LENGTH_SHORT).show()
}

Now run the code and click the button see the toast message.

So, that's it.
you can find this project on GitHub

Thanks for reading.
Hope this tutorial will help you a lot.

Happy coding.

Sunday, June 3, 2018

Dart: Introduction

Welcome to this post.
Recently I start to learn Dart programming language.

From today, I will post about dart programming language.

dart
Src: Dartlang


What is dart?
Dart is an object-oriented programming language, developed by Google. It is used to build web, server, and mobile applications(Flutter).

Before Learning darts, some important concept, we have to understand.
Concepts:

  • Everything in darts is object and object is an instance of Class.
  • Even variable, function and null are object too.
  • Type annotation is optional because it is strongly typed. So we can special type or dynamic
  • Dart support generic type (for example a list of integers: List
  • Top level function is supported, we also used functions that tied to an object or a class. And another cool thing is it supports nested function
  • It also supports top-level variable and tied variables. The instance variable, sometimes known as fields or properties.
  • Like Java, Dart has no keyword like public, protected, private, If variables start with underscore (_) that consider as package private.
  • Dart tools can report only two kinds of problems. The first one is warnings that just indications of your code might not work, but they don’t prevent your program from executing. The second one is errors, it can be either compile-time or run-time and finally, it prevents the code from executing at all


That's the concept of dart. Now come where we can use this language.
Application of Dart
Dart is a scalable language. SO we write a simple script or full-featured app. we use this mainly 3 areas. Like-

Flutter - we can write a mobile app, that will run both Android and Ios.
Web - we can write an app that can run in modern web browser.
Dart VM - we can write command line app or server.


I think that's enough introduction about dart. So we can start learning.
In this blog, I will try to cover the basic of Dart.

So, Let's create a list of learning path of Dart programming Language.

What I will cover in this series tutorial -
  • Tutorial
    • Hello word
    • Variable
    • Data type
    • Function
    • Operators
    • String operation
    • Collection
    • Control flow statement
    • Classes
    • Methods
    • Enumerated types
    • Generics
    • Library and visibility
    • Asynchrony support
This is the learning path about dart. I will go through every topic.

That's the deal.
Stay connected with my blog. 

Saturday, June 2, 2018

Kotlin Data Structure: Circular Queue

Welcome to this post.
In this post, we are going to learn about the Circular queue.

If you don't know the queue data structure, please check this post Queue.

In the previous post of Queue, I discuss the problem about the queue. So today we learn about the circular queue.

In queue, to data in the queue, the method is called enqueue()  
and to get data from the queue, the method is dequeue()

Let's jump in the programming:

circular queue
circular queue

In the above picture, you can see that data inserted in the back or last position and then the position move one row. and the same thing happens when we access data.
So we have to track
  • Top position
  • Last position
First, create a class with a constructor. In the constructor take an int type data. It will use for initializing the circular queue with size.
class CircularQueueK(size: Int){
}
Create an array with size and also create 2 variable that mentions above.
private val list:Array<Any> = Array(size,{ i: Int -> i })
private var head = 0
private var tail = 0

we have to implement 2 additional method
  • isFull() ->  this will return true if the queue is full, so we don't allow to insert more data.
  • isEmpty() -> this will return true if the queue is empty, so we don't allow dequeue the data.
Let's implement those-
fun isFull() = (tail + 1) % list.size == head
fun isEmpty() = head == tail

Code review of isFull():
In this method, we increase of tail with one the modules with list size and if the result is same as head then it is full. For example, At first, the head is 0, so insert data and tail are increasing, assume that our list size is 5, so at the 4 index it will be filled and the tail is now 4.
Now, when this method is called then first increase tail, and modulus with the list size. Increase the tail to 5 and list size is 5, then the modulus is zero, and it is equal to the head. So it's now empty. because it's come back to the start position.

enqueue():
First, check the circular queue is full or not, If full the return.
Insert data in the list at the tail position
Insert the value in the tail as we did on the if full method
fun enqueue(value: Any){
    if (isFull()){
        return
    }

    list[tail] = value
    tail = (tail+1) % list.size
}

dequeue():
First, check the circular queue is empty or not. if empty return
Get data from the head position
assign new value of the read same as enqueue()
fun dequeue():Any{

    var a:Any = ""

    if (!isEmpty()){
        a = list[head]
        head = (head +1) % list.size
    }

    return a
}

Code analysis:
head = (head +1) % list.size
what is actually happening under the hood?
For example, assume the list size is 5 and head position is now 4.
Now if we want to access data from the list then it is the last position of the list. so we don't access next data.
This is the main problem in the queue. But in the circular queue head and tail position is circled from zero to list position.
so now our goal is to initialize head position to again start point.
If the head is 4 then with increase 1 and modules with the list size, and the result is zero.
So, it's back again.
In the circular queue, at least one position is to remain blank for this purpose.

Ok, one more extra method to go-
fun iterator() = list.withIndex()

Now time for testing
Create the main method-
fun main(args: Array<String>) {
}

Create an instance of the circular queue.
val queue = CircularQueueK(5)

enqueue():
run a while loop until the circular queue is full
var s = 0

while (!queue.isFull()){
    queue.enqueue(s)
    s++
}

Check the list:
run a for loop with the help of iterator() function that we created earlier.
for ((i,v) in queue.iterator()) {
    println("Index:$i and value:$v")
}
Output:
Index:0 and value:0
Index:1 and value:1
Index:2 and value:2
Index:3 and value:3
Index:4 and value:4

dequeue():
just call dequeue method for 3 times and print the value
println("\nGet value1:${queue.dequeue()}")
println("Get value2:${queue.dequeue()}")
println("Get value3:${queue.dequeue()}")
Output:
Get value1:0
Get value2:1
Get value3:2

now enqueue() again:
var d = 10
while (!queue.isFull()){
     queue.enqueue(d)
     d++
}

Compare this list with the previous result-
print all data from the circular queue
for ((i,v) in queue.iterator()) {
    println("Index:$i and value:$v")
}
Output:
Index:0 and value:11
Index:1 and value:12
Index:2 and value:2
Index:3 and value:3
Index:4 and value:10

Result analysis:
If you compare this output with the previous output you will see the changes.
we call dequeue() function for 3times, that means we get 3 data from the circular queue. So 3 position is empty now.
We enqueue() again, and only 3 data is inserted on the position of the array is 4, 1, 2 and now the head position is 3. so circulated.

That's the ending of the circular queue()
Thank you, for reading.
Happy coding.

Friday, June 1, 2018

Kotlin Data Structure: Queue

Welcome to this post.
This is the second post about data Structure.
In this post, we are going to learn about Queue data structure.

In the previous post, we discuss Stack. Stack is FILO type data structure.
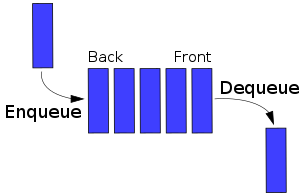
But Queue is the FIFO data structure, that means the data enter first that also come first.
queue data structure in kotlin
Src: Wikipedia
In queue, to data in the queue, the method is called enqueue()  
and to get data from queue, the method is dequeue()

Implementation of Queue:
In the above picture, you can see that data inserted in the back or last position and then the position move one row. and the same thing happens when we access data.
So we have to track
  • Top position
  • Last position
Create an array of Int' and also create 2 variable that mentions above.
var ints = IntArray(10)
var head = 0
var tail = 0

Methods:
enqueue():
insert data in the tail position and increase the tail
fun enqueue(n: Int) {
    ints[tail] = n
    tail += 1
    println("Input:" + n)
}
dequeue():
get data from head position index from the array and increase the head
fun dequeue(): Int {
    val n = ints[head]
    head += 1
    return n
}
Empty check:
if head and tail is same then the stack is empty
val isEmpty: Boolean
        get() = head == tail

Now time for access data:
First, create the main method:
fun main(arg: Array<String>) {
}
enqueue():
just run a for loop from 0 to 10 and insert data
for (i in 0..9) {
     enqueue(i)
}
Output:
Input:0
Input:1
Input:2
Input:3
Input:4
Input:5
Input:6
Input:7
Input:8
Input:9
works fine.
dequeue()
run a while loop until the queue is empty
while (!isEmpty) {
    println("value: " + dequeue())
}
Output:
value: 0
value: 1
value: 2
value: 3
value: 4
value: 5
value: 6
value: 7
value: 8
value: 9

It's work fine.
That's is the basic queue implementation.
You can check this out on Github

Discussion about queue:
The uses of the basic queue are not huge. It has a very limited use.
Because it wastes memory.
For example, if the queue has the capacity of 100. Then at the beginning data inserted from zero, when we access data from one we can get that data from the zero position. After the head is also increased and the tail already increased. Imagine by this way at 99 position data is filled and we access data from the 99 potions. If we want to insert new data into the queue it shows you a warning, "hey! I am full, I can not take any new data". But already the previous position is empty and there is no way to insert new data in the queue. we can use the previous position. But it allocates the memory. This is obviously the waste of memory. see the picture for the more clear concept.

Queue Data structure


To fix this problem we use the circular queue

Circular Queue
Circular Queue


In circular queue top position and the last position move around a circle. I will discuss circular queue in the next post.

Until then, stay happy and keep practicing.
Thank you for reading this post. 
Happy coding