Sunday, December 24, 2017

Android Material SearchView with Recent Search Suggestions

December 24, 2017

Welcome to this post.

In this post, I am going to cover Android Search View with Recent Search Suggestion.

In a previous post, I already cover Android Material SearchView. In that post, I use a 3rd party library. If you want to use 3rd party library to add search functionality, see this post. Android Material SearchView

But Now I don't want to use any 3rd party library.
In this post, I use:
  • Search Widget
Let's start:
create a new activity:(In my case, I named it: SearchActivity)
First jump into XML code-

Read More

Sunday, September 24, 2017

Android Share Action Provider

September 24, 2017

Welcome to my Blog.
In this post, I am going to talk about android share action provider.

android shareActionProvider tutorial @androidSketchPad


What is Share Action Provider?
Share action provider is just a provider for share some action. we just create a that enable data sharing and also to show a submenu with sharing activities if the hosting item is placed on the overflow menu.

In this post, I will show you how can you add this feature in your app. Let's start What we need to do for adding share action provider? It's very simple step. We just need to create a view on menu.xml file add reference it from the java class. That's it.

First, create an XML file on res -> menu folder
<item android:id="@+id/action_share"
        android:title="@string/share"
        app:showAsAction="ifRoom"
        app:actionProviderClass="android.support.v7.widget.ShareActionProvider"/>


Code analysis:
1. android:id -> we need an id for the call this view
2. android:title -> set a title, for this view3. app:showAsAction -> here I use "If room". Also available some other action too.
here a short list of action and their work

  • If room -> if there is enough space on action bar then it will 
  • show always -> it will show this view always in the action bar 
  • never -> for this action, this view will never show
  • collapseActionView -> This item's action view collapses to a normal menu item. 
  • with text -> this will show the icon with text that defines on android: title on the XML file.
4. actionProviderClass -> here we need to set action provider class. We are working on Share action provider, so we need to set-
android.support.v7.widget.ShareActionProvider

Time for java code-
Create a global variable of Share action Provider Class;
ShareActionProvider myShareActionProvider;
Now come on onCreateOptionsMenu() method initializes this by using getActionProvider() method class of MenuItemCompat
myShareActionProvider = (ShareActionProvider) MenuItemCompat.getActionProvider(shareItem);
set a share intent
myShareActionProvider.setShareIntent(createShareIntent());
Creta a method that's return Intent
private Intent createShareIntent() {
        Intent shareIntent = new Intent(Intent.ACTION_SEND);
        shareIntent.setType("text/plain");
        String s = "welocme to android sketchPad";
        shareIntent.putExtra(Intent.EXTRA_TEXT, s);

        return shareIntent;
    }
Now we create another method that name update share action provider: note: don't forget to cheek shareActionProvider is not null
private void resetShareActionProvider(String word) {
        if (myShareActionProvider != null) {
            Intent shareIntent = new Intent(Intent.ACTION_SEND);
            shareIntent.setType("text/plain");
            shareIntent.putExtra(Intent.EXTRA_TEXT, word);

            myShareActionProvider.setShareIntent(shareIntent);
        }
    }
Now you can use this method anywhere you want and update intent for this share action provider.

we just finished all code for adding share action prover. But ...

we can do this also various way, here is another one,
Create a global Variable of ShareActionProvider and initialize it on the on Create menu option (same as previous) now create an Intent where you have data and bind your data on and set this intent to ShareActionProvider variable
see the code:
Intent shareIntent = new Intent(Intent.ACTION_SEND);
shareIntent.setType("text/plain");
String s = "welome to Android SketchPad";
shareIntent.putExtra(Intent.EXTRA_TEXT, s);

if (myShareActionProvider != null) {
    myShareActionProvider.setShareIntent(shareInten);
}
       
If you are using loader manager then do this task on the onLoadFinished() method

Fix app crashing: 
If you use proguard in your project, then your app will be crashed on release mode. To fix this you need to add below line on the proguard-project.txt
-keep class android.support.v7.widget.ShareActionProvider { *; }

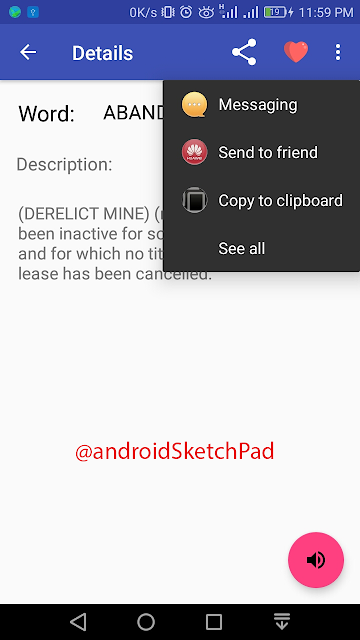
Final screen shot:
share action provider @android SketchPad


Another One:
Share action Provider 2@android SketchPad


That's it:
That's the ending of today code. now you can add this option to your app. In this post, I just show you a basic tutorial about share action provider. In share action provider I just share text, but you can share image, document, video, audio and much more.

Thanks for reading this post.
Happy coding.

Read More

Friday, June 16, 2017

Android Spinner and it's adapter

June 16, 2017

Welcome to this post. In this post, we going to learn about Spinner.

Spinner is really awesome to give user choice to select from a small list. you can use the spinner to get a value from a list.

In this project, we are going to create a list that shows a list in the spinner.
The list has 3 items-

  • Everyday
  • Today
  • Schedule


Let's start- layout name as you want.

I create a fragment that contains a spinner and a text view. I am currently using the same spinner in two or more file so I use the fragment. But you can use on your desired layout.

Note: I use Java and Kotlin code simultaneously. First is java and the second one is Kotlin.

Let's add XML Code-
<android.support.constraint.ConstraintLayout
    xmlns:android="http://schemas.android.com/apk/res/android"
    xmlns:app="http://schemas.android.com/apk/res-auto"
    android:layout_width="match_parent"
    android:layout_height="wrap_content"
    android:orientation="vertical">

    <TextView
        android:id="@+id/textView2"
        android:layout_width="0dp"
        android:layout_height="wrap_content"
        android:layout_margin="8dp"
        android:layout_marginLeft="8dp"
        android:layout_marginRight="8dp"
        android:layout_marginTop="8dp"
        android:padding="10dp"
        android:text="@string/select_task_type"
        app:layout_constraintLeft_toLeftOf="parent"
        app:layout_constraintRight_toRightOf="parent"
        app:layout_constraintTop_toTopOf="parent"/>

    <Spinner
        android:id="@+id/spinner"
        android:layout_width="0dp"
        android:layout_height="wrap_content"
        android:layout_margin="8dp"
        android:layout_marginLeft="8dp"
        android:layout_marginRight="8dp"
        android:layout_marginTop="16dp"
        android:padding="10dp"
        android:visibility="visible"
        app:layout_constraintLeft_toLeftOf="parent"
        app:layout_constraintRight_toRightOf="parent"
        app:layout_constraintTop_toBottomOf="@+id/textView2"/>

</android.support.constraint.ConstraintLayout>
Now you can use this layout in any other layout. Now time to write java code-
private Spinner spinner;
assign view
spinner = (Spinner) findViewById(R.id.spinner);

In kotlin, we need to add only one line.
val spinner: Spinner = findViewById(R.id.spinner)

Now create a list
 // Spinner Drop down elements
List<String> categories = new ArrayList<>();
categories.add(MainActivity.EVERYDAY);
categories.add(MainActivity.TODAY);
categories.add(MainActivity.SCHEDULE);
Kotlin:
val categories = ArrayList<String>()
categories.add("EVERYDAY")
categories.add("TODAY")
categories.add("SCHEDULE")
Now create an adapter for this spinner-
 // Creating adapter for spinner
ArrayAdapter dataAdapter = new ArrayAdapter<>
     (this, android.R.layout.simple_spinner_item, categories);
Kotlin:
val dataAdapter = ArrayAdapter(this, android.R.layout.simple_spinner_item, categories)
Now add a drop-down layout style with list view with radio button
dataAdapter.setDropDownViewResource(android.R.layout.simple_spinner_dropdown_item);
Kotlin:
dataAdapter.setDropDownViewResource(android.R.layout.simple_spinner_dropdown_item);
set data adapter to spinner
spinner.setAdapter(dataAdapter);
Kotlin:
spinner.adapter = dataAdapter

I add a method to get selected data from the list- In my case method name is getTaskType.
we have to do-
1. we need to add setOnItemSelectedListener to our spinner
2. so we also override two methods name
i) onItemSelected -> when we select something then this method is called
ii) onNothingSelected -> if the user is not select anything

Let's see the code-
//get task type from spinner
private String getTaskType() {

      final String[] tasks = new String[]{null};

      // Spinner click listener
        spinner.setOnItemSelectedListener(new AdapterView.OnItemSelectedListener() {
          @Override
          public void onItemSelected(AdapterView<?> parent, View view, 
                    int position, long id) {
              tasks[0] = parent.getItemAtPosition(position).toString();
            }

          @Override
          public void onNothingSelected(AdapterView<?> parent) {
              //do nothing
          }
      });

     return tasks[0];
}

Kotlin:
private fun getTaskType(spinner:Spinner):String {

        var tasks = "no text"

        // Spinner click listener
        spinner.onItemSelectedListener = object : AdapterView.OnItemSelectedListener {
            override fun onItemSelected(parent: AdapterView<*>, view: View, position: Int, id: Long) {
                tasks = parent.getItemAtPosition(position).toString()
            }
            
            override fun onNothingSelected(parent: AdapterView<*>) {
                //do nothing
            }
        }
        
        return tasks
    }

That's it.
this post will help you in both case, if you are working with java or kotlin.
Now you can use the spinner in your project.
Happy coding.

Read More

Thursday, June 15, 2017

RecyclerView OnClick Listener again

June 15, 2017

RecyclerVIew On Click listener Image
RecyclerView is the more flexible than ListView. Now we all use RecyclerView. But In the RecyclerVIew there is a problem that it's not come with the listener. So we can not handle click event easily. I already post a method to handle click event click here. Here are an another methods to handle click event.
Note: In this post, I just show only some methods where you have to change not full code.

Benefits of the methods are you can use this click listener in your activity, not adapter class.
If you want to learn about full recycle view code like the adapter and viewHolder class sees this post. 

Processes-
 1. First, you need to add an interface (you can add interface in separate interface file or declare in on inner class). I add on Adapter class
public interface ClickListener{
    void onItemClickListener(String s);
}
Note: If you need long click listener then create another method and add on view holder class. I add a method on interface name  OnItemClickListener and add parameter String because we need a string to send another activity.

 2.Now modify the default constructor of adapter class
private ClickListener clickListener;

    /**
     * Constructor for the CustomCursorAdapter
     * @param clickListener to handle click event
     */
    public CustomCursorAdapter(ClickListener clickListener) {
        this.clickListener = clickListener;
    }
3. Implements view.OnClickListener on viewHolder class. See this
class MyViewHolder extends RecyclerView.ViewHolder implements View.OnClickListener {

        // Class variables for the task description and priority TextViews
        TextView word;

        /**
         * Constructor for the TaskViewHolders.
         *
         * @param itemView The view inflated in onCreateViewHolder
         */
        private MyViewHolder(View itemView) {
            super(itemView);

            word = (TextView) itemView.findViewById(R.id.mainRecycleView_TV);

            word.setOnClickListener(this);
        }

        @Override
        public void onClick(View v) {
            mCursor.moveToPosition(getAdapterPosition());
            int wordIndex = mCursor.getColumnIndex(COLUMN_WORD);
            String word = mCursor.getString(wordIndex);
            //get word from cursor and set it to click listener parameter
            // we can easily access form click event methods
            clickListener.onItemClickListener(word);
        }
    }
on the Onclick listener method, we take String from array or Cursor and send as our interface method parameter. Now can easily access this string on the main activity. 4. Now time to  Use - implements the interface that's we created earlier,
public class MainActivity extends AppCompatActivity
        implements CustomCursorAdapter.ClickListener {
   

       //some code

}

After that's
/** onClick listener for recycler view
     * called if click any item on recycler view
     * @param word is the selected word from data base
     */
    @Override
    public void onItemClickListener(String word) {
        Intent intent = new Intent(MainActivity.this, DetailsActivity.class);
        intent.putExtra(Intent.EXTRA_TEXT,word);
        startActivity(intent);
}


Using adapter
CustomCursorAdapter mAdapter = new CustomCursorAdapter(this);
recyclerView.setAdapter(mAdapter);

Thanks for reading this post.

I hope your code is running well. And you can handle the click event on RecyclerView more easily. But once again full code post of recyclerview is here.
 If you have any queries then use comment option I will help you.


Happy coding :p

Read More

Android Night Mode

June 15, 2017

welcome to this post.In this post we are going to learn about how to use night mode on Android app. you can turn on night mode in your app by using android support library. you can use this option in settings or in the menu item.

night_mode
Night mode


In this case, I use this on settings. In a past post, we learn how to make app settings you can take a look
Let's start-
First, add new file name colors.xml in values-night folder and some colors-
<resources>
  <color name="colorPrimary">#051358</color>
  <color name="colorPrimaryDark">#020620</color>
  <color name="colorAccent">#800931</color>
  <color name="textColorPrimary">#e2dede</color>

  <color name="colorFabPressed">#1e710b</color>
  <color name="colorFabRipple">#0b0b3d</color>
  <color name="colorFabShadow">#66030303</color>

  <color name="colorFabToday">#385437</color>
  <color name="colorFabEveryday">#54364a</color>

  <color name="colorFabLabel_txt">#f2f1f1</color>
  <color name="colorFabLabelNormal">#232520</color>
  <color name="colorFabLabelPressed">#66626660</color>
  <color name="colorFabLabelRipple">#66844182</color>

</resources>
Note: add this color but you can only just add that's the color you want to override in night mode. Take a look on my values->colors.xml file then you can take a clear look on it.
<resources>
  <color name="colorPrimary">#3F51B5</color>
  <color name="colorPrimaryDark">#303F9F</color>
  <color name="colorAccent">#FF4081</color>
  <color name="textColorPrimary">#0e0e0e</color>

  <color name="colorFabPressed">#50ea2d</color>
  <color name="colorFabRipple">#2a23e7</color>
  <color name="colorFabShadow">#66626660</color>

  <color name="colorFabToday">#5d895a</color>
  <color name="colorFabEveryday">#704862</color>

  <color name="colorFabLabel_txt">#f2f1f1</color>
  <color name="colorFabLabelNormal">#232520</color>
  <color name="colorFabLabelPressed">#66626660</color>
  <color name="colorFabLabelRipple">#66844182</color>
</resources>
Now time to change your style- your style might look like this-
<!-- Base application theme. -->
  <style name="AppTheme" parent="Theme.AppCompat.Light.DarkActionBar">
  <!-- Customize your theme here. -->
  <item name="colorPrimary">@color/colorPrimary</item>
  <item name="colorPrimaryDark">@color/colorPrimaryDark</item>
  <item name="colorAccent">@color/colorAccent</item>
  
  </style>
Now change Theme.AppCompat.Light.DarkActionBar to Theme.AppCompat.DayNight.DarkActionBar. Let's do this-
<!-- Base application theme. -->
  <style name="AppTheme" parent="Theme.AppCompat.DayNight.DarkActionBar">
  <!-- Customize your theme here. -->
  <item name="colorPrimary">@color/colorPrimary</item>
  <item name="colorPrimaryDark">@color/colorPrimaryDark</item>
  <item name="colorAccent">@color/colorAccent</item>
  
  </style>
Look like you complete 50% work Now come to the java code- I am using settings so night is enabled not that's saved in a shared preference. Shared preferences key-
<string name="switchKey">SwitchKey</string>
Now create a method that is checked is night mode is enable or not. The default value is false-
public static boolean getNightModeEnabled(Context context) {

        SharedPreferences preferences = PreferenceManager.getDefaultSharedPreferences(context);

        return preferences.getBoolean(context.getString(R.string.switchKey), false);
    }
Now Create a new Methods that's set Night mode in any activity-
Follow those steps-
1. call the newly created methods and save the return value on a boolean.
2 If the value is true the we write AppCompatDelegate.setDefaultNightMode(AppCompatDelegate.MODE_NIGHT_YES) on the if condition.
3. If it false then we add AppCompatDelegate.setDefaultNightMode(AppCompatDelegate.MODE_NIGHT_NO)this line.

see the code-
//set night mode for app
    private void setNightMode() {

        //get from setting check bok preference is true or false
        boolean isEnabled = getNightModeEnabled(this);

        if (isEnabled) {
            AppCompatDelegate.setDefaultNightMode(
                    AppCompatDelegate.MODE_NIGHT_YES);
        } else {
            AppCompatDelegate.setDefaultNightMode(
                    AppCompatDelegate.MODE_NIGHT_NO);
        }
    }
Final Screen short

day_mode
Day Mode

night_mode
Night mode


Thank you for reading this post hope you can use this option in your app
Happy coding

Read More

Wednesday, June 14, 2017

Android Material SearchView

June 14, 2017

Welcome to this post.
Android Material Search view tutorial. In this tutorial, we going to make a project and Implement A search view on the toolbar.
For search view, I use a 3rd party library Material SearchView

Note: If you don't want to use 3rd party library see this post,  Android Material SearchView with Recent Search Suggestions

Let's start-
Before starting, see a screenshot-
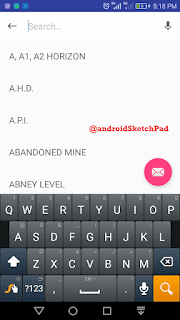
material_search_view
Material Search View


we have to do with this project-
1. we set search view on the toolbar.
2. Filter RecyclerView with text input
3. voice search

some bonus- In this project,
1. use SQL database for store data2. use the content provider to access data.
3. use Loaders for load data(Curser loaders).

Let's Start- First, add this line to your build.gradle file and sync gradle.
compile 'br.com.mauker.materialsearchview:materialsearchview:1.2.2'
Now go to on your style.xml file and below style-
<style name="MaterialSearchViewStyle">
  <item name="searchBackground">@color/white_ish</item>
  <item name="searchVoiceIcon">@drawable/ic_action_voice_search</item>
  <item name="searchCloseIcon">@drawable/ic_action_navigation_close</item>
  <item name="searchBackIcon">@drawable/ic_action_navigation_arrow_back</item>
  <item name="searchSuggestionBackground">@color/search_layover_bg</item>
  <item name="searchBarHeight">?attr/actionBarSize</item>
  <item name="voiceHintPrompt">@string/hint_prompt</item>
  <item name="android:textColor">@color/black</item>
  <item name="android:textColorHint">@color/gray_50</item>
  <item name="android:hint">@string/search_hint</item>
  <item name="android:inputType">textCapWords</item>
  </style>
OK, now time to add a toolbar to the layout. In this case, I add on activity_main.xml
<RelativeLayout xmlns:android="http://schemas.android.com/apk/res/android"
  android:layout_width="match_parent"
  android:layout_height="?attr/actionBarSize"
  tools:context=".MainActivity"
  android:background="@color/colorPrimary"
  android:layout_marginBottom="2dp"
  android:elevation="6dp">
  <!-- don't forget to set elevation or it look like old action bar-->

  <android.support.v7.widget.Toolbar
  android:id="@+id/toolbar"
  android:layout_width="match_parent"
  android:layout_height="?attr/actionBarSize"
  android:background="?attr/colorPrimary"
  android:theme="@style/ThemeOverlay.AppCompat.Dark.ActionBar"
  app:popupTheme="@style/ThemeOverlay.AppCompat.Light" />

  <br.com.mauker.materialsearchview.MaterialSearchView
  android:id="@+id/search_view"
  android:layout_width="match_parent"
  android:layout_height="match_parent"
  style="@style/MaterialSearchViewStyle"/>

  </RelativeLayout>
Note: I will provide GitHub link to this project later in this post

Now add a menu button on menu.xml-
<item
  android:id="@+id/action_search"
  android:icon="@drawable/ic_search"
  android:orderInCategory="100"
  android:title="@string/abc_search_hint"
  app:showAsAction="always" />

options menu looks like:
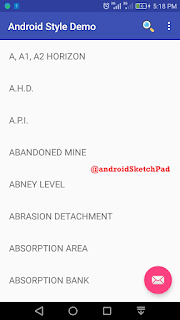
menu
Material Search View (options menu)


Now time to write java code- In this case MainActivity.java
MaterialSearchView searchView;
and again this view on onCreate-
searchView = (MaterialSearchView) findViewById(R.id.search_view);

now set all search operation I created a private method and call it on Oncreate-
In this method, we add three listeners to the search view-
1. setOnQueryTextListener
2. setSearchViewListener
3. setOnVoiceClickedListener In listener

1. setOnQueryTextListener is fired when we type text in the search view. In this listener, we have to override two methods name-
i. onQueryTextSubmit
ii. onQueryTextChange

i. onQueryTextSubmit is called when we put the query data with submit button.
after submit-
* build a URI
* call getContentResolver and query database and save it on cursor variable.
 * if the cursor is not null and cursor data is more than 0 we have data(Call cursor.getCount())
* so we go to the details activity with intent and set this URI with intent
*close search view

ii. onQueryTextChange is called every time when you write.
So we have to set-
* we are going to update recycler view with type text
* we check the text length is greater than zero
* then we create a selection string variable for cursor query. we use SQL LIKE statement not where statement.
String selection = MainWordDBContract.Entry.COLUMN_WORD +" like ? ";
* add also selection Argument-
String[] selectionArg = new String[]{newText+"%"};
* same way to get cursor and same condition for update UI as onQueryTextSubmit

Let's see the code-
searchView.setOnQueryTextListener(new MaterialSearchView.OnQueryTextListener() {
  @Override
  public boolean onQueryTextSubmit(String query) {

  Uri uri = MainWordDBContract.Entry.buildUriWithWord(query.toUpperCase());
  Cursor cursor = getContentResolver().query(uri,
  MainActivity.projection,null,null,null);

  if (cursor != null && cursor.getCount() > 0){
  Intent intent = new Intent(MainActivity.this,
  DetailsActivity.class);
  intent.setData(uri);
  startActivity(intent);
  searchView.closeSearch();
  searchView.setCloseOnTintClick(false);
  }

  if (cursor != null){
  cursor.close();
  }
  return true;
  }

  @Override
  public boolean onQueryTextChange(String newText) {

  if (newText.length() > 0){
  String selection = MainWordDBContract.Entry.COLUMN_WORD +" like ? ";
  //if you are try to search from any position of word
  //then use
  //String[] selectionArg = new String[]{"%"+newText+"%"};
  //if you try to search from start of word the use this line
  String[] selectionArg = new String[]{newText+"%"};

  Cursor cursor = getContentResolver().query(MainWordDBContract.Entry.CONTENT_URI,
  MainActivity.projection,selection,selectionArg,null);

  if (cursor != null && cursor.getCount() > 0){
  mAdapter.swapCursor(cursor);
  }

  return true;
  } else {
  return false;
  }
  }
  });
Now add the setSearchViewListener listener and there are also two methods.
* if search view is open then hide the fab
* if searchView close the show the fab again Code-
searchView.setSearchViewListener(new MaterialSearchView.SearchViewListener() {
  @Override
  public void onSearchViewOpened() {
  fab.hide();
  }

  @Override
  public void onSearchViewClosed() {
  fab.show();
  }
  });
On the last, we have added setOnVoiceClickedListener if you are using this option. for this, I write another method name askSpeechInput so let's see the code one by one- the listener-
searchView.setOnVoiceClickedListener(new MaterialSearchView.OnVoiceClickedListener() {
  @Override
  public void onVoiceClicked() {
  askSpeechInput();
  }
  });
method-
private void askSpeechInput() {
  Intent intent = new Intent(RecognizerIntent.ACTION_RECOGNIZE_SPEECH);

  intent.putExtra(RecognizerIntent.EXTRA_LANGUAGE_MODEL,
  RecognizerIntent.LANGUAGE_MODEL_FREE_FORM);

  intent.putExtra(RecognizerIntent.EXTRA_LANGUAGE, Locale.getDefault());
  intent.putExtra(RecognizerIntent.EXTRA_PROMPT,
  "Speak your desire word");
  try {
  startActivityForResult(intent, MaterialSearchView.REQUEST_VOICE);
  } catch (ActivityNotFoundException a) {
  a.printStackTrace();
  slet("Activity not found", a);
  Toast.makeText(this, "Sorry Speech To Text is not " +
  "supported in your device", Toast.LENGTH_SHORT).show();
  }
  }
one more method to go. we are now overriding onActivityResult for getting voice input-
@Override
    protected void onActivityResult(int requestCode, int resultCode, Intent data) {

        if (requestCode == MaterialSearchView.REQUEST_VOICE && resultCode == RESULT_OK) {
            ArrayList<String> matches = data.getStringArrayListExtra(RecognizerIntent.EXTRA_RESULTS);
            if (matches != null && matches.size() > 0) {
                String searchWrd = matches.get(0);
                if (!TextUtils.isEmpty(searchWrd)) {

                    //Todo more accure on settings
                    searchView.setQuery(searchWrd, false);
                    Uri uri = MainWordDBContract.Entry.buildUriWithWord(searchWrd.toUpperCase());

                    Cursor cursor = getContentResolver().query(uri,
                            MainActivity.projection,null,null,null);

                    if (cursor != null && cursor.getCount() > 0){
                        Intent intent = new Intent(MainActivity.this, DetailsActivity.class);
                        intent.setData(uri);
                        startActivity(intent);
                        searchView.closeSearch();
                        searchView.setCloseOnTintClick(false);
                    }

                    if (cursor != null){
                        cursor.close();
                    }
                }
            }

            return;
        }
        super.onActivityResult(requestCode, resultCode, data);
    }

voice search screen short:
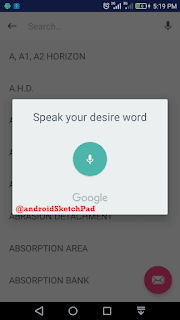
voice
Material Search View (voice search)


add this line onResume method
searchView.activityResumed();
and last one-
@Override
    public boolean onOptionsItemSelected(MenuItem item) {
        // Handle action bar item clicks here. The action bar will
        // automatically handle clicks on the Home/Up button, so long
        // as you specify a parent activity in AndroidManifest.xml.
        switch (item.getItemId()) {
            case R.id.action_search:
                // Open the search view on the menu item click.
                searchView.openSearch();
                return true;

            default:
                return super.onOptionsItemSelected(item);
        }
    }
Now run your app and see the material search view

It will work fine.

Note: If you don't want to use 3rd party library to add search functionality, see this post.Android Material SearchView with Recent Search Suggestions
Thank you for reading

Happy coding
Read More

Sunday, May 21, 2017

Android CollapsingToolbarLayout

May 21, 2017

Android CollapsingToolbarLayout is one of the most common features on android material design. By using collapsing toolbar we can now collapse our android app toolbar and use image or others things on the toolbar and that visibility is gone with collapse.

In this post, We will learn how to use Collapsing Tollbar layout.

Let's check documentation

Now start- First, add design dependence on your build.graddle file. (But it automatically added by the android studio. But lets a check)

dependencies {
    //some code
    compile 'com.android.support:design:23.0.1'
}

Now go to your XML file. In my case activity_main.xml it looks like-

<android.support.design.widget.AppBarLayout
        android:layout_width="match_parent"
        android:layout_height="wrap_content"
        android:theme="@style/AppTheme.AppBarOverlay">

        <android.support.v7.widget.Toolbar
            android:id="@+id/toolbar"
            android:layout_width="match_parent"
            android:layout_height="?attr/actionBarSize"
            android:background="?attr/colorPrimary"
            app:popupTheme="@style/AppTheme.PopupOverlay"/>

    </android.support.design.widget.AppBarLayout>

Now we add collapsing toolbar layout in AppBarLayout. Let's add-

<android.support.design.widget.CollapsingToolbarLayout
            android:layout_width="match_parent"
            android:layout_height="match_parent"
            android:id="@+id/main_collapsing_tb"
            app:layout_scrollFlags="scroll|exitUntilCollapsed"
            app:contentScrim="?attr/colorPrimary">

here we use scroll flag for how our layout should be scrolled. we want to scroll and exit until collapsed. now modify Toolbar. just adding a line.

app:layout_collapseMode="pin"

Now our collapsing toolbar is working. We here use only a toolbar in collapsing toolbar layout. But you can add picture and others things. If you are adding picture the modify code

app:layout_collapseMode="parallax"

Ok. That's it. If you miss some code or don't understand code where to use then see below full code.

<android.support.design.widget.AppBarLayout
        android:layout_height="@dimen/main_app_bar"
        android:layout_width="wrap_content"
        android:fitsSystemWindows="true"
        android:theme="@style/AppTheme.AppBarOverlay">

        <android.support.design.widget.CollapsingToolbarLayout
            android:layout_width="match_parent"
            android:layout_height="match_parent"
            android:id="@+id/main_collapsing_tb"
            app:layout_scrollFlags="scroll|exitUntilCollapsed"
            app:contentScrim="?attr/colorPrimary">

            <android.support.v7.widget.Toolbar
                android:id="@+id/toolbar"
                android:layout_width="match_parent"
                android:layout_height="?attr/actionBarSize"
                android:background="?attr/colorPrimary"
                android:layout_gravity="top"
                app:layout_collapseMode="pin"
                app:popupTheme="@style/AppTheme.PopupOverlay" />

        </android.support.design.widget.CollapsingToolbarLayout>
    </android.support.design.widget.AppBarLayout>
Thanks for reading this post.
Hope you are able to use this feature.


 Happy coding

Read More

Thursday, May 18, 2017

Android RecycleView and OnClickListener part 2

May 18, 2017

If you miss Part 1. Please Check Part 1 first by clicking here.

Now come back to your MainActivity.java follow some steps-
  • Create SubjectList type ArrayList
  • Create Adapter and initialize it
  • set adapter to RecyclerView by recyclerView.setAdapter(adapter);
  • at last, fill the array list.
See the code-
public class MainActivity extends AppCompatActivity {

    private ArrayList<SubjectList> arrayList;

    public static final String [] list = {
            "one", "two", "three",
            "four", "five", "six",
            "seven", "eight", "nine",
            "ten", "eleven", "twelve",
            "thirteen", "fourteen", "fifteen",
            "sixteen", "seventeen", "eighteen"

    };

    @Override
    protected void onCreate(Bundle savedInstanceState) {
        
        fillUpArray();
        
        //initialize adapter
        MainAdapter adapter = new MainAdapter(arrayList,this);

        recyclerView.setAdapter(adapter);

    }

    private void fillUpArray() {

        arrayList = new ArrayList<>();
        
        for (int i = list.length; i > 0 ; i--) {
            SubjectList sub = new SubjectList(list[(list.length)- i]);
            arrayList.add(sub);
        }

    }

}
That’s it. Now revise full code that we use here-

MainActivity.java

1:  package com.blogspot.shudiptotrafder.androidaio;  
2:    
3:  import android.content.Intent;  
4:  import android.os.Bundle;  
5:  import android.support.v7.app.AppCompatActivity;  
6:  import android.support.v7.widget.LinearLayoutManager;  
7:  import android.support.v7.widget.RecyclerView;  
8:  import android.util.Log;  
9:  import android.view.Menu;  
10:  import android.view.MenuItem;  
11:    
12:  import com.blogspot.shudiptotrafder.androidaio.main.MainAdapter;  
13:  import com.blogspot.shudiptotrafder.androidaio.main.SubjectList;  
14:    
15:  import java.util.ArrayList;  
16:    
17:  public class MainActivity extends AppCompatActivity {  
18:    
19:    private ArrayList<SubjectList> arrayList;  
20:    
21:    public static final String[] list = {  
22:        "one", "two", "three",  
23:        "four", "five", "six",  
24:        "seven", "eight", "nine",  
25:        "ten", "eleven", "twelve",  
26:        "thirteen", "fourteen", "fifteen",  
27:        "sixteen", "seventeen", "eighteen"  
28:    
29:    };  
30:    
31:    private static final String logTag = MainActivity.class.getSimpleName();  
32:    
33:    @Override  
34:    protected void onCreate(Bundle savedInstanceState) {  
35:      super.onCreate(savedInstanceState);  
36:      setContentView(R.layout.activity_main);  
37:    
38:      RecyclerView recyclerView = (RecyclerView) findViewById(R.id.main_recyView);  
39:    
40:      fillUpArray();  
41:    
42:      //initialize adapter  
43:      MainAdapter adapter = new MainAdapter(arrayList,this);  
44:    
45:      LinearLayoutManager linearLayoutManager = new  
46:          LinearLayoutManager(this,LinearLayoutManager.VERTICAL,false);  
47:    
48:      //setting layout manager  
49:      recyclerView.setLayoutManager(linearLayoutManager);  
50:      recyclerView.setNestedScrollingEnabled(false);  
51:      recyclerView.setAdapter(adapter);  
52:    
53:    }  
54:    
55:    private void fillUpArray() {  
56:    
57:      arrayList = new ArrayList<>();  
58:    
59:    
60:      for (int i = list.length; i > 0 ; i--) {  
61:        SubjectList sub = new SubjectList(list[(list.length)- i]);  
62:        arrayList.add(sub);  
63:        sl(String.valueOf(i));  
64:      }  
65:    
66:    }  
67:    
68:    private static void sl(String string){  
69:      if (BuildConfig.DEBUG){  
70:        Log.e(logTag,string);  
71:      }  
72:    }  
73:    
74:    //for option menu  
75:    @Override  
76:    public boolean onCreateOptionsMenu(Menu menu) {  
77:      // Inflate the menu; this adds items to the action bar if it is present.  
78:      getMenuInflater().inflate(R.menu.menu_main, menu);  
79:      return super.onCreateOptionsMenu(menu);  
80:    }  
81:    
82:    @Override  
83:    public boolean onOptionsItemSelected(MenuItem item) {  
84:    
85:      // Handle action bar item clicks here. The action bar will  
86:      // automatically handle clicks on the Home/Up button, so long  
87:      // as you specify a parent activity in AndroidManifest.xml.  
88:      int id = item.getItemId();  
89:    
90:      //noinspection SimplifiableIfStatement  
91:      if (id == R.id.action_settings) {  
92:        return true;  
93:      }  
94:    
95:      return super.onOptionsItemSelected(item);  
96:    }  
97:  }  
98:    

MainAdapter.java

1:  package com.blogspot.shudiptotrafder.androidaio.main;  
2:    
3:  import android.content.Context;  
4:  import android.content.Intent;  
5:  import android.support.v7.widget.RecyclerView;  
6:  import android.view.LayoutInflater;  
7:  import android.view.View;  
8:  import android.view.ViewGroup;  
9:  import android.widget.TextView;  
10:    
11:  import com.blogspot.shudiptotrafder.androidaio.LocationActivity;  
12:  import com.blogspot.shudiptotrafder.androidaio.R;  
13:  import com.blogspot.shudiptotrafder.androidaio.email.EmailValidationActivity;  
14:  import com.blogspot.shudiptotrafder.androidaio.fab.FabActivity;  
15:  import com.blogspot.shudiptotrafder.androidaio.string.StringFormatActivity;  
16:    
17:  import java.util.ArrayList;  
18:    
19:  /**  
20:   * AndroidAIO  
21:   * com.blogspot.shudiptotrafder.androidaio.main  
22:   * Created by Shudipto Trafder on 1/2/2017 at 10:22 PM.  
23:   * 
24:   */  
25:    
26:  public class MainAdapter extends RecyclerView.Adapter<MainAdapter.MainViewHolder> {  
27:    
28:    
29:    //Array list  
30:    private ArrayList<SubjectList> objects;  
31:    //context  
32:    private Context context;  
33:    
34:    //view holder class  
35:    class MainViewHolder extends RecyclerView.ViewHolder {  
36:    
37:      TextView textView;  
38:    
39:      private MainViewHolder(View itemView) {  
40:        super(itemView);  
41:        textView = (TextView) itemView.findViewById(R.id.main_card_tv);  
42:      }  
43:    }  
44:    
45:    //constructor  
46:    public MainAdapter(ArrayList<SubjectList> objects, Context context) {  
47:      this.objects = objects;  
48:      this.context = context;  
49:    }  
50:    
51:    @Override  
52:    public MainViewHolder onCreateViewHolder(ViewGroup parent, int viewType) {  
53:    
54:      View view = LayoutInflater.from(parent.getContext())  
55:          .inflate(R.layout.main_card_view,parent,false);  
56:      return new MainViewHolder(view);  
57:    }  
58:    
59:    @Override  
60:    public void onBindViewHolder(final MainViewHolder holder, int position) {  
61:    
62:      final SubjectList list = objects.get(position);  
63:    
64:      holder.textView.setText(list.getSubName());  
65:      holder.textView.setOnLongClickListener(new View.OnLongClickListener() {  
66:        @Override  
67:        public boolean onLongClick(View v) {  
68:          return false;  
69:        }  
70:      });  
71:    
72:      holder.textView.setOnClickListener(new View.OnClickListener() {  
73:        @Override  
74:        public void onClick(View v) {  
75:        context.startActivity(new Intent(context,EmailValidationActivity.class));  
76:        }  
77:      });  
78:    }  
79:    
80:    @Override  
81:    public int getItemCount() {  
82:      return objects.size();  
83:    }  
84:  }  
85:    
86:    

SubjectList

1:  package com.blogspot.shudiptotrafder.androidaio.main;  
2:    
3:  /**  
4:   * AndroidAIO  
5:   * com.blogspot.shudiptotrafder.androidaio.main  
6:   * Created by Shudipto Trafder on 1/3/2017 at 2:47 PM.  
7:   * 
8:   */  
9:    
10:  public class SubjectList {  
11:    
12:    private String subName;  
13:    
14:    public SubjectList(String subName) {  
15:      this.subName = subName;  
16:    }  
17:    
18:    public String getSubName() {  
19:      return subName;  
20:    }  
21:  }  
22:    

activity_main.xml

1:  <?xml version="1.0" encoding="utf-8"?>  
2:  <RelativeLayout  
3:    xmlns:android="http://schemas.android.com/apk/res/android"  
4:    xmlns:tools="http://schemas.android.com/tools"  
5:    android:id="@+id/activity_main"  
6:    android:layout_width="match_parent"  
7:    android:layout_height="match_parent"  
8:    android:paddingBottom="@dimen/activity_vertical_margin"  
9:    android:paddingLeft="@dimen/activity_horizontal_margin"  
10:    android:paddingRight="@dimen/activity_horizontal_margin"  
11:    android:paddingTop="@dimen/activity_vertical_margin"  
12:    tools:context="com.blogspot.shudiptotrafder.androidaio.MainActivity">  
13:    
14:    <android.support.v7.widget.RecyclerView  
15:      android:layout_width="match_parent"  
16:      android:layout_height="wrap_content"  
17:      android:layout_alignParentTop="true"  
18:      android:padding="10dp"  
19:      android:layout_alignParentStart="true"  
20:      android:id="@+id/main_recyView"/>  
21:    
22:  </RelativeLayout>  

main_card_view.xml

1:  <?xml version="1.0" encoding="utf-8"?>  
2:    
3:  <android.support.v7.widget.CardView  
4:    xmlns:android="http://schemas.android.com/apk/res/android"  
5:    android:layout_width="match_parent"  
6:    android:layout_height="wrap_content"  
7:    android:layout_marginTop="10dp"  
8:    android:elevation="10dp"  
9:    android:padding="10dp">  
10:    
11:    <TextView  
12:      android:id="@+id/main_card_tv"  
13:      android:layout_width="match_parent"  
14:      android:layout_height="wrap_content"  
15:      android:layout_gravity="center"  
16:      android:padding="10dp"  
17:      android:text="@string/app_name"  
18:      android:textSize="20sp"/>  
19:    
20:  </android.support.v7.widget.CardView>  
Now, this is the final picture of our RecyclerView with Simple List.
final picture rcv

Read More