Tuesday, August 28, 2018

Dependency Injection with KOIN to Androidx Jetpack

August 28, 2018

Welcome to this post.

A few months ago google launch jetpack. This library includes some new component, like Work Manager. The problem is if you want to use dependency injection, then you can not do easily. If you heard about dependency injection then the first library coming in our mind is Dagger. But the problem is Dagger still not support androidx.

A few days ago I work with a new project, and I decide to use Work manger. But the problem arises because I am used Dagger. I search and waste a couple of hours but the solution is not in the satisfaction level. Then I decide to move to KOIN.

This is the first time I use KOIN. And the problem is gone. And I found KOIN is very handy. I don't have to write a lot of code. Just a simple line configuration. Declaring module is also very easy.
you will see that too in this post.

So let's start KOIN
First, add dependencies of KOIN


implementation 'org.koin:koin-android:0.9.3'
implementation "org.koin:koin-androidx-viewmodel:1.0.0-beta-3"

Note: Don't forget to add room, viewmodel, and livedata dependencies.

Let's Create a database.
I use room.

I skipping this part. you probably know how to create database using room. (This post is about some advanced topics).

Code snippet:
Create a table, such as WordTable
@Entity
class WordTable(
        @PrimaryKey(autoGenerate = true)
        var id: Int = 0,
        var word: String = "",
        var des: String = "",
        var bookmark: Boolean = false,
        var addByUser: Boolean = false,
        var uploaded:Boolean = false
)

Now Data Accessing object(Dao), exp: WordTableDao
@Dao
interface WordTableDao {
    @Insert(onConflict = OnConflictStrategy.REPLACE)
    fun add(table: WordTable): Long

    @Update
    fun update(table: WordTable): Int

    @Delete
    fun delete(pageTable: WordTable): Int


    @Query("Select * From WordTable")
    fun getAllList(): List<WordTable>
}

All set, create the database class.

@Database(entities = [WordTable::class], version = 1,
        exportSchema = false)
abstract class MyDatabase:RoomDatabase(){
    abstract val wordTableDao: WordTableDao
}

So our class database is ready, but still, we don't create the database. We will create the database in the KOIN module declaration time.

Now create a ViewModel class.
we need only Dao. it will provide by KOIN. We ViewModel Class as the parent class.
In the class just create a method called getData()  and load data from the database and return.

class MainVM(private val wordTableDao: WordTableDao):ViewModel(){

    fun getData() = wordTableDao.getRandomData()

}

Now time for module declaration. See the code first, then I discussing code.
we have two module. The first one is dbModule

val dbModule = module {

    single {
        Room.databaseBuilder(androidContext(), MyDatabase::class.java,
                "SS").build()
    }

    single { get<MyDatabase>().wordTableDao }

}

code -
1. keyword: module, it's just a function that creating a koin module
2. To create an instance you have to use single (from this new version, in the old version, use been keyword)
3. in a single, create the database
4. another single, call get function and type MyDatabase and access the Dao.

The second module is vmModule,
Same as this module but this time use viewmodel instead of single.

val vmModule = module {
    viewModel {
        MainVM(get() as WordTableDao)
    }
}

Note: if you don't use the androidx version of KOIN then you get an error, in this module declaration

we finished all declaration. Now we are ready for using KOIN. But before using KOIN, we have to start KOIN. To start KOIN declare an application class.
and write a simple line of code-

startKoin(this, listOf(module_list)

See code-

class MyApp:Application(){

    override fun onCreate() {
        super.onCreate()
        startKoin(this, listOf(dbModule, vmModule))
    }
}

All set. Now inject the ViewModel in the Main activity.
Now hard here, just declare a variable type MainVM and use by keyword (for lazy injection) and call viewModel() function.

    private val viewModel: MainVM by viewModel()

See code-

class MainActivity : AppCompatActivity() {

    private val viewModel: MainVM by viewModel()

    override fun onCreate(savedInstanceState: Bundle?) {
        super.onCreate(savedInstanceState)
        setContentView(R.layout.activity_main)
        setSupportActionBar(toolbar)


        viewModel.getData().observe(this, Observer {
            //observe data
        })
    }

}

Now the most desired one-
we are going to inject in the worker class. Create a worker class. But this time you are injecting KOIN not supported class. Don't worry. KOIN has already built an option to solve this problem. You have to implement KoinComponent.
After that same, declare a variable and lazy injection call inject() function
    val wordTableDao: WordTableDao by inject()

See the code-

class MyWorker : Worker(), KoinComponent {

    val wordTableDao: WordTableDao by inject()

    override fun doWork(): Result {

        val table = WordTable()

        wordTableDao.add(table)
        
        return Result.SUCCESS
    }


}

That's it. We are done. We finished our goal.

If you check all of those code in Gist also. Click here.

So by using KOIN, you can easily inject on the Androidx component. But for the dagger case, it's not so easy as this.

So, it's your choice, to use dagger or koin.

Thanks for reading.
Hope this articles help you a lot.

Happy coding
Read More

Friday, June 8, 2018

Communication between View and ViewModel

June 08, 2018

Welcome to this post.

In this post, I am going to talk about, how to communicate between view and viewModel.

Let's take a look on ViewModel

ViewModel was introduced on Google I/O 17, a part of Lifecycle extensions. Now it's released version is 1.1.0.
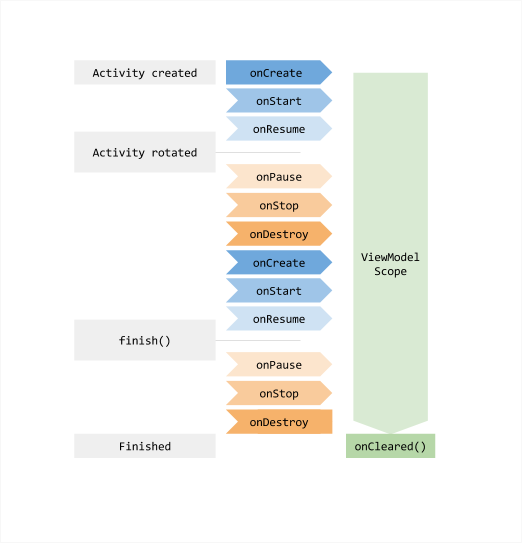
lifecycle
Src: Medium

From the picture, you can see that it launch with the creation of activity. And it will be cleared only when the activity is finished. The biggest advantage is that it can survive configuration changes.
You should not put any view reference in the viewModel. Why?
The answer is so simple When activity recreated the also. So if you pass view to ViewModel then it creates a leak, because, on the recreation of activity, all the views are brand new, but your ViewModel is still holding the older view that already destroyed.
Don't do this.

Now a question, so how to communicate between view and ViewModel?

Case Study:
Imagine you build an app that has an option for the user signup. When the user clicks signup button then
you can show a dialog and after successful signup, we have to show a notification or perform any task. In this case how you contact view and ViewModel.

Let's start-
To solve this problem I create a class that inherited Mutable Live Data Class.
class SingleLiveEvent<T> : MutableLiveData<T>() {

    private val pending = AtomicBoolean(false)

    @MainThread
    override fun observe(owner: LifecycleOwner, observer: Observer<T>) {

        if (hasActiveObservers()) {
            //Log.w(TAG, "Multiple observers registered but only one will be notified of changes.")
        }

        // Observe the internal MutableLiveData
        super.observe(owner, Observer<T> { t ->
            if (pending.compareAndSet(true, false)) {
                observer.onChanged(t)
            }
        })
    }

    @MainThread
    override fun setValue(t: T?) {
        pending.set(true)
        super.setValue(t)
    }

    /**
     * Used for cases where T is Void, to make calls cleaner.
     */
    @MainThread
    fun call() {
        value = null
    }

    companion object {
        private const val TAG = "SingleLiveEvent"
    }
}

This is the sample from google, it is the blueprint of architecture component. Check this.
But If you want to set a value from the main thread then it's ok. you can use this without changing anything.

But what about the background thread?
If you want to set a value from a background thread, then you have to override postValue() method.
override fun postValue(value: T) {
    pending.set(true)
    super.postValue(value)
}
If you have any confuse, then check GitHub

Create a status class
enum class Status{
    LOGIN,
    SIGNUP,
    FAILED
}

Now come on ViewModel Code:
create an instance of SingleLiveEvent
val observableEvent = SingleLiveEvent<Status>()

I create 3 mock methods, just with a thread that wait for 2 seconds and set the value on the variable, observableEvent.

mockLogin()
just set value from the main thread and start a new background thread.
fun mockLogin(){
    observableEvent.value = Status.LOGIN
    background()
}

mockSignup()
start a thread and wait for 2s and set value. and also start a new background thread.
fun mockSignUp(){
        Thread({
            try {
                Thread.sleep(2000) //2 sec wait
            } catch (e:Exception){
                //nothing
            } finally {
                observableEvent.postValue(Status.SIGNUP)
                //do some task from background
                background()
            }
        }).start()
    }

background()
start a background thread and with the handler and wait for 2s
private fun background(){
        val thread = HandlerThread("Background")
        thread.start()

        Handler(thread.looper).post({

            //wait for 2 sec
            Thread({
                try {
                    Thread.sleep(2000) //2 sec wait
                } catch (e:Exception){
                    //nothing
                } finally {
                    observableEvent.postValue(Status.FAILED)
                }
            }).start()
        })
    }

Now time for activity code:
I have 3 view
  • progress bar
  • login button
  • signup button
First, hide the progress bar
val progressBar:ProgressBar = progressBar
progressBar.gone()
Note, here I use an extension function. see here 

set onclick event for every button and also called the method from ViewModel

Login:
hide progress bar
button.setOnClickListener {
    progressBar.vis()
    viewModel.mockLogin()
}

Sign up:
hide progress bar
button2.setOnClickListener {
    progressBar.vis()
    viewModel.mockSignUp()
}

now observe that event and show toast message. see the code
viewModel.observableEvent.observe(this, Observer {
    if (it == Status.LOGIN){
        progressBar.gone()
        "Login Successful".showToast()
    } else if (it == Status.SIGNUP) {
        progressBar.gone()
        "Sign up Successful".showToast()
    }

    if (it == Status.FAILED){
        "Job Failed from background thread".showToast()
    }
})
here, showToast is another extension function
private fun String.showToast(){
    Toast.makeText(context, this, Toast.LENGTH_SHORT).show()
}

Now run the code and click the button see the toast message.

So, that's it.
you can find this project on GitHub

Thanks for reading.
Hope this tutorial will help you a lot.

Happy coding.

Read More

Friday, April 13, 2018

Android ThemeLibrary

April 13, 2018

Hello visitors,

After a long gap, I bring a post for you.
I don't like to waste your time anymore.

Let's start-
Today, I will write about a new library. The Library is about for android theming and color plate.

First of all, see some screenshot-
sample11

So you can see that this library has an awesome theme list. You can use this list and with your own additional list. You can also remove this list and use your own theme list.
It has a built-in night mode icon that switches On and Off night mode. The biggest advantage of this library is If you don't like this option you can turn off by one line of code.
See another screenshot (here night mode is enabled)
nightmode

So you can see that this is highly customizable.
Enough intro lets get started-

Read More

Tuesday, November 14, 2017

Android Settings Series (part 2)

November 14, 2017

Welcome to this series post.
In this series post, we are going to create a complete Settings for a productive app.

We already published a post-
Now I am starting where I left in the previous post.

Now we need to create other 2 XML file. (In our final settings we need 3 XML file, we already have done one.)

Read More

Saturday, November 11, 2017

Android Settings Series (part 1)

November 11, 2017

Welcome to this Series post.
In this series post, we are going to create a complete Settings for a productive app.

Basic overview of our final settings?

Our final settings contains-
  •  multiple preference screen 
In a previous post, I  cover android settings with a single preference screen (Android App Settings with Preference Fragment Compat).

we create 3 screen that's are-
  • General
  • Backup 
  • Advance
So we create multiple preference screen in the same XML file and after user click, we replace the fragment.
That's the deal,
Lets Start-

Read More

Monday, October 2, 2017

Android Common Code

October 02, 2017

All the common android code list that used almost every android project.

Here is the list of all code in this post:
  • Support vector drawable
  • PreferenceFragment support
  • Java 8 support
Support vector drawable:
to support vector drawable add below line on the build.gradle file
compile 'com.android.support:support-vector-drawable:26.1.0'
also adds below line on those activities where you use vector drawable.
static {
    AppCompatDelegate.setCompatVectorFromResourcesEnabled(true);
}

PreferenceFragment support:
add the following line on the build.gradle file
compile 'com.android.support:preference-v14:26.1.0'
adds also add below line on the style.XML file
<item name="preferenceTheme">@style/PreferenceThemeOverlay.v14.Material</item>
note: This line is for Material Theme support.

Java 8 support:
to support Java 8 add following line on the build.gradle file
// Keep the following configuration in order to target Java 8.
compileOptions {
    sourceCompatibility JavaVersion.VERSION_1_8
    targetCompatibility JavaVersion.VERSION_1_8
}


Read More

Wednesday, September 27, 2017

How to create Android Material App intro

September 27, 2017

Welcome to this post.

In this post, we are going to make awesome app into for android app.

app intro @androidSketchPad


Read More

Monday, September 18, 2017

Android text to speech tutorial

September 18, 2017

Welcome to this post. In this post, we are going to discuss android text to speech.
Before the start, check the official documentation of Android text to speech.

In my case, I use this option with a fab (Floating action button). When the user clicks on this fab button this text to speech is triggered and user heard the speech.
Let's start,
Implement TextToSpeech.OnIntListener on your activity class.
public class DetailsActivity extends AppCompatActivity implements
        TextToSpeech.OnInitListener {
}

Create an instance of TextToSpeech Class
private TextToSpeech toSpeech;

override onIint() methods and follow below steps:
 1. First, we need to check if Text to speech engine is installed or not
if (status != TextToSpeech.ERROR) {
}
2. If the status is not erroring then we set a default language, we set here the US as default.
int result = toSpeech.setLanguage(Locale.US);
3. now check language data is missing or not supported or not installed then we start for install this text to speech engine.
if (result == TextToSpeech.LANG_MISSING_DATA ||
    result == TextToSpeech.LANG_NOT_SUPPORTED ||
    result == TextToSpeech.ERROR_NOT_INSTALLED_YET) {

      Intent installIntent = new Intent();
      installIntent.setAction(
              TextToSpeech.Engine.ACTION_INSTALL_TTS_DATA);
      startActivity(installIntent);

}
if you missing something check the full code of onInit() method
@Override
    public void onInit(int status) {

        if (status != TextToSpeech.ERROR) {

            int result = toSpeech.setLanguage(Locale.US);

            if (result == TextToSpeech.LANG_MISSING_DATA ||
                    result == TextToSpeech.LANG_NOT_SUPPORTED ||
                    result == TextToSpeech.ERROR_NOT_INSTALLED_YET) {

                Intent installIntent = new Intent();
                installIntent.setAction(
                        TextToSpeech.Engine.ACTION_INSTALL_TTS_DATA);
                startActivity(installIntent);

            }

        }
    }
Create a method and add a single parameter, word as String. In my case, I named it as setTTS() and parameter is word as String,
setTTS(String selectedWord)
private void setTTS(String selectedWord) {

        if (Build.VERSION.SDK_INT >= Build.VERSION_CODES.LOLLIPOP) {
            toSpeech.speak(selectedWord, TextToSpeech.QUEUE_FLUSH, null, null);

        } else {
            toSpeech.speak(selectedWord, TextToSpeech.QUEUE_FLUSH, null);
        }

    }
Note: below methods is deprecated. So check if the device is lollipop and higher then use utterance as an extra parameter.

One more thing to go.
We need to shut down this TextToSpeech engine when the activity is destroyed. but before we need to check textToSpeech is null or not to avoid any error. If it is not null the call stop and shutdown method. see the code
@Override
protected void onDestroy() {
   super.onDestroy();
   if (toSpeech != null) {
       toSpeech.stop();
       toSpeech.shutdown();
    }
}

That's it 
you finished writing coding. Now call setTTS() method from anywhere in your project. You can use it as Button onClick or TextView onClick. Just pass a string parameter and call the method. As I told you, at the beginning of this post I am using this option in a fab button. you can that code by the following link. But don't be confused. This is the full activity code, so there is a lot of things with TextToSpeech. Click GitHub link.

Now you can use this code. Hope you understand this TextToSpeech logic. and you will be you use this option in your next or existing project.

Thanks for reading this post.
Happy coding.

Read More

Tuesday, September 5, 2017

How to connect firebase directly from android studio

September 05, 2017

welcome to firebase series.

In this post, we are going to learn about how to connect firebase from the android studio. This is the easiest methods ever.
we can directly connect firebase through the android studio.
Let's start-
open any project or create the new project
I am going throw picture by picture. Follow picture to picture for completing this process.

In android studio click tool and select firebase.
firebase1-androidSketchpad

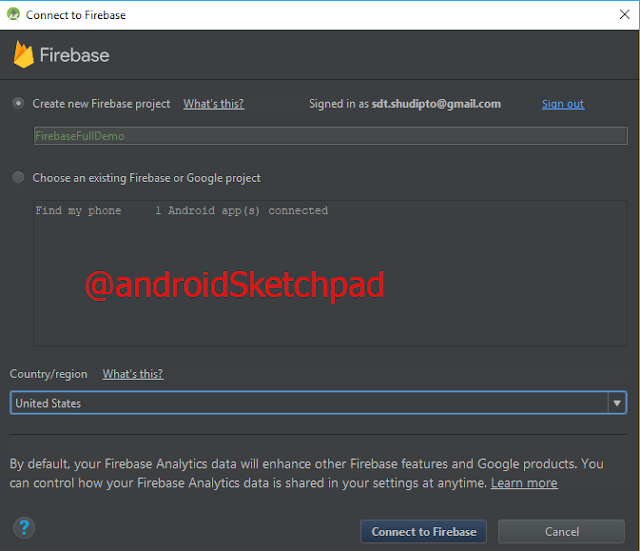
after click that it will open this window
firebase2-androidSketchpad

Now click any option. In my case, I use analytics
firebase3-androidSketchpad


click log on any event. After it will open this window
firebase4-androidSketchpad

Click connect to firebase
firebase5-androidSketchpad


after the process is finished it will open this window.
firebase6-androidSketchpad

Edit project name (this is for firebase project. it will show in the firebase only)  change your location.
firebase7-androidSketchpad


click on connect to the firebase
firebase8-androidSketchpad

after the finish of this  process, it will show will connect firebase
firebase9-androidSketchpad


succesfully connected now click add analytics to your app
firebase10-androidSketchpad

click accept. it will change your gradle file
firebase11-androidSketchpad

wait for finishing the gradle build.
firebase12-androidSketchpad


after gradle finish, this will show Dependices set up correctly.
firebase13-androidSketchpad

you can add more function by clicking the same process.
firebase14-androidSketchpad

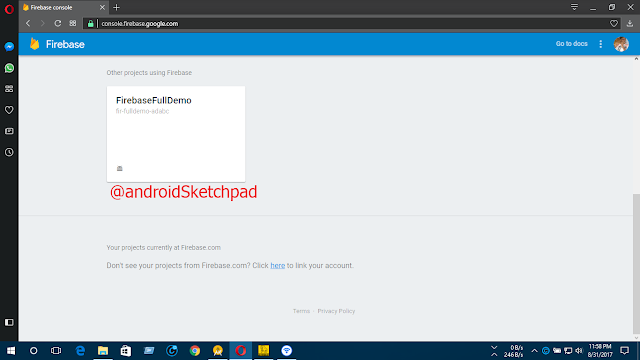
Now go to the firebase console
firebase15-androidSketchpad

this is our newly created process.
firebase15-androidSketchpad

That's it:
we successfully connected our project to firebase. This is the easiest methods ever. you don't need to add JSON file manually. All the file automatically add to your project.

Thank you for reading this post.
Happy coding.


Read More

Wednesday, August 30, 2017

How to set sign in anonymously in Firebase

August 30, 2017

welcome to firebase series tutorial.

In this post, we are going learn about how to sign in anonymously in firebase.
But before starting, I am providing you some ideas why we need sign in anonymously?
If you are using real-time database and storage you need to create a rule for access database and storage.
By default the rule is
{


  "rules": {

    ".read": "auth != null",

    ".write": "auth != null"

  }

}
here auth means Authentication. So if your app hasn't any login option you sign in anonymously sign in from your app. So by doing this, that database and storage can be access only from your app. so you can protect your database. Or if you change the rule to access everyone there is a possibility to lose your database. anyone can delete your database with in a single request.

So we sign in anonymously in Firebase from our app to protect database and storage.

Let's start,
you already know how to connect Firebase for your project.
now go to firebase console and select authentication.
click this to go directly Firebase Console.
Now go to sign in method

firebase-auth

and click anonymous and enable it.
firebase-auth1

that's the ending of the configuration of firebase console
now time for coding
Note: I use kotlin as a default language.

add below line to your build.gradle file
implementation 'com.google.firebase:firebase-auth:11.2.0'
Now create an instance of FirebaseAuth class
see the code-
val mAuth = FirebaseAuth.getInstance()
use signInAnonymously() method and add a complete listener. if the task is successful we show a message that Authentication is successful and also user id. if failed then we will show a fail message.
mAuth.signInAnonymously()
     .addOnCompleteListener(this, { task ->
         if (task.isSuccessful) {
                val user = mAuth.currentUser
                Toast.makeText(this, "Authentication successful. user id ${user.uid}",
                                Toast.LENGTH_SHORT).show()

            } else {
                // If the sign in fails displays a message to the user.
                Toast.makeText(this, "Authentication failed.",
                                Toast.LENGTH_SHORT).show()

                    }
                })
That's it coding see the final screen short in the firebase console
firebase-auth android sketchpad
you find some details about your user
1. creation date
2. signed in date
3. user id

That's it from this post hope this will help you to understand this concept.
and you will implement anonymous login option for your app and make a better security for your Firebase database and storage.
Happy coding

Read More

Friday, June 23, 2017

Android: Job Scheduler schedule you job

June 23, 2017

Welcome to the android tutorial.
android
Android

In this post, we talk about JobSchedular. A job scheduler is more effective than alarm manager. Want to see it benefits then check out this link.

For scheduling, you have many options to use.
1. Android Alarm manager
2. Job Scheduler
3. Gcm Network Manager

In the previous post, we talk about android alarm manager. Are you confused about those? which one is appropriate for your android app. Read this document Become a pro at scheduling tasks in Android

Now come to code- Before starting we have to add below line in the build.gradle file
compile 'com.firebase:firebase-jobdispatcher:0.5.0'
Now we need to a service class. Create a services class and extend it to JobService. In this case, my class name is EverydayJobTask.java
public class EverydayJobTask extends JobService {
}
we need to override two class-
1. onStartJob()
2. onStopJob()

onStartJob() will call when the job is started. So we need to implement the start logic in this methods.
onStopJob() will call after job will finish. In my case, I show a notification on start Job.

Full Java code of service class-
public class EverydayJobTask extends JobService {

  @Override
  public boolean onStartJob(JobParameters job) {

  //if job schedule then set a notification
  TaskNotification.notify(EverydayJobTask.this,
  "Start sync Task... ", 0);

  return true;
  }

  @Override
  public boolean onStopJob(JobParameters job) {
  return true;
  }
}
Now we need to build FirebaseJobDispatcher. we need to create a google play driver
Driver driver = new GooglePlayDriver(context);
now create a firebase job dispatcher variable and pass this driver
FirebaseJobDispatcher dispatcher = new FirebaseJobDispatcher(driver);
next step is to create a job this job will help to do the task with time-
Job syncJob = dispatcher.newJobBuilder()
set service to the job by calling setService and parameter will be a service class and its super class must be JobService.
.setService(EverydayJobTask.class)
set a tag and this tag must be unique. this tag is used to identify this job.
.setTag("Everyday_Task")
set it's lifetime by calling setLifeTime(). setLifetime sets how long this job should persist you two option
1. UNTIL_NEXT_BOOT
2.FOREVER
.setLifetime(Lifetime.FOREVER)
set a Network constraints on which this Job should run. You have some option
1. DEVICE_CHARGING -> the will be run only while the device is running.
2. ON_ANY_NETWORK -> for this case job will be running on any network
3. ON_UNMETERED_NETWORK-> on unmetered connection.

In my case, I set on any network
.setConstraints(Constraint.ON_ANY_NETWORK)
Note: It might be a good idea to include a preference for this, as some users may not want to download any data on their mobile plan.

set trigger for the job to start by calling setTrigger and the parameter will be another method Trigger.executionWindow(). This method has two parameters.The first argument for * which the data should be synced Note: this end time is not * guaranteed, but is more of a guideline for FirebaseJobDispatcher to go off we need two time interval time and flex time for that add those below line-
private static final int HOURS = 3;
private static final int INTERVAL_SECONDS = (int) TimeUnit.HOURS.toSeconds(HOURS);
private static final int FLEXTIME_SECONDS = INTERVAL_SECONDS / 3;
Note: I set interval time three hours. If you want to set more hour then change hours variable. After that add below code-
.setTrigger(Trigger.executionWindow(INTERVAL_SECONDS,INTERVAL_SECONDS+FLEXTIME_SECONDS))
If you want to set this job requiring the set true in the setRecurring or don't set false-
.setRecurring(true)
once the job is finished then call build method. this method has returned a job.
.build();
we finished making the job. But we have one more step to finish. we need to set schedule this job with the dispatcher.
dispatcher.schedule(syncJob);

oh! we done. Now I think you can use this job scheduler in your next android project.
That's it's today post
Happy coding.

Read More

Friday, June 16, 2017

Android: Alarm Manger with broadcast receiver

June 16, 2017

Welcome to this post. In this post, we are going to learn about Alarm manager and BroadCast Receiver. As usual before start please check official documentation.
1.Alarm Manager official documentation
2.BroadCast Receiver official documentation

Alarm manager is used for scheduling task. If you want to do a task after some time intervals or if want to do some task at 11 am. of the daytime, you have to use alarm manager. Because there is a possibility that user is not using this app at that particular time. So If you are using alarm manager and schedule some task then you don't have to tense about your task is executed or not. More accurately, when phone time is 11.am (example time) then system send a broadcast and from the broadcast receiver, you can receive this signal and execute the task.

Ok, enough talk.

First Alarm Manager-

* we have to create a calendar variable like-
Calendar calendar = Calendar.getInstance();
Now set a time when you do the task. In this case, I want to set 23.59.00 this time. you can also set a specific date. But I don't need a date I just need time so I set time only. But you can also add a date in similar ways.
calendar.set(Calendar.HOUR_OF_DAY,23);
calendar.set(Calendar.MINUTE,59);
calendar.set(Calendar.SECOND,0);

Now we have to do-
 * create an alarm manager and get system alarm services
* create an Intent and Intent class must be a broadcast receiver extend the class (we will create in later in this post).
* set an intent action (so we can filter on broadcast receiver, in this case, I use package name)
* now create a pending intent and get broadcast receiver
*now set alarm manager with set repeating
see the code-
//alarm manager
AlarmManager alarmManager = (AlarmManager) getSystemService(Context.ALARM_SERVICE);

Intent intent = new Intent(this, TaskManager.class);
intent.setAction("com.blogspot.shudiptotrafder.lifeschedular");

PendingIntent pendingIntent = PendingIntent.getBroadcast(this, 0, intent,

PendingIntent.FLAG_UPDATE_CURRENT);

alarmManager.setRepeating(AlarmManager.RTC_W
  AKEUP, calendar.getTimeInMillis(),
  AlarmManager.INTERVAL_DAY, pendingIntent);
Note: here I set interval time AlarmManager.INTERVAL_DAY so it will be trigger at once in every day. you can set a custom time limit.
That's it on alarm manager.

BroadCast Reciever 

the broadcast receiver receives system and custom broadcast. we also explain in the first section of this post. Create a class extend with the broadcast receiver
public class TaskManager extends BroadcastReceiver {
}
you have to override onRecive method.
@Override
public void onReceive(Context context, Intent intent) {
}
we check that if intent has the same action that we have passed through pending intent on alarm manager. If the answer is true then we do our task. For simplicity, I show a toast message.
if (intent.getAction().equalsIgnoreCase("com.blogspot.shudiptotrafder.lifeschedular")) {

  Toast.makeText(context, "Received", Toast.LENGTH_SHORT).show();
}
Now we have to declare this receiver on manifest (AndroidMenifest.xml)
<!-- Broadcast Receiver -->
<receiver
  android:name=".manager.TaskManager"
  android:enabled="true"
  android:exported="false">
  <intent-filter>
  <action android:name="com.blogspot.shudiptotrafder.lifeschedular"/>

  <category android:name="android.intent.category.DEFAULT"/>
  </intent-filter>
</receiver>
we set the specific broadcast receiver on the intent filter. If you want to receive more action then set on action tag. Full receiver class-
public class TaskManager extends BroadcastReceiver {
  
  @Override
  public void onReceive(Context context, Intent intent) {

  if (intent.getAction().equalsIgnoreCase("com.blogspot.shudiptotrafder.lifeschedular")) {

  Toast.makeText(context, "Received", Toast.LENGTH_SHORT).show();
}
That's all.
Happy coding.

Read More

Thursday, June 15, 2017

RecyclerView OnClick Listener again

June 15, 2017

RecyclerVIew On Click listener Image
RecyclerView is the more flexible than ListView. Now we all use RecyclerView. But In the RecyclerVIew there is a problem that it's not come with the listener. So we can not handle click event easily. I already post a method to handle click event click here. Here are an another methods to handle click event.
Note: In this post, I just show only some methods where you have to change not full code.

Benefits of the methods are you can use this click listener in your activity, not adapter class.
If you want to learn about full recycle view code like the adapter and viewHolder class sees this post. 

Processes-
 1. First, you need to add an interface (you can add interface in separate interface file or declare in on inner class). I add on Adapter class
public interface ClickListener{
    void onItemClickListener(String s);
}
Note: If you need long click listener then create another method and add on view holder class. I add a method on interface name  OnItemClickListener and add parameter String because we need a string to send another activity.

 2.Now modify the default constructor of adapter class
private ClickListener clickListener;

    /**
     * Constructor for the CustomCursorAdapter
     * @param clickListener to handle click event
     */
    public CustomCursorAdapter(ClickListener clickListener) {
        this.clickListener = clickListener;
    }
3. Implements view.OnClickListener on viewHolder class. See this
class MyViewHolder extends RecyclerView.ViewHolder implements View.OnClickListener {

        // Class variables for the task description and priority TextViews
        TextView word;

        /**
         * Constructor for the TaskViewHolders.
         *
         * @param itemView The view inflated in onCreateViewHolder
         */
        private MyViewHolder(View itemView) {
            super(itemView);

            word = (TextView) itemView.findViewById(R.id.mainRecycleView_TV);

            word.setOnClickListener(this);
        }

        @Override
        public void onClick(View v) {
            mCursor.moveToPosition(getAdapterPosition());
            int wordIndex = mCursor.getColumnIndex(COLUMN_WORD);
            String word = mCursor.getString(wordIndex);
            //get word from cursor and set it to click listener parameter
            // we can easily access form click event methods
            clickListener.onItemClickListener(word);
        }
    }
on the Onclick listener method, we take String from array or Cursor and send as our interface method parameter. Now can easily access this string on the main activity. 4. Now time to  Use - implements the interface that's we created earlier,
public class MainActivity extends AppCompatActivity
        implements CustomCursorAdapter.ClickListener {
   

       //some code

}

After that's
/** onClick listener for recycler view
     * called if click any item on recycler view
     * @param word is the selected word from data base
     */
    @Override
    public void onItemClickListener(String word) {
        Intent intent = new Intent(MainActivity.this, DetailsActivity.class);
        intent.putExtra(Intent.EXTRA_TEXT,word);
        startActivity(intent);
}


Using adapter
CustomCursorAdapter mAdapter = new CustomCursorAdapter(this);
recyclerView.setAdapter(mAdapter);

Thanks for reading this post.

I hope your code is running well. And you can handle the click event on RecyclerView more easily. But once again full code post of recyclerview is here.
 If you have any queries then use comment option I will help you.


Happy coding :p

Read More