Friday, June 1, 2018

Kotlin Data Structure: Queue

June 01, 2018

Welcome to this post.
This is the second post about data Structure.
In this post, we are going to learn about Queue data structure.

In the previous post, we discuss Stack. Stack is FILO type data structure.
But Queue is the FIFO data structure, that means the data enter first that also come first.
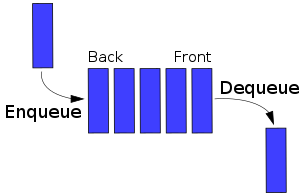
queue data structure in kotlin
Src: Wikipedia
In queue, to data in the queue, the method is called enqueue()  
and to get data from queue, the method is dequeue()

Implementation of Queue:
In the above picture, you can see that data inserted in the back or last position and then the position move one row. and the same thing happens when we access data.
So we have to track
  • Top position
  • Last position
Create an array of Int' and also create 2 variable that mentions above.
var ints = IntArray(10)
var head = 0
var tail = 0

Methods:
enqueue():
insert data in the tail position and increase the tail
fun enqueue(n: Int) {
    ints[tail] = n
    tail += 1
    println("Input:" + n)
}
dequeue():
get data from head position index from the array and increase the head
fun dequeue(): Int {
    val n = ints[head]
    head += 1
    return n
}
Empty check:
if head and tail is same then the stack is empty
val isEmpty: Boolean
        get() = head == tail

Now time for access data:
First, create the main method:
fun main(arg: Array<String>) {
}
enqueue():
just run a for loop from 0 to 10 and insert data
for (i in 0..9) {
     enqueue(i)
}
Output:
Input:0
Input:1
Input:2
Input:3
Input:4
Input:5
Input:6
Input:7
Input:8
Input:9
works fine.
dequeue()
run a while loop until the queue is empty
while (!isEmpty) {
    println("value: " + dequeue())
}
Output:
value: 0
value: 1
value: 2
value: 3
value: 4
value: 5
value: 6
value: 7
value: 8
value: 9

It's work fine.
That's is the basic queue implementation.
You can check this out on Github

Discussion about queue:
The uses of the basic queue are not huge. It has a very limited use.
Because it wastes memory.
For example, if the queue has the capacity of 100. Then at the beginning data inserted from zero, when we access data from one we can get that data from the zero position. After the head is also increased and the tail already increased. Imagine by this way at 99 position data is filled and we access data from the 99 potions. If we want to insert new data into the queue it shows you a warning, "hey! I am full, I can not take any new data". But already the previous position is empty and there is no way to insert new data in the queue. we can use the previous position. But it allocates the memory. This is obviously the waste of memory. see the picture for the more clear concept.

Queue Data structure


To fix this problem we use the circular queue

Circular Queue
Circular Queue


In circular queue top position and the last position move around a circle. I will discuss circular queue in the next post.

Until then, stay happy and keep practicing.
Thank you for reading this post. 
Happy coding

Read More

Tuesday, May 29, 2018

Kotlin Data Structure: Stack

May 29, 2018

Welcome to this post.
This is going to be a series post about data structure and algorithm, In this series, I use kotlin as a default language.

Let's start with stack data structure-

Stack is a simple data structure.
The implementation of this data structure is also called LIFO that means Last in Fast out.
Basically, in this data structure, the last data will come in first.

Src: Wikipedia

In this picture, the First A block moves into C. Now if we want to get a block from C then we must take the green block first that insert in the last. And this is the basic concept of Stack.
You check Wikipedia for more.

Now come in programming-
To put data in Stack there is a function called push()
and to access data called pop() and this function also removes the first element of Stack.

Src: Wikipedia


To implement sack we always think about the top position. For example, after a successful push top position will change and also in the pop operation.

So, create a class, (you can make an inner class) and create two variable,
  • one is for top position
  • other is a list to store data.
we are using kotlin so mutable list will be perfect.
initialize top as -1 and an empty list
class Stack<T> {
    private var top = -1
    private val array:MutableList<T> = mutableListOf()
}

push() function
         now our top position is -1. so in the push method, we just increase the top position. Just add plus one in every push. and insert data in the array at this index.
fun push(value: T) {
    top += 1
    array.add(top,value)
}

pop() function:
          when we create the class we initialize top position as -1. basically, array stary from zero indexes. so -1 index does not exist. so first check the value of the top position. if the position is -1 the stack has no data yet. If you called pop() function you are trying to get data from the empty stack. For this case, if the stack is empty we throw an exception.
if (top == -1) {
    throw Exception("Stack is empty")
}

now take the value from array and array index will be top value. And finally, reduce the top position.
fun pop(): T {

    if (top == -1) {
         throw Exception("Stack is empty")
    }

    val value = array[top]
    top -= 1
    return value
}

now create a variable that will show the length of this stack. we use get method of kotlin.
If the top is -1 then the length will be 0 and is not then length will be top + 1
val length:Int get() {
     return if (top == -1) 0
     else top + 1
}

Now time for put data and access data from this stack

create the main function-
fun main(args: Array<String>) {
}
create an instance of stack and type will be Int
val stack = Stack<Int>()
push():
run a for loop and the number range will be 0 to 10. And insert the date in the stack
for (i in 0 until 10){
    stack.push(i)
}

Now print the length of Stack-
println("Stack length:${stack.length}")
Output:
Stack length:10
so the data inserted successfully. Now get the data

pop()
we run a while loop until the stack length is zero
while (stack.length > 0){
    println("Stack: value:${stack.pop()} length:${stack.length}")
}
Output:
Stack: value:9 length:9
Stack: value:8 length:8
Stack: value:7 length:7
Stack: value:6 length:6
Stack: value:5 length:5
Stack: value:4 length:4
Stack: value:3 length:3
Stack: value:2 length:2
Stack: value:1 length:1
Stack: value:0 length:0

see the first value is 9 and but we start to insert data from 0. We find zero in the last.
at the last, the value is zero and the length is zero.
So now our stack is zero.

If we try to get data from stack then see what will happen-
println("Stack ${stack.pop()}")
Output:
Exception in thread "main" java.lang.Exception: Stack is empty
    at dataStructure.stack.Stack.pop(StackDemo.kt:33)
    at dataStructure.stack.StackDemoKt.main(StackDemo.kt:18)
we will get an exception.

That's it, we finished the implementation of stack and do push and pop operation.

In case you miss something, check the full code on Github

Thank you very much for reading. Hope this will help you.
Keep practicing

Happy coding

Read More

Friday, April 13, 2018

Android ThemeLibrary

April 13, 2018

Hello visitors,

After a long gap, I bring a post for you.
I don't like to waste your time anymore.

Let's start-
Today, I will write about a new library. The Library is about for android theming and color plate.

First of all, see some screenshot-
sample11

So you can see that this library has an awesome theme list. You can use this list and with your own additional list. You can also remove this list and use your own theme list.
It has a built-in night mode icon that switches On and Off night mode. The biggest advantage of this library is If you don't like this option you can turn off by one line of code.
See another screenshot (here night mode is enabled)
nightmode

So you can see that this is highly customizable.
Enough intro lets get started-

Read More

Sunday, December 24, 2017

Android Material SearchView with Recent Search Suggestions

December 24, 2017

Welcome to this post.

In this post, I am going to cover Android Search View with Recent Search Suggestion.

In a previous post, I already cover Android Material SearchView. In that post, I use a 3rd party library. If you want to use 3rd party library to add search functionality, see this post. Android Material SearchView

But Now I don't want to use any 3rd party library.
In this post, I use:
  • Search Widget
Let's start:
create a new activity:(In my case, I named it: SearchActivity)
First jump into XML code-

Read More

Friday, November 17, 2017

Android Runtime permission

November 17, 2017

Welcome to this post.

In this post, I am going to discussing a new topic that is android runtime permission.

What is runtime permission?
Basically, when we want to access some data on the device or want to make a network request from our app, we need user permission.Basically, we need to write the permissions on the AndroidMenifest.xml
AndroidMenifest.xml

<uses-permission android:name="android.permission.INTERNET" />
<uses-permission android:name="android.permission.WRITE_EXTERNAL_STORAGE" />
if the user installs the app, the user must accept the permissions that we write on AndroidMenifest.xml
But in Android 6.0 API 23
The Android team want to give more control to the user and now user can install without accepting all the permission.
For an example, we want to access to the storage(external storage), so we need permission first. Now we promote to the user to accept the permission in the app runtime to access the storage.
If the user does not accept the permission that means we do not access the storage.

Read More

Tuesday, November 14, 2017

Android Settings Series (part 2)

November 14, 2017

Welcome to this series post.
In this series post, we are going to create a complete Settings for a productive app.

We already published a post-
Now I am starting where I left in the previous post.

Now we need to create other 2 XML file. (In our final settings we need 3 XML file, we already have done one.)

Read More

Saturday, November 11, 2017

Android Settings Series (part 1)

November 11, 2017

Welcome to this Series post.
In this series post, we are going to create a complete Settings for a productive app.

Basic overview of our final settings?

Our final settings contains-
  •  multiple preference screen 
In a previous post, I  cover android settings with a single preference screen (Android App Settings with Preference Fragment Compat).

we create 3 screen that's are-
  • General
  • Backup 
  • Advance
So we create multiple preference screen in the same XML file and after user click, we replace the fragment.
That's the deal,
Lets Start-

Read More