Wednesday, August 30, 2017

How to set sign in anonymously in Firebase

August 30, 2017

welcome to firebase series tutorial.

In this post, we are going learn about how to sign in anonymously in firebase.
But before starting, I am providing you some ideas why we need sign in anonymously?
If you are using real-time database and storage you need to create a rule for access database and storage.
By default the rule is
{


  "rules": {

    ".read": "auth != null",

    ".write": "auth != null"

  }

}
here auth means Authentication. So if your app hasn't any login option you sign in anonymously sign in from your app. So by doing this, that database and storage can be access only from your app. so you can protect your database. Or if you change the rule to access everyone there is a possibility to lose your database. anyone can delete your database with in a single request.

So we sign in anonymously in Firebase from our app to protect database and storage.

Let's start,
you already know how to connect Firebase for your project.
now go to firebase console and select authentication.
click this to go directly Firebase Console.
Now go to sign in method

firebase-auth

and click anonymous and enable it.
firebase-auth1

that's the ending of the configuration of firebase console
now time for coding
Note: I use kotlin as a default language.

add below line to your build.gradle file
implementation 'com.google.firebase:firebase-auth:11.2.0'
Now create an instance of FirebaseAuth class
see the code-
val mAuth = FirebaseAuth.getInstance()
use signInAnonymously() method and add a complete listener. if the task is successful we show a message that Authentication is successful and also user id. if failed then we will show a fail message.
mAuth.signInAnonymously()
     .addOnCompleteListener(this, { task ->
         if (task.isSuccessful) {
                val user = mAuth.currentUser
                Toast.makeText(this, "Authentication successful. user id ${user.uid}",
                                Toast.LENGTH_SHORT).show()

            } else {
                // If the sign in fails displays a message to the user.
                Toast.makeText(this, "Authentication failed.",
                                Toast.LENGTH_SHORT).show()

                    }
                })
That's it coding see the final screen short in the firebase console
firebase-auth android sketchpad
you find some details about your user
1. creation date
2. signed in date
3. user id

That's it from this post hope this will help you to understand this concept.
and you will implement anonymous login option for your app and make a better security for your Firebase database and storage.
Happy coding

Read More

Saturday, August 19, 2017

Kotlin null safety

August 19, 2017

Welcome to kotlin Series

In this post, we are going to discuss a very important topic of Kotlin. The topic is kotlin null safety.
I think you already heard this keyword, null safety, Kotlin is a null safety language. right?
what is the null safety? In kotlin by default, you can not assign a value of a variable as null. All the variable must have a value.

but if you want an assign a variable as null, you have to use?
code-
val nullValue:String? = null
if you want to create a variable but want to assign a value later then use
var name:String?
name = "shudipto"
now print the value
println("Name: $name")
output:
Name: shudipto
now assign this value to null
name = null
print this new value
println(name)
Output:
null
Note: if you want to set this variable must have value then use below code-
print(name!!)
now we create a function that returns null
//null return function
fun returnNull():String? {
    return null
}
print this value:
 println("Function: ${returnNull()}")
Output:
 println("Function: ${returnNull()}")
now we use the force operator to assign the return value of this methods
val returnNull1:String ?= returnNull()
now if we want to learn the length of this variable we can use length method
//val returnNull2 = returnNull1.length
but this line shows an error because the value of the variable is null. This is the advantage of kotlin. If you are in java the here this line program will be crashed. but in kotlin, we can do by this way without any crash
val returnNull2 = returnNull1?.length
Now, this program will not crash. but you can do another thing that is if the value is null then you can save a string or default value I am using a string
val returnNull2 = returnNull1?.length ?: "value is null"
print the value
println("ReturnNull2: $returnNull2")
output:
ReturnNull2: value is null
see the variable value is null so the default value is assigned. you can also use this method for the specific data type variable:
val returnNull4:String = returnNull() ?: "No name"
print the value:
println(returnNull4)
Output:
No name
That's it. Hope you understand the concept. This is very important in Android App development. It prevent some unexpected crash.

Thank you very much.
Happy coding

Read More

Kotlin Series

August 19, 2017

welcome to kotlin series.
Kotlin
Kotlin Series

In this series, we are basically going through some basic and advanced tutorial about kotlin language.
we try to serve you best practices on those tutorials.

Here is the collection of all post

1. String -  kotlin string tutorial
2. Array and loop - array and loop tutorial
3. File reader and write - kotlin IO tutorial. 
4. ArrayList - kotlin ArrayList
5. How to control loop in kotlin - kotlin loop control
6. Collection - kotlin collection such as hash map, array, list
7.Null Safety - kotlin null safety

Series tutorial:
Kotlin OOP series:
  1. OOP Basic
  2. Constructor
  3. Inheritance
  4. Method Overriding
Advance:
1.Bookstore a simple program with function and input-output from the console with conditions. 

Read More

Friday, August 18, 2017

Kotlin Collection Example

August 18, 2017

Welcome to kotlin Series

In the tutorial, we are going to discuss Kotlin collection.
we touch on below topics
1. Hashmap
2. Array
3. List
       3.a. mutable list
       3.b. immutable list
4. Set
       4.a. mutable set
       4.b. immutable set

Let's start-

Hashmap: In kotlin, we can use java hashmap easily. But kotlin has an own hashmap. First, we go through Java hashmap create an instance of Hashmap class and parameter will be string and string after input some data and print data to check.
see the code-
val hasMap = HashMap<String,String>()

hasMap.put("s","Shudipto")
hasMap["d"] = "trafder"
hasMap["f"] = "Himu"
hasMap["g"] = "Rupa"
now print a value
println(hasMap["s"])
Output:
Shudipto
I am using a for loop to print all the value that stored in hashmap with their key. code-
for ((v,k) in hasMap.entries){
        println("$v -> $k")
    }
Output:
s -> Shudipto
d -> trafder
f -> Himu
g -> Rupa
that's it in this way we use java hashmap. But kotlin has already a default hashmap. now use kotlin hashmap.
See the code
val hasmap = hashMapOf(1 to "shudipto")
hasmap.put(2,"trafder")
hasmap.put(3,"himu")
print a value
println(hasmap[1])
Output:
shudipto
use a for loop to see all the value with the key that stored in the hashmap.
//print all value with index
for ((position,value) in hasmap.entries){
    println("Index:$position value:$value")
}
Output:
//print all value with index
for ((position,value) in hasmap.entries){
    println("Index:$position value:$value")
}
That's all on hashmap. next topics Array

Array: kotlin has a special array class. let's see the example. But before jump into code, you can check our two tutorial about ArrayList and Array and loop. This will help you to understand the array concept easily.
see the code-
println("\nKotlin Array")
val array = arrayOf("Shudipto",1,2,3.5,"Trafder")
array[4] = "himu"
now print all the value with for loop-
for ((p,v) in array.withIndex()){
    println("Index:$p value:$v")
}
Output:
Index:0 value:Shudipto
Index:1 value:1
Index:2 value:2
Index:3 value:3.5
Index:4 value:himu
That's it on Array. Next topics is  list

List:  In kotlin, there are two types of list available. Mutable and immutable list.
see the code-
mutable list-
println("\n\nMutable list of array")
val list = mutableListOf(1,2,34,5,6,7,8,"Shudipto")

list[0] = "trafder"
immutable list-
val list2 = listOf(1,2,34,5,6,7,8,"Shudipto")

Mutable vs immutable list: you can not update immutable list after assign.

now print all the value by using for loop
mutable list-
for ((p,v) in list.withIndex()){
    println("Index:$p value:$v")
}
Output:
Mutable list of array
Index:0 value:trafder
Index:1 value:2
Index:2 value:34
Index:3 value:5
Index:4 value:6
Index:5 value:7
Index:6 value:8
Index:7 value:Shudipto
Immutable List
println("\n\nimmutable list of array")
for ((p,v) in list2.withIndex()){
    println("Index:$p value:$v")
}
Output:
immutable list of array
Index:0 value:1
Index:1 value:2
Index:2 value:34
Index:3 value:5
Index:4 value:6
Index:5 value:7
Index:6 value:8
Index:7 value:Shudipto
That's it on the list. Nest on set.

Set: As list, kotlin has also two types of set. one is mutable and second is immutable.
so see the code
mutable set-
val mSet = mutableSetOf(1,2,4,5,6,6,8,1)
mSet.add(5)
immutable set
val set = setOf(15,2,3,10,5,6,15,10)

mutable vs immutable set: you can update mutable set anytime. But immutable set can not update after assign.
print all the value
mutable set-
for ((p,v) in mSet.withIndex()) println("Index:$p value:$v")
output:
Index:0 value:1
Index:1 value:2
Index:2 value:4
Index:3 value:5
Index:4 value:6
Index:5 value:8
Immutable set-
for ((p,v) in set.withIndex()) println("Index:$p value:$v")
Output:
Index:0 value:15
Index:1 value:2
Index:2 value:3
Index:3 value:10
Index:4 value:5
Index:5 value:6
That's it on set.

oh! we finish all the topics. Before finish this post I will give you a gift topics.
List vs set:
you probably see that list and set is working basically same process. List and Set both save a collection of data. They also have the mutable and immutable option. you can save any time of data type and you can also mix data type. but the question is, what is the difference between list and set?
the answer is, the set is not stored duplicate value but list save. If you are working with duplicate value then you must use list. or, If you are want to ignore duplicate value then use set.

Thank you for reading.
Hope you enjoy this tutorial.
Happy coding.

Read More

How to control loop in Kotlin

August 18, 2017

Welcome to kotlin Series

In this small post, we are going to discuss how to control loop in Kotlin.
Basically, we use 2 keywords for the control loop.
1. continue
2. break
if we want to skip one process, then we use to continue the keyword
for (a in 1..5){
        if (a==4){
            continue
        }
        println("A: $a")
    }
Output:
A: 1
A: 2
A: 3
A: 5
or if we stop the loop then we use break keyword
for (a in 1..5){
    if (a==4){
        break
     }
    println("A: $a")
}
Output:
A: 1
A: 2
A: 3

But in the nested loop if we want to stop the second loop after a selected value.
But in this case, if we use break keyword in the second loop-
for (a in 1..5){
        println("A: $a")

        for (b in 1..5){
            if (a == 4){
                break
            }
            println("B: $b")
        }
    }
and output:
A: 1
B: 1
B: 2
B: 3
B: 4
B: 5
A: 2
B: 1
B: 2
B: 3
B: 4
B: 5
A: 3
B: 1
B: 2
B: 3
B: 4
B: 5
A: 4
A: 5
B: 1
B: 2
B: 3
B: 4
B: 5
so we see loop is not stopped. It only stops inner loop after reaching the value of a is 4. no value of this loop is not printed and it repeated every time with increasing value with a
But our target on the basis of above value, we want to stop whole loop not only second loop after the value of a is 4.
For this case, we use loop keyword.
See the code-
loop@ for (a in 1..5){
        
        println("value a:$a")

        for (b in 1..4){
            if (a == 4){
                break@loop
            }

            println(" b:$b")
        }
    }

    println("Loop done")
Output:
value a:1
 b:1
 b:2
 b:3
 b:4
value a:2
 b:1
 b:2
 b:3
 b:4
value a:3
 b:1
 b:2
 b:3
 b:4
value a:4
Loop done
Oh! now our loop is stopped when the value of a is 4
sometimes we need to control the inner loop with the main loop condition. So loop keyword is saved a lot of time, we don't need to implement the complex logic.

Thank you for reading this post.
Happy coding

Read More

Wednesday, August 16, 2017

Kotlin ArrayList

August 16, 2017

Welcome to kotlin Series

Kotlin

In this post, we are going to learn about ArrayList. In android the use of ArrayList is huge.
So let's move on today task list.
1. we create an ArrayList
2. insert some value
3. update some value
4. search in ArrayList
5. delete some value

Let's start:
Note: we discuss array and loop in this post Kotlin: Array and Loop. you can take a look at this post of array section it will help you to understand today's topics easily.
Create an instance of ArrayList class and make this variable as immutable by using val
val list = ArrayList<String>()
Now insert some value by calling add method
list.add("Shudipto")
list.add("Trafder")
list.add("Is")
list.add("a")
list.add("good")
list.add("student")
Now print the first element of this array list
println("First Name:${list[0]}")
Result:
First Name:Shudipto
Now print all the element by using a for loop. see the code-
println("All element")
println("\nOnly value")
for (a in list){
     println("value:$a")
}
Output:
All element

Only value
value:Shudipto
value:Trafder
value:Is
value:a
value:good
value:student
Now print all the element with the index number. see the code-
println("\nIndex with value")
for ((position,a) in list.withIndex()){
    println("Index:$position value:$a")
}
Output:
Index with value
Index:0 value:Shudipto
Index:1 value:Trafder
Index:2 value:Is
Index:3 value:a
Index:4 value:good
Index:5 value:student
Now update an element-
we update the value of index number 5.
The new value will be developer.
println("\n\nUpdate an element")
list[5] = "developer"
Now print all the value with index
println("\nIndex with value")
for ((position,a) in list.withIndex()){
     println("Index:$position value:$a")
}
Output:
Index with value
Index:0 value:Shudipto
Index:1 value:Trafder
Index:2 value:Is
Index:3 value:a
Index:4 value:good
Index:5 value:developer
Search in ArrayList: we make a search in our ArrayList.
If we found the data and we print name found and if not we print name not found.
see the code below
println("\n\nSearch in array list")
if (list.contains("Shudipto")){
    println("Name found")
} else println("Not found")
Output:
Search in array list
Name found
Now delete some data: we can remove by two ways.
1. by value
2. by index number
I am showing you those two ways by the value, we remove "a" by index number, we remove index number 5
see the code below
println("Delete some data")
//with value
list.remove("a")
//with position
list.removeAt(4)
Note: in code, we use index number 4 because we just remove one element so the last index number is now 4.
Now print all the value with index number
println("\nIndex with value")
for ((position,a) in list.withIndex()){
     println("Index:$position value:$a")
}
Output:
Index with value
Index:0 value:Shudipto
Index:1 value:Trafder
Index:2 value:Is
Index:3 value:good
Today's full code:
fun main(args: Array<String>) {

    val list = ArrayList<String>()

    list.add("Shudipto")
    list.add("Trafder")
    list.add("Is")
    list.add("a")
    list.add("good")
    list.add("student")

    println("First Name:${list[0]}") //list.get(0)

    println("All element")
    println("\nOnly value")
    for (a in list){
        println("value:$a")
    }

    println("\nIndex with value")
    for ((position,a) in list.withIndex()){
        println("Index:$position value:$a")
    }

    println("\n\nUpdate an element")
    //list.set(5,"developer")
    list[5] = "developer"

    println("All element")
    println("\nOnly value")
    for (a in list){
        println("value:$a")
    }

    println("\nIndex with value")
    for ((position,a) in list.withIndex()){
        println("Index:$position value:$a")
    }

    println("\n\nSearch in array list")
    if (list.contains("Shudipto")){
        println("Name found")
    } else println("Not found")

    println("Delete some data")
    //with value
    list.remove("a")
    //with position
    list.removeAt(4)

    println("\nIndex with value")
    for ((position,a) in list.withIndex()){
        println("Index:$position value:$a")
    }
}
Full output:
First Name:Shudipto
All element

Only value
value:Shudipto
value:Trafder
value:Is
value:a
value:good
value:student

Index with value
Index:0 value:Shudipto
Index:1 value:Trafder
Index:2 value:Is
Index:3 value:a
Index:4 value:good
Index:5 value:student


Update an element
All element

Only value
value:Shudipto
value:Trafder
value:Is
value:a
value:good
value:developer

Index with value
Index:0 value:Shudipto
Index:1 value:Trafder
Index:2 value:Is
Index:3 value:a
Index:4 value:good
Index:5 value:developer


Search in array list
Name found
Delete some data

Index with value
Index:0 value:Shudipto
Index:1 value:Trafder
Index:2 value:Is
Index:3 value:good

Process finished with exit code 0
Thank you for reading this post.
Happy coding

Read More

Tuesday, August 15, 2017

Kotlin: File reader and writer

August 15, 2017

Welcome to kotlin Series

Kotlin


In this post, we are going to learn about kotlin IO (input or output)

we basically learn about file reader and writer.
In this post, we are going to write a program that takes text from the console and save it on computer hard disk as a text file.
Let start-

First, we are going to create a method for saving file, method name writeToFile
Follow those step:
1. take a String parameter
 2. Create an instance of FileWriter
3. in try-catch block write this string by using write method.
See the code-
fun writeToFile(str: String) {

    val writer = FileWriter("text.txt", true)

    try {
        writer.write(str+"\n")

    } catch (ex: Exception) {
        println(ex.message)

    } finally {
        writer.close()
    }
}
Now time to create the Main method-
in the main method-
1. first we show a message to user to write some text
2. take those text and save in on a variable
3. after the call the writeToFile method and parameter is this variable.
see the code-
fun main(args: Array<String>) {
    println("Write a message")
    val str: String = readLine().toString()

    writeToFile(str)

}


Now time to read this text file and print the text in the console-
Follow those step-
1.create a method name readFile()
2. in try-catch block create an instance of FileReader class
3. print text to the console by using readText() method
see the code-
fun readFile(){

    try {
        val read = FileReader("text.txt")

        println(read.readText())


    } catch (e:Exception){
        println(e.message)
    }

}
In the main method, call this method-
fun main(args: Array<String>) {
    println("Write a message")
    val str: String = readLine().toString()

    writeToFile(str)

    readFile()

}

Now run this program-
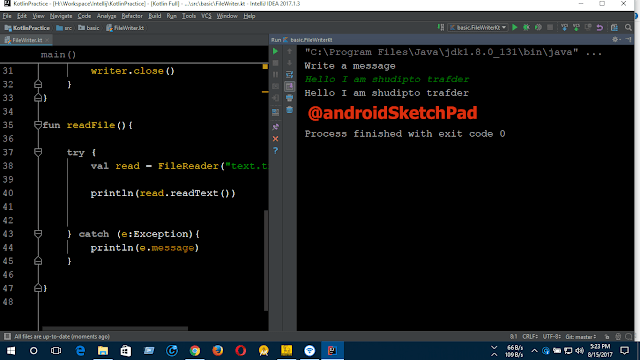
after running the programming this will show you like below picture
input some text I input: Hello I am shudipto trafder

kotlin-io-code

Note: Green colored text is your input text and white color text is output text( that read from the file)
this is the text file that saved

kotlin-io-output

Thanks for reading this post.
Happy coding.

Read More