Saturday, August 19, 2017

Kotlin Series

August 19, 2017

welcome to kotlin series.
Kotlin
Kotlin Series

In this series, we are basically going through some basic and advanced tutorial about kotlin language.
we try to serve you best practices on those tutorials.

Here is the collection of all post

1. String -  kotlin string tutorial
2. Array and loop - array and loop tutorial
3. File reader and write - kotlin IO tutorial. 
4. ArrayList - kotlin ArrayList
5. How to control loop in kotlin - kotlin loop control
6. Collection - kotlin collection such as hash map, array, list
7.Null Safety - kotlin null safety

Series tutorial:
Kotlin OOP series:
  1. OOP Basic
  2. Constructor
  3. Inheritance
  4. Method Overriding
Advance:
1.Bookstore a simple program with function and input-output from the console with conditions. 

Read More

Friday, August 18, 2017

Kotlin Collection Example

August 18, 2017

Welcome to kotlin Series

In the tutorial, we are going to discuss Kotlin collection.
we touch on below topics
1. Hashmap
2. Array
3. List
       3.a. mutable list
       3.b. immutable list
4. Set
       4.a. mutable set
       4.b. immutable set

Let's start-

Hashmap: In kotlin, we can use java hashmap easily. But kotlin has an own hashmap. First, we go through Java hashmap create an instance of Hashmap class and parameter will be string and string after input some data and print data to check.
see the code-
val hasMap = HashMap<String,String>()

hasMap.put("s","Shudipto")
hasMap["d"] = "trafder"
hasMap["f"] = "Himu"
hasMap["g"] = "Rupa"
now print a value
println(hasMap["s"])
Output:
Shudipto
I am using a for loop to print all the value that stored in hashmap with their key. code-
for ((v,k) in hasMap.entries){
        println("$v -> $k")
    }
Output:
s -> Shudipto
d -> trafder
f -> Himu
g -> Rupa
that's it in this way we use java hashmap. But kotlin has already a default hashmap. now use kotlin hashmap.
See the code
val hasmap = hashMapOf(1 to "shudipto")
hasmap.put(2,"trafder")
hasmap.put(3,"himu")
print a value
println(hasmap[1])
Output:
shudipto
use a for loop to see all the value with the key that stored in the hashmap.
//print all value with index
for ((position,value) in hasmap.entries){
    println("Index:$position value:$value")
}
Output:
//print all value with index
for ((position,value) in hasmap.entries){
    println("Index:$position value:$value")
}
That's all on hashmap. next topics Array

Array: kotlin has a special array class. let's see the example. But before jump into code, you can check our two tutorial about ArrayList and Array and loop. This will help you to understand the array concept easily.
see the code-
println("\nKotlin Array")
val array = arrayOf("Shudipto",1,2,3.5,"Trafder")
array[4] = "himu"
now print all the value with for loop-
for ((p,v) in array.withIndex()){
    println("Index:$p value:$v")
}
Output:
Index:0 value:Shudipto
Index:1 value:1
Index:2 value:2
Index:3 value:3.5
Index:4 value:himu
That's it on Array. Next topics is  list

List:  In kotlin, there are two types of list available. Mutable and immutable list.
see the code-
mutable list-
println("\n\nMutable list of array")
val list = mutableListOf(1,2,34,5,6,7,8,"Shudipto")

list[0] = "trafder"
immutable list-
val list2 = listOf(1,2,34,5,6,7,8,"Shudipto")

Mutable vs immutable list: you can not update immutable list after assign.

now print all the value by using for loop
mutable list-
for ((p,v) in list.withIndex()){
    println("Index:$p value:$v")
}
Output:
Mutable list of array
Index:0 value:trafder
Index:1 value:2
Index:2 value:34
Index:3 value:5
Index:4 value:6
Index:5 value:7
Index:6 value:8
Index:7 value:Shudipto
Immutable List
println("\n\nimmutable list of array")
for ((p,v) in list2.withIndex()){
    println("Index:$p value:$v")
}
Output:
immutable list of array
Index:0 value:1
Index:1 value:2
Index:2 value:34
Index:3 value:5
Index:4 value:6
Index:5 value:7
Index:6 value:8
Index:7 value:Shudipto
That's it on the list. Nest on set.

Set: As list, kotlin has also two types of set. one is mutable and second is immutable.
so see the code
mutable set-
val mSet = mutableSetOf(1,2,4,5,6,6,8,1)
mSet.add(5)
immutable set
val set = setOf(15,2,3,10,5,6,15,10)

mutable vs immutable set: you can update mutable set anytime. But immutable set can not update after assign.
print all the value
mutable set-
for ((p,v) in mSet.withIndex()) println("Index:$p value:$v")
output:
Index:0 value:1
Index:1 value:2
Index:2 value:4
Index:3 value:5
Index:4 value:6
Index:5 value:8
Immutable set-
for ((p,v) in set.withIndex()) println("Index:$p value:$v")
Output:
Index:0 value:15
Index:1 value:2
Index:2 value:3
Index:3 value:10
Index:4 value:5
Index:5 value:6
That's it on set.

oh! we finish all the topics. Before finish this post I will give you a gift topics.
List vs set:
you probably see that list and set is working basically same process. List and Set both save a collection of data. They also have the mutable and immutable option. you can save any time of data type and you can also mix data type. but the question is, what is the difference between list and set?
the answer is, the set is not stored duplicate value but list save. If you are working with duplicate value then you must use list. or, If you are want to ignore duplicate value then use set.

Thank you for reading.
Hope you enjoy this tutorial.
Happy coding.

Read More

How to control loop in Kotlin

August 18, 2017

Welcome to kotlin Series

In this small post, we are going to discuss how to control loop in Kotlin.
Basically, we use 2 keywords for the control loop.
1. continue
2. break
if we want to skip one process, then we use to continue the keyword
for (a in 1..5){
        if (a==4){
            continue
        }
        println("A: $a")
    }
Output:
A: 1
A: 2
A: 3
A: 5
or if we stop the loop then we use break keyword
for (a in 1..5){
    if (a==4){
        break
     }
    println("A: $a")
}
Output:
A: 1
A: 2
A: 3

But in the nested loop if we want to stop the second loop after a selected value.
But in this case, if we use break keyword in the second loop-
for (a in 1..5){
        println("A: $a")

        for (b in 1..5){
            if (a == 4){
                break
            }
            println("B: $b")
        }
    }
and output:
A: 1
B: 1
B: 2
B: 3
B: 4
B: 5
A: 2
B: 1
B: 2
B: 3
B: 4
B: 5
A: 3
B: 1
B: 2
B: 3
B: 4
B: 5
A: 4
A: 5
B: 1
B: 2
B: 3
B: 4
B: 5
so we see loop is not stopped. It only stops inner loop after reaching the value of a is 4. no value of this loop is not printed and it repeated every time with increasing value with a
But our target on the basis of above value, we want to stop whole loop not only second loop after the value of a is 4.
For this case, we use loop keyword.
See the code-
loop@ for (a in 1..5){
        
        println("value a:$a")

        for (b in 1..4){
            if (a == 4){
                break@loop
            }

            println(" b:$b")
        }
    }

    println("Loop done")
Output:
value a:1
 b:1
 b:2
 b:3
 b:4
value a:2
 b:1
 b:2
 b:3
 b:4
value a:3
 b:1
 b:2
 b:3
 b:4
value a:4
Loop done
Oh! now our loop is stopped when the value of a is 4
sometimes we need to control the inner loop with the main loop condition. So loop keyword is saved a lot of time, we don't need to implement the complex logic.

Thank you for reading this post.
Happy coding

Read More

Wednesday, August 16, 2017

Kotlin ArrayList

August 16, 2017

Welcome to kotlin Series

Kotlin

In this post, we are going to learn about ArrayList. In android the use of ArrayList is huge.
So let's move on today task list.
1. we create an ArrayList
2. insert some value
3. update some value
4. search in ArrayList
5. delete some value

Let's start:
Note: we discuss array and loop in this post Kotlin: Array and Loop. you can take a look at this post of array section it will help you to understand today's topics easily.
Create an instance of ArrayList class and make this variable as immutable by using val
val list = ArrayList<String>()
Now insert some value by calling add method
list.add("Shudipto")
list.add("Trafder")
list.add("Is")
list.add("a")
list.add("good")
list.add("student")
Now print the first element of this array list
println("First Name:${list[0]}")
Result:
First Name:Shudipto
Now print all the element by using a for loop. see the code-
println("All element")
println("\nOnly value")
for (a in list){
     println("value:$a")
}
Output:
All element

Only value
value:Shudipto
value:Trafder
value:Is
value:a
value:good
value:student
Now print all the element with the index number. see the code-
println("\nIndex with value")
for ((position,a) in list.withIndex()){
    println("Index:$position value:$a")
}
Output:
Index with value
Index:0 value:Shudipto
Index:1 value:Trafder
Index:2 value:Is
Index:3 value:a
Index:4 value:good
Index:5 value:student
Now update an element-
we update the value of index number 5.
The new value will be developer.
println("\n\nUpdate an element")
list[5] = "developer"
Now print all the value with index
println("\nIndex with value")
for ((position,a) in list.withIndex()){
     println("Index:$position value:$a")
}
Output:
Index with value
Index:0 value:Shudipto
Index:1 value:Trafder
Index:2 value:Is
Index:3 value:a
Index:4 value:good
Index:5 value:developer
Search in ArrayList: we make a search in our ArrayList.
If we found the data and we print name found and if not we print name not found.
see the code below
println("\n\nSearch in array list")
if (list.contains("Shudipto")){
    println("Name found")
} else println("Not found")
Output:
Search in array list
Name found
Now delete some data: we can remove by two ways.
1. by value
2. by index number
I am showing you those two ways by the value, we remove "a" by index number, we remove index number 5
see the code below
println("Delete some data")
//with value
list.remove("a")
//with position
list.removeAt(4)
Note: in code, we use index number 4 because we just remove one element so the last index number is now 4.
Now print all the value with index number
println("\nIndex with value")
for ((position,a) in list.withIndex()){
     println("Index:$position value:$a")
}
Output:
Index with value
Index:0 value:Shudipto
Index:1 value:Trafder
Index:2 value:Is
Index:3 value:good
Today's full code:
fun main(args: Array<String>) {

    val list = ArrayList<String>()

    list.add("Shudipto")
    list.add("Trafder")
    list.add("Is")
    list.add("a")
    list.add("good")
    list.add("student")

    println("First Name:${list[0]}") //list.get(0)

    println("All element")
    println("\nOnly value")
    for (a in list){
        println("value:$a")
    }

    println("\nIndex with value")
    for ((position,a) in list.withIndex()){
        println("Index:$position value:$a")
    }

    println("\n\nUpdate an element")
    //list.set(5,"developer")
    list[5] = "developer"

    println("All element")
    println("\nOnly value")
    for (a in list){
        println("value:$a")
    }

    println("\nIndex with value")
    for ((position,a) in list.withIndex()){
        println("Index:$position value:$a")
    }

    println("\n\nSearch in array list")
    if (list.contains("Shudipto")){
        println("Name found")
    } else println("Not found")

    println("Delete some data")
    //with value
    list.remove("a")
    //with position
    list.removeAt(4)

    println("\nIndex with value")
    for ((position,a) in list.withIndex()){
        println("Index:$position value:$a")
    }
}
Full output:
First Name:Shudipto
All element

Only value
value:Shudipto
value:Trafder
value:Is
value:a
value:good
value:student

Index with value
Index:0 value:Shudipto
Index:1 value:Trafder
Index:2 value:Is
Index:3 value:a
Index:4 value:good
Index:5 value:student


Update an element
All element

Only value
value:Shudipto
value:Trafder
value:Is
value:a
value:good
value:developer

Index with value
Index:0 value:Shudipto
Index:1 value:Trafder
Index:2 value:Is
Index:3 value:a
Index:4 value:good
Index:5 value:developer


Search in array list
Name found
Delete some data

Index with value
Index:0 value:Shudipto
Index:1 value:Trafder
Index:2 value:Is
Index:3 value:good

Process finished with exit code 0
Thank you for reading this post.
Happy coding

Read More

Tuesday, August 15, 2017

Kotlin: File reader and writer

August 15, 2017

Welcome to kotlin Series

Kotlin


In this post, we are going to learn about kotlin IO (input or output)

we basically learn about file reader and writer.
In this post, we are going to write a program that takes text from the console and save it on computer hard disk as a text file.
Let start-

First, we are going to create a method for saving file, method name writeToFile
Follow those step:
1. take a String parameter
 2. Create an instance of FileWriter
3. in try-catch block write this string by using write method.
See the code-
fun writeToFile(str: String) {

    val writer = FileWriter("text.txt", true)

    try {
        writer.write(str+"\n")

    } catch (ex: Exception) {
        println(ex.message)

    } finally {
        writer.close()
    }
}
Now time to create the Main method-
in the main method-
1. first we show a message to user to write some text
2. take those text and save in on a variable
3. after the call the writeToFile method and parameter is this variable.
see the code-
fun main(args: Array<String>) {
    println("Write a message")
    val str: String = readLine().toString()

    writeToFile(str)

}


Now time to read this text file and print the text in the console-
Follow those step-
1.create a method name readFile()
2. in try-catch block create an instance of FileReader class
3. print text to the console by using readText() method
see the code-
fun readFile(){

    try {
        val read = FileReader("text.txt")

        println(read.readText())


    } catch (e:Exception){
        println(e.message)
    }

}
In the main method, call this method-
fun main(args: Array<String>) {
    println("Write a message")
    val str: String = readLine().toString()

    writeToFile(str)

    readFile()

}

Now run this program-
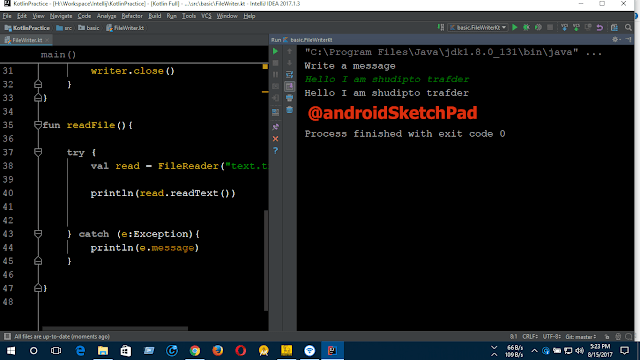
after running the programming this will show you like below picture
input some text I input: Hello I am shudipto trafder

kotlin-io-code

Note: Green colored text is your input text and white color text is output text( that read from the file)
this is the text file that saved

kotlin-io-output

Thanks for reading this post.
Happy coding.

Read More

Saturday, August 12, 2017

Android studio: share code on Github and add SSH key to you Git

August 12, 2017

Welcome to this post. In this post, we are going to discuss how to share code on Git from Android Studio.

(I don't want to describe what is GitHub or why you need to use git. I just want to show you the process only)
Let's jump in.

Before share, you need to create a GitHub account click here for GitHub account.
After creating a GitHub account, you can now share your code into GitHub.

Open android studio. Now open an exciting project that you want to share.
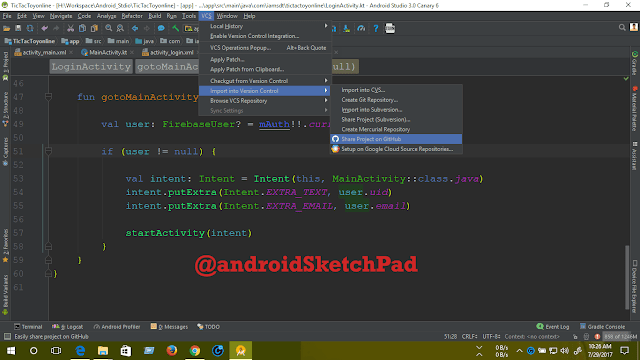
Click on VCS on the main toolbar.
then import into version
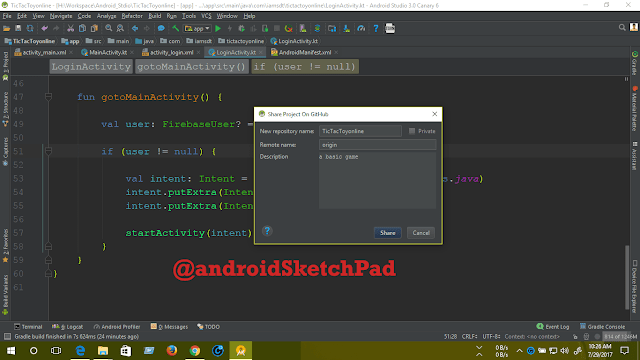
after Share project on GitHub
Like below picture

Share Project into GitHub

You will get an error. To fix this error you need to add an SSH key.

Open git-bash
gitbash1


To add this you need to check first if you have any key open git-bash.
Now enter the command
ls -al ~/.ssh

if the key already exists you can jump on the copy to clip bord option.
If the key does not exist then you need to create a new key.
Follow this command-
ssh-keygen -t rsa -b 4096 -C "your@email.com"
in your@email.com you need to write your email that you used in GitHub account.

gitbash2

it will show-
Generating public/private rsa key pair.
When you're prompted to "Enter a file in which to save the key," press Enter if you want to save those file in the default location.
Enter a file in which to save the key (/c/Users/you/.ssh/id_rsa):[Press enter]
now enter your password.
Note for the beginner: If you enter your password it will not showing anything (even no start).
Enter passphrase (empty for no passphrase): [Type a passphrase]
Enter same passphrase again: [Type passphrase again]
your password must be same. your SSH key is created.
Now you need to add your SSH key to the ssh-agent before adding, you need to ensure the ssh-agent is running: to run ssh-agent-
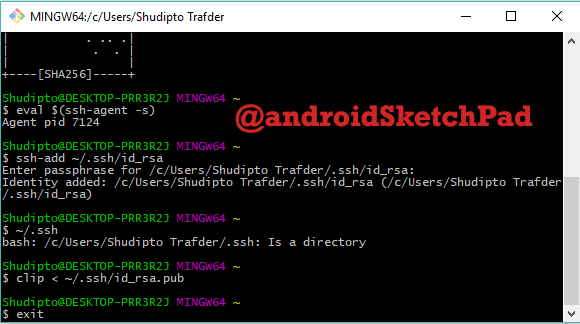
eval $(ssh-agent -s)
Now add your ssh private key to ssh-agent
ssh-add ~/.ssh/id_rsa
Now run this command this command will copy the key into you clip bord.
clip < ~/.ssh/id_rsa.pub

show the picture
gitbash3

Time to add this key into you Github account.
Login your GitHub and go to Settings.
Select SSH and GPG key Now click New SSH key.

GitHub account


write the title as you want and the key will be your copied key.
press ctrl+c button to paste the copied key.
and save this by pressing add SSH key.

That's it. It will be working fine

Now click on
VCS on the main toolbar.
then import into version
after Share project on GitHub

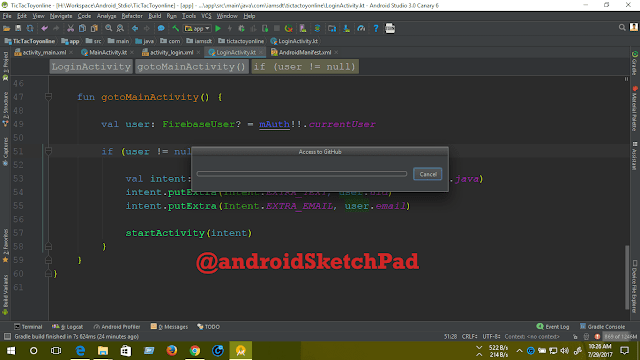
it will show like below picture

share1

if you are not logged in then it will prompt to login. Log in through your Github user name, and pass.

After login, it will show like this-
share2


Now write a short description about your project

share 4

it will promote like this 
share4

write commit message

And click ok.

Note: after you find a popup window of Git and login in with your GitHub account details.

It will share your project in Github.
Login to your Github account you will find your project.

Thanks for reading.
Hope you will post will help you and you are now able to share project on GitHub

Happy coding.

Read More

Saturday, July 15, 2017

Kotlin OOP: method overriding

July 15, 2017

Welcome to kotlin Series


Kotlin OOP series:
  1. OOP Basic
  2. Constructor
  3. Inheritance
  4. Method Overriding
This is the fourth post in this Kotlin OOP series. In this series, we are going to cover a very important topic that is method overriding. This uses in the android app development is huge. First, we create two classes and we use one class method for other class. But we already know it how we can do that. we can do this? In the third part of this series. But in this tutorial, we are going to do some advance. We modify first class method in the second class.

Let's start.
Create a class name Math3 and also create 2 two class. Like previous Math class.

See the code-
class Math3 {

    fun add(a:Int, b:Int):Int{
        return a+b
    }

    fun sub(a:Int, b:Int):Int{
        return a-b
    }
}
Now create a second class name Math4 and it also has two methods.(like previous second math class). But take an extra variable and we use this variable in the override methods.
See the code-
class Math4(val extra:Int) {

    fun mul(a:Int, b:Int):Int{
        return a*b
    }

    fun div(a:Int, b:Int):Int{return a/b}
}
two class creation complete. Now we do our main job. Before inheriting one class to another make class as open and methods also.

See the code-
open class Math3 {

    open fun add(a:Int, b:Int):Int{
        return a+b
    }

    open fun sub(a:Int, b:Int):Int{
        return a-b
    }
}
Now inherit the first class, to second class.
class Math4(val extra:Int) : Math3(){
     //some code
}
we override two methods from first math class (Math3.kt). in add and sub-method we just add our extra value.

See the code-
add method
override fun add(a:Int, b:Int):Int{
    return a+b+extra
}
submethod-
override fun sub(a:Int, b:Int):Int{
        return a-b+extra
}
That it we finish. Now we run this code in the Main method.

see full code of Math4.kt
class Math4(val extra:Int) : Math3(){

    override fun add(a:Int, b:Int):Int{
        return a+b+extra
    }

    override fun sub(a:Int, b:Int):Int{
        return a-b+extra
    }

    fun mul(a:Int, b:Int):Int{
        return a*b
    }

    fun div(a:Int, b:Int):Int{return a/b}
}
on the Main method, we first create an instance of the Math3 class and use Math3 methods.
fun main(args: Array<String>){

    val math = Math3()
    println("add: ${math.add(20,21)}")
    println("add: ${math.sub(22,21)}")
}
Output-
add: 41
Sub: 1
Now time for Math4. use 4 methods and pass value 10.
val math2 = Math4(10)
println("add: ${math2.add(20,21)}")
println("sub: ${math2.sub(22,21)}")

println("mul: ${math2.mul(20,21)}")
println("div: ${math2.div(22,21)}")
Output-
add: 51
sub: 11
mul: 420
div: 1
Now compare two those output. you see 10 different in the result of add and sub.
Main Method-
fun main(args: Array<String>){

    val math = Math3()
    println("add: ${math.add(20,21)}")
    println("Sub: ${math.sub(22,21)}")

    val math2 = Math4(10)
    println("add: ${math2.add(20,21)}")
    println("sub: ${math2.sub(22,21)}")

    println("mul: ${math2.mul(20,21)}")
    println("div: ${math2.div(22,21)}")

}
Output-
add: 41
Sub: 1
add: 51
sub: 11
mul: 420
div: 1
That's it.
Now we learn how we can modify one class methods in other class.

Thank you for reading this post

Happy coding.

Read More