Tuesday, August 15, 2017

Kotlin: File reader and writer

August 15, 2017

Welcome to kotlin Series

Kotlin


In this post, we are going to learn about kotlin IO (input or output)

we basically learn about file reader and writer.
In this post, we are going to write a program that takes text from the console and save it on computer hard disk as a text file.
Let start-

First, we are going to create a method for saving file, method name writeToFile
Follow those step:
1. take a String parameter
 2. Create an instance of FileWriter
3. in try-catch block write this string by using write method.
See the code-
fun writeToFile(str: String) {

    val writer = FileWriter("text.txt", true)

    try {
        writer.write(str+"\n")

    } catch (ex: Exception) {
        println(ex.message)

    } finally {
        writer.close()
    }
}
Now time to create the Main method-
in the main method-
1. first we show a message to user to write some text
2. take those text and save in on a variable
3. after the call the writeToFile method and parameter is this variable.
see the code-
fun main(args: Array<String>) {
    println("Write a message")
    val str: String = readLine().toString()

    writeToFile(str)

}


Now time to read this text file and print the text in the console-
Follow those step-
1.create a method name readFile()
2. in try-catch block create an instance of FileReader class
3. print text to the console by using readText() method
see the code-
fun readFile(){

    try {
        val read = FileReader("text.txt")

        println(read.readText())


    } catch (e:Exception){
        println(e.message)
    }

}
In the main method, call this method-
fun main(args: Array<String>) {
    println("Write a message")
    val str: String = readLine().toString()

    writeToFile(str)

    readFile()

}

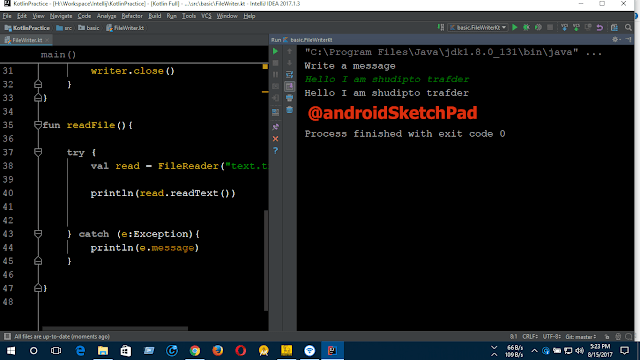
Now run this program-
after running the programming this will show you like below picture
input some text I input: Hello I am shudipto trafder

kotlin-io-code

Note: Green colored text is your input text and white color text is output text( that read from the file)
this is the text file that saved

kotlin-io-output

Thanks for reading this post.
Happy coding.

Read More

Saturday, July 15, 2017

Kotlin OOP: method overriding

July 15, 2017

Welcome to kotlin Series


Kotlin OOP series:
  1. OOP Basic
  2. Constructor
  3. Inheritance
  4. Method Overriding
This is the fourth post in this Kotlin OOP series. In this series, we are going to cover a very important topic that is method overriding. This uses in the android app development is huge. First, we create two classes and we use one class method for other class. But we already know it how we can do that. we can do this? In the third part of this series. But in this tutorial, we are going to do some advance. We modify first class method in the second class.

Let's start.
Create a class name Math3 and also create 2 two class. Like previous Math class.

See the code-
class Math3 {

    fun add(a:Int, b:Int):Int{
        return a+b
    }

    fun sub(a:Int, b:Int):Int{
        return a-b
    }
}
Now create a second class name Math4 and it also has two methods.(like previous second math class). But take an extra variable and we use this variable in the override methods.
See the code-
class Math4(val extra:Int) {

    fun mul(a:Int, b:Int):Int{
        return a*b
    }

    fun div(a:Int, b:Int):Int{return a/b}
}
two class creation complete. Now we do our main job. Before inheriting one class to another make class as open and methods also.

See the code-
open class Math3 {

    open fun add(a:Int, b:Int):Int{
        return a+b
    }

    open fun sub(a:Int, b:Int):Int{
        return a-b
    }
}
Now inherit the first class, to second class.
class Math4(val extra:Int) : Math3(){
     //some code
}
we override two methods from first math class (Math3.kt). in add and sub-method we just add our extra value.

See the code-
add method
override fun add(a:Int, b:Int):Int{
    return a+b+extra
}
submethod-
override fun sub(a:Int, b:Int):Int{
        return a-b+extra
}
That it we finish. Now we run this code in the Main method.

see full code of Math4.kt
class Math4(val extra:Int) : Math3(){

    override fun add(a:Int, b:Int):Int{
        return a+b+extra
    }

    override fun sub(a:Int, b:Int):Int{
        return a-b+extra
    }

    fun mul(a:Int, b:Int):Int{
        return a*b
    }

    fun div(a:Int, b:Int):Int{return a/b}
}
on the Main method, we first create an instance of the Math3 class and use Math3 methods.
fun main(args: Array<String>){

    val math = Math3()
    println("add: ${math.add(20,21)}")
    println("add: ${math.sub(22,21)}")
}
Output-
add: 41
Sub: 1
Now time for Math4. use 4 methods and pass value 10.
val math2 = Math4(10)
println("add: ${math2.add(20,21)}")
println("sub: ${math2.sub(22,21)}")

println("mul: ${math2.mul(20,21)}")
println("div: ${math2.div(22,21)}")
Output-
add: 51
sub: 11
mul: 420
div: 1
Now compare two those output. you see 10 different in the result of add and sub.
Main Method-
fun main(args: Array<String>){

    val math = Math3()
    println("add: ${math.add(20,21)}")
    println("Sub: ${math.sub(22,21)}")

    val math2 = Math4(10)
    println("add: ${math2.add(20,21)}")
    println("sub: ${math2.sub(22,21)}")

    println("mul: ${math2.mul(20,21)}")
    println("div: ${math2.div(22,21)}")

}
Output-
add: 41
Sub: 1
add: 51
sub: 11
mul: 420
div: 1
That's it.
Now we learn how we can modify one class methods in other class.

Thank you for reading this post

Happy coding.

Read More

Friday, July 14, 2017

Kotlin OOP: Inheritance

July 14, 2017

Welcome to kotlin Series

Kotlin OOP series:
  1. OOP Basic
  2. Constructor
  3. Inheritance
  4. Method Overriding

This is the third post about Kotlin OOP. In this post, we are going to cover Kotlin Inheritance.
Let's start-
First, create a class named Math. This class contains two function name add and sub.

add method -> take two integers and return the addition result of that two integers.
sub method -> also take two integers and return the subtracted result of two integers.

Full math class code-
class Math {

  fun add(a:Int, b:Int):Int{
  return a+b
  }

  fun sub(a:Int, b:Int):Int{
  return a-b
  }
}
Now we create a new class and the class name is Math2. see the code-
class Math2 {

  fun mul(a:Int, b:Int):Int{
  return a*b
  }

  fun div(a:Int, b:Int):Int{return a/b}
}
Now we inherited Math class to Math2. But you get some error. Because by default all the class is final. So you can not modify the class. So that we need to modify the Math class and open keyword before class Math
open class Math {
//some code
}
Now the error will be solved. See the code-
class Math2 : Math(){

  fun mul(a:Int, b:Int):Int{
  return a*b
  }

  fun div(a:Int, b:Int):Int{return a/b}
}
Now in the main method- create a math instance and print use those the two method-
val math = Math()
println("add: ${math.add(20,21)}")
println("add: ${math.sub(22,21)}")
output-
add: 41
add: 1
so we see that we can an easily use add and sub-methods. Now we create the Math2 instance. Through this instance, we can use 4 methods. two class method and Math class method.
Let see-
val math2 = Math2()
println("add: ${math2.add(20,21)}")
println("sub: ${math2.sub(22,21)}")

println("mul: ${math2.mul(20,21)}")
println("div: ${math2.div(22,21)}")
see we use both Math and Math2 class methods.
Output-
add: 41
sub: 1
mul: 420
div: 1
Full main method-
fun main(args: Array<String>){

  val math = Math()
  println("add: ${math.add(20,21)}")
  println("add: ${math.sub(22,21)}")

  val math2 = Math2()
  println("add: ${math2.add(20,21)}")
  println("sub: ${math2.sub(22,21)}")

  println("mul: ${math2.mul(20,21)}")
  println("div: ${math2.div(22,21)}")

}
Output:
add: 41
add: 1
add: 41
sub: 1
mul: 420
div: 1

That's all. In this post, we learn about Kotlin inheritance. In Android app development we use this concept a lot.

Thanks for reading this post.

Happy coding.
Read More

Kotlin OOP : Constructor

July 14, 2017

Welcome to kotlin Series


Kotlin OOP series:
  1. OOP Basic
  2. Constructor
  3. Inheritance
  4. Method Overriding

This is the second post about Kotlin OOP Concept. In the previous post,  Kotlin OOP: Basic
we talk about a basic opp concept.
In this post, we are going to litter deeper.
Let's start-
From the previous post, we create an Apple class like previous.
let do this-
private class Apple(color:String,shape:String){

  var color:String? = null
  var shape:String? = null

  init {
  //println("Color: $color")
  //println("Shape: $shape")

  this.color = color
  this.shape = shape
  }

  fun GetColor():String?{
  return this.color
  }

  fun GetShape():String?{
  return this.shape
  }

}
In this class, we are working with the primary constructor. But If we have another option to working with the second constructor. Just like Java. How can I do this? Let's start- Let's make the primary constructor empty
private class Apple3(){
}
and declarer secondary constructor like below-
constructor(color:String,shape:String): this() {
}
Now declare class two class variable and assign it in the constructor.
var color:String? = null
var shape:String? = null
assign it-
//second constrictor
constructor(color:String,shape:String): this() {
  this.color = color
  this.shape = shape
}
Greater and setter method already there Check full class code-
private class Apple(){

  var color:String? = null
  var shape:String? = null

  //second constrictor
  constructor(color:String,shape:String): this() {
  this.color = color
  this.shape = shape
  }

  fun GetColor():String?{
  return this.color
  }

  fun GetShape():String?{
  return this.shape
  }

}
test this on the Main method-
fun main(args: Array<String>){
  val apple =Apple3("red","oval")

  println("Color: ${apple.GetColor()} Shape: ${apple.GetShape()}")
}
output-
Color: red Shape: oval
This is very similar to Java code. But if you are using this secondary constructor. you can not create a variable like the primary constructor.

This is a very smaller post. In this post we cover constructor. Some you need the secondary constructor and some time you need the primary constructor. If you come from Java then you should go through the secondary constructor. Then it looks link java. So you feel easy to learn Kotlin. Keep learning.

Thank you for reading this post.
Happy coding.

Read More

Kotlin OOP: Basic

July 14, 2017

Welcome to kotlin Series

Kotlin OOP series:
  1. OOP Basic
  2. Constructor
  3. Inheritance
  4. Method Overriding

In this post, we are going to cover object-oriented programming concept with kotlin. In kotlin, all the item is an object. So we are going to create an object name apple. and it has two properties color and shape. Let's create an Apple object class-
private class Apple(color:String,shape:String){
}
now we are going to create two class variable and this variable can nullable. Those are color and shape
var color:String? = null
var shape:String? = null
Now initialize this value in init{}
init {
   this.color = color
   this.shape = shape
}
Not: it just like Java constructor. In java you assign your class variable in the constructor it works just like that. Now we are going to create two methods that return shape and color. Those methods are like Java getter method
fun GetColor():String?{
    return this.color
}

fun GetShape():String?{
    return this.shape
}
oh! we finished the apple class. you check my full apple class code.
private class Apple(color:String,shape:String){

    var color:String? = null
    var shape:String? = null

    init {
        this.color = color
        this.shape = shape
    }

    fun GetColor():String?{
        return this.color
    }

    fun GetShape():String?{
        return this.shape
    }

}
Now time to test this apple class.
Create a main Method-
fun main(args: Array<String>){
}
create a variable name apple and assign to apple class.
val apple =Apple("red","oval")
print apple color and shape-
println("Color: ${apple.GetColor()} Shape: ${apple.GetShape()}")
complete Main method-
fun main(args: Array<String>){
    val apple =Apple("red","oval")

    println("Color: ${apple.GetColor()} Shape: ${apple.GetShape()}")
}
Output:
Color: red Shape: oval
This code like too similar to Java. I try to make it similar to java. But we are learning new language Kotlin. we can make this class is very small through Kotlin concept. we make a new class Apple2. It also has same properties like color and shape.
Let's do that.
code-
class Apple2(var color: String, var shape: String)
our Apple class is complete in just one line. We don't need any greater or setter methods. No extra constructor need.
Let's test this apple class and check the output is same.
fun main(args: Array<String>){
    val apple =Apple2("red","oval")
    println("Color: ${apple.color} Shape: ${apple.shape}")
}
Output
Color: red Shape: oval
So we see that output is same. We don't need to write more code. Another big advantage is that you can define default value when you create the class variable.
See this-
private class Apple2(var color: String = "red",
                     var shape: String = "oval")
on the main method
val deafult = Apple2()
println("Color: ${deafult.color} Shape: ${deafult.shape}")
See we don't pass any value. Those values come from the default value when you assign it.
Output-
Color: red Shape: oval
we can also assign value through variable wise.
see the code-
val appleGreen = Apple2(color = "red",shape = "round")
This is very helpful when you have many variables in your constructor. So you don't check again and again is the value is assigned the correct one.
Check the main method-
val appleGreen = Apple2(color = "red",shape = "round")
println("Color: ${appleGreen.color} Shape: ${appleGreen.shape}")
Output
Color: red Shape: round
Full main Method code-
fun main(args: Array<String>){
    val apple =Apple2("red","oval")
    println("Color: ${apple.color} Shape: ${apple.shape}")

    val deafult = Apple2()
    println("Color: ${deafult.color} Shape: ${deafult.shape}")

    val appleGreen = Apple2(color = "red",shape = "round")
    println("Color: ${appleGreen.color} Shape: ${appleGreen.shape}")

}
and output is
Color: red Shape: oval
Color: red Shape: round
That's it today. Thank you for reading this post.

Happy coding

Read More

Tuesday, June 20, 2017

Kotlin: Array and Loop

June 20, 2017

Welcome to kotlin Series

kotlin
Kotlin Series

In this post, we are going to learn about Array. The array is really helpful for saving the collection of data. Let's start- we declare a variable and name arrays and assign with Array.
val arrays = Array(5) { 0 }
Now currently our arrays variable has only one index and index position is 0 now add some other index and also print an index for checking.
val arrays = Array(5) { 0 }

arrays[1] = 1
arrays[2] = 2
println(arrays[2])
Note: here Array(5) it indicates that it's size is 5. See an another example-
val arrayStr = Array(5) { "Shudipto" }
arrays[1] = 2
println(arrayStr[0])
Code analysis-
if we don't define this array with a data type then we can insert any type of data type in it. Now add an another variable and initialize it by calling listOf()
val arraysNew = listOf(1, "shudipto", 2.5, 0.234, "Trafder", false)
Code analysis- you might notice that in this array we insert
1. integer
2. string
3. double
4. float
5. boolean
many data types. It's work fine. we don't put the same type of data in the array. That's are array declaring.

Now we use some practices with the loop that's print all the value in an array. first, we using while loop we create a variable that value is zero first and after working with loop this value will increase.
While Loop
var size = 0

//using while loop
while (size < arraysNew.size) {
    println("Position $size value ${arraysNew[size]}")
    size++

}
For Loop:
// using for loop
for (i in arraysNew) {
    println("value: $i")
}
Note: here i is predefined in kotlin it looks like Val i If we want to print value with position then we need two variable in for loop. In the previous we have one variable now we need two variables. How can we do that? see the code-
for ((position, i) in arraysNew.withIndex()) {
     println("position: $position value: $i")
}
Now we do some advance practice: 1. we create a variable and fill this variable this user input after that we show all the data that in the array we for loop(essay to use). we also know how to use for loop.(we just learn it)
for ((position) in arrayFill.withIndex()) {
    print("Insert a value:")
    val input = readLine()!!.toInt()
    arrayFill[position] = input
}
Code Analysis: we need the only position so we declare only one variable. (In the previous code we work with two variables and because we also learn the value along with the position). we also need an array with the index. if don't understand below the line, ignore this list for now. This is null safety. I will talk about null safety in another post.
val input = readLine()!!.toInt()
Now time to print what we are inserted in the array. Try yourself. You already learn how to print all the data of any array. Code-
for ((position, i) in arrayFill.withIndex()) {
    println("position: $position value: $i")
}
Today Full Code-
/**
 * Created by Shudipto Trafder on 6/20/2017.
 */

fun main(args: Array<String>) {

    val arrays = Array(5) { 0 }

    arrays[1] = 1
    arrays[2] = 2
    println(arrays[2])

    val arrayStr = Array(5) { "Shudipto" }
    arrays[1] = 2
    println(arrayStr[0])

    val arraysNew = listOf(1, "shudipto", 2.5, 0.234, "Trafder", false)

    var size = 0

    //using while loop
    while (size < arraysNew.size) {
        println("Position $size value ${arraysNew[size]}")
        size++

    }

    // using for loop
    for (i in arraysNew) {
        println("value: $i")
    }

    for ((position, i) in arraysNew.withIndex()) {
        println("position: $position value: $i")
    }

    println("Please help us to fill some data")
    val arrayFill = Array(5) { 0 }
    for ((position) in arrayFill.withIndex()) {
        print("Insert a value:")
        val input = readLine()!!.toInt()
        arrayFill[position] = input
    }

    println("Your inserted data")
    for ((position, i) in arrayFill.withIndex()) {
        println("position: $position value: $i")
    }
}

Thank you very much for reading this post.
Happy coding

Read More

Thursday, June 15, 2017

Bookstore: Kotlin a simple program

June 15, 2017

Bookstore a Kotlin example code
LEVEL: BEGINNER

kotlin


This example is good for understanding
  1. Array
  2. methods
  3. conditions(if and else)
  4. variable declaration
The program features are-
  1. First, we welcome to our customer to our bookstore
  2. Then we ask the user to which book do you want?
  3. If we found that book we show a price about the book.
  4. Then we say to our customer that we have a discount for student and teacher only.
  5. we ask the customer about his profession.
  6. If our customer's profession is student and teachers then we give different discount
  7. After that, we show the discount prices and give a thank message
That's our today's main target.

I also a publish a post about the same program in Java you can also see that post.(Click here)

First, we declare an array
//books name
val booksName = arrayOf("java","c","c++","kotlin","c#","html")
Now add a scanner that's scan user input
val scanner = Scanner(System.`in`)
Now add two variable for two type of discount
val studentDiscount = .25f
val teacherDiscount = .15f
Now time to welcome to our customer and get customer input
println("*************WELCOME TO OUR BOOK STORE**********")
println("Which book do you want?")
print("Answer: ")
val book = scanner.nextLine()
Now create a method that calculates price after discount-
private fun calculatePrice(x: Float): Unit {
    var price = 200f
    price -= price * x

    println("Your total payable price is $price TK.")
}
Time to write some conditions against user input-
if (booksName.contains(book.toLowerCase())){
        println("You Want $book book. price 200 Tk.")
        println("we have some discount for student and teacher.\nWhat is your occupation?")
        print("Answer: ")
        val occupation = scanner.nextLine()

        when(occupation.toLowerCase()){
            "student" -> {
                calculatePrice(studentDiscount)
            }

            "teacher" ->{
                calculatePrice(teacherDiscount)
            }

            else -> println("Sorry you don't get any discount."+
                    "\nYour total payable price is 200 TK.")
        }

    } else{
        println("Sorry we don't have $book book")
    }
Code analysis-
1.If we have customer desire book that we show a price 200 and If we don't then we print Sorry we don't have that book.
2.If we found the book then we ask again user about his/her occupation
3.If he/she is a student or teacher then we give some discount
4.If the student then we call to calculate the price and pass the student discount value or If the teacher, then we call to calculate the price and pass the teacher discount value.

Full code-
package firstKotlin

import java.util.*

fun main(arg: Array<String>){

    //books name
    val booksName = arrayOf("java","c","c++","kotlin","c#","html")

    val scanner = Scanner(System.`in`)

    val studentDiscount = .25f
    val teacherDiscount = .15f

    println("*************WELCOME TO OUR BOOK STORE**********")
    println("Which book do you want?")
    print("Answer: ")
    val book = scanner.nextLine()

    if (booksName.contains(book.toLowerCase())){
        println("You Want $book book. price 200 Tk.")
        println("we have some discount for student and teacher.\nWhat is your occupation?")
        print("Answer: ")
        val occupation = scanner.nextLine()

        when(occupation.toLowerCase()){
            "student" -> {
                calculatePrice(studentDiscount)
            }

            "teacher" ->{
                calculatePrice(teacherDiscount)
            }

            else -> println("Sorry you don't get any discount."+
                    "\nYour total payable price is 200 TK.")
        }

    } else{
        println("Sorry we don't have $book book")
    }
}

private fun calculatePrice(x: Float): Unit {
    var price = 200f
    price -= price * x

    println("Your total payable price is $price TK.")
}
Thanks for reading.
Happy coding

Read More

Monday, May 29, 2017

Kotlin: working with String

May 29, 2017

Welcome to kotlin Series


In this tutorial, we are working with String of Kotlin.
In this post, we are going to learn about-
#variable type
#variable declaring
#String
#Join String
#Compare two String
#Find index from any String.

Ok Let's start by Creating the main method
fun main(arg : Array<String>){
  println("Hello world kotlin")
}

In Kotlin we have two types of variable-
1.mutable
2.immutable

1.mutable variable can change after declaring
2.immutable can not change Declare a string

the mutable variable can declare as using prefix val and
the immutable variable can declare as using prefix var

Let's add two type of variable-
val name = "shudipto"
var id = 1215

Defina a string-
val name = "Shudipto"
you can also declare a multiline string by using triple double quotation (""")
val des ="""I am shudipto trafder lives in Khulna.
  I study on the Khulna University """
Now print a string-
println("Name: "+name)
we can print a string in another way. we use dollar sign $ and directly type the variable name that's we want to print in the double quotation -
println("Name: $name")
Note: you probably confuse with semi-clone but Kotlin does not care about semi-clone.

Now join two String-
we take two string in two variable and join those variables into a new variable and print this newly created variable.
val FName = "Shudipto"
val LName = "Trafder"
    
var fullName = FName + LName
    
println("Full name: "+fullName)
we can use the alternative methods directly joint variable int the print statement-
 val FName = "Shudipto"
 val LName = "Trafder"

 println("Full name: ${FName+" "+LName}")
Compare two String- we declare two string and compare with equals function or using '=='
    //compare two string
    val string1 = "user"
    val string2 = "User"

    println("Strings are same: ${string1.equals(string2)}")
    println("Strings are same: ${string1 == string2}")
If you are working with ignore case then use-
println("Strings are same: ${string1.equals(string2,true)}")
Contains a word in particular String- we add a String like "I love you". we are checking that this String contains love word. Let jump on code-
var s = "I love you"

//check a word that exists in a string
println("Word is exist: ${s.contains("love")}")
the result will be shown in a boolean value.

Today's Last Topics. Find an Index of any String.
First, we declare a String "I love you". We are going to find what char is in the position
var s = "I love you"

//get a character with specific index
println("2nd index: ${s[2]}")
If we want to find a specific range of the index. For example, we want to find the index position 2 to 5. On code
var s = "I love you"
    

//a specific index from 2 to 5
println("2nd index to 5 Index: ${s.subSequence(2,6)}")

Read More